Showing posts with label cake. Show all posts

Friday, March 29, 2013

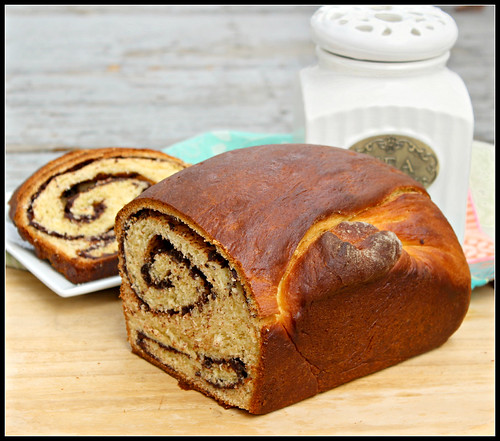
Chocolate Cinnamon Babka

11 comments:
Chocolate Babka

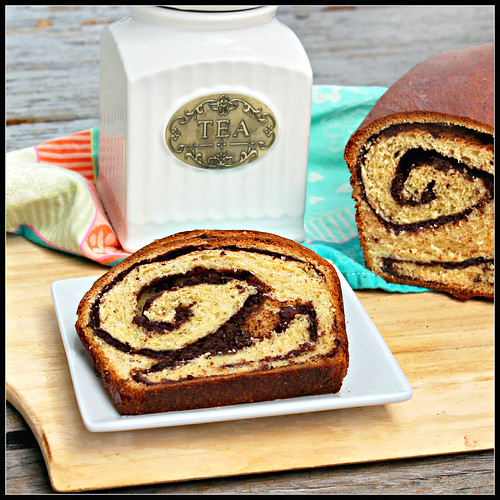
After years of intending, I've baked my second babka in two weeks!  This is the kind I always meant to make, the kind filled with chocolate.  And like so many things I delay, I wonder why I've waited so long.  It wasn't difficult at all.  The babka is rich and soft, and the chocolate has a nice bittersweet flavor that isn't overly sweet.  The exterior is flaky and breaks off in dozens of shard-like crumbs as you cut it.

Chocolate Cinnamon Babka Loaf

The most daunting part might be planning the timing, but you can break it up into stages, even two days, by refrigerating the dough.  I made the babka in one straight shot.  And most of the time is inactive -- I made the dough, went out to an appointment, came back and shaped it, worked out at the gym, and came home and put it in the oven.  Babka is a traditional Easter dessert, so you might want to try it this weekend.  Just don't wait as long as I did!


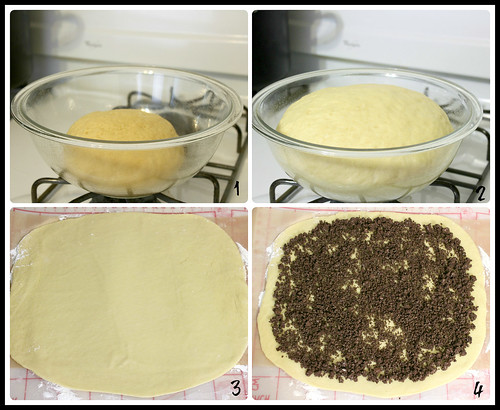
Babka collage 1

  1. The dough before its first rise.
  2. The risen dough.
  3. The dough rolls out easily, with no sticking or snapping back. A sheet of parchment underneath dusted with flour is helpful.
  4. Scatter the chocolate-cinnamon-butter mixture on top, and get ready to roll!

Babka collage 2

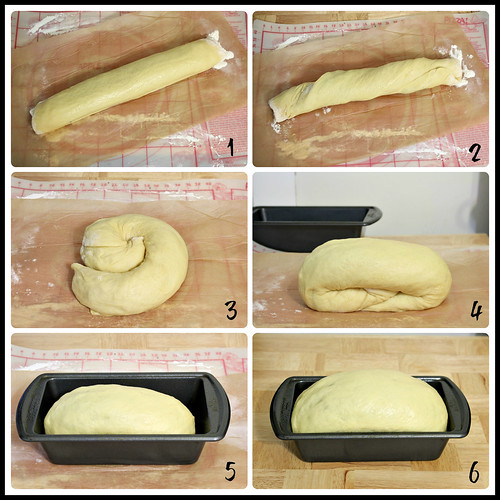
  1. Roll up the dough, then use your hands to elongate it.
  2. Give the log a bit of a twist.
  3. Coil the log into a snail shape.
  4. Stand the coil up on its end, then press down to compact into a loaf shape.
  5. Move the dough to a loaf pan, then wrap it up for its second rise.
  6. The dough after its second rise. Ready to bake!

Saturday, January 5, 2013

Cranberry Maple Pecan Cake

9 comments:
Cranberry Maple Pecan Breakfast Cake

As the holidays approached, the list of things I wanted to bake was building. I wanted to try all kinds of cookies, make another kugelhopf, and this cranberry cake. Then December was insanely busy and I kept to my tried and true recipes for parties and potlucks. But I was going to have my cranberry cake, holidays or not!  Who says cranberries are relegated to November and December only?  This cake has whole cranberries, pecans, and maple syrup, and Joanne Chang writes in Flour that it tastes like pancakes. I don't agree, but it's still a really good cake.

I like the use of whole, juicy cranberries instead of the dried cranberries you often see in recipes, and that they're not too tart here. The loaf is moist, and the maple pecans give a nice sweet crunch. The maple glaze is good. I did run into two problems:

  • Most of the berries and nuts sink to the bottom.  On my second try I tossed them with flour, usually a sure remedy, but a lot still sank to the bottom as the cake baked.  This affects only the aesthetics, not the taste.
  • I checked on the cake early and found it slightly overdone.  I think it's because my bread pan is made of a dark metal. The second time I took the cake out of the oven a few minutes early and it was perfect, and I'll note that in the recipe after the jump.

Even with these minor issues, though, I really enjoyed having a slice of this at breakfast or teatime.  You don't need to wait for the holidays to roll around again to make this.

Sunday, September 2, 2012

Chocolate-Raspberry Roulade

8 comments:
Chocolate Raspberry Roulade

This raspberry roulade is a thin sheet cake spread with raspberry jam and whipped chocolate ganache, sprinkled with fresh raspberries, then rolled up and drizzled with chocolate.  It's the chocolate lover's alternative to yesterday's Blueberry Roulade, and the ganache is crazy good.

Chocolate-Raspberry Roulade 2

You'll want to plan this cake in advance, since the whipped chocolate ganache needs to be chilled for hours. It can also be made a few days in advance.  I've been leafing through Alice Medrich's Bittersweet, and I like her explanations for why chocolate behaves in a certain way, or her adaptations when using a chocolate with a higher or lower cacao percentage.  One thing Medrich points out for this recipe is not to worry if the melted chocolate and cream look too soft to spread, because it won't stiffen until it's whipped -- and it will stiffen more after it's chilled.

Raspberries
I'm going to miss farmers market berries when the cold hits!
Out of these three roulade combinations I've posted, my favorite has been raspberries and cream.  Because I like raspberries more, and the plainer whipped cream really lets the subtle summery flavor shine through.  But this whipped chocolate ganache is so good I'm bookmarking it for other recipes, like piping on top of cupcakes or using as a filling between cake layers.  Use a quality chocolate to really appreciate the flavor.  I used Callebaut.

Saturday, September 1, 2012

Blueberry Roulade . . . or make it Raspberry!

8 comments:
Blueberry Roulade

This is so good, so easy, and so versatile I've made it three times in the past week now.  And Labor Day will be four.  No, I didn't polish them all off myself, but they were a hit at an intern's farewell party and then a beach picnic.  Nobody believes me that they're a cinch to pull off.  "It's just a sheet cake," I say, "filled with cream and jam and fruit and rolled up."  "Rolled up?" they ask.  "How do you roll up a cake?"

Bluberry Roulade 2

The cake itself is almost fat free -- no butter or oil in the recipe, just eggs.  There's the cream in the filling, but it still comes off feeling light.  And that was really welcome after the ultra-rich Pecan Bars I made last time.  This is just what a summer dessert ought to be, seasonal fruit in a cake that doesn't weigh you down.  And the cake is easy, going something like this: Beat eggs with sugar, then fold in flour with other dry ingredients, scrape into a pan, and bake.

Raspberries

This blueberries and cream variation was really good, but my favorite was the raspberries and cream version.  Dress the cake simply with a dusting of confectioners sugar, or pipe whipped cream on top.  Another possibility?  Come back tomorrow to see how to make this into a Chocolate Raspberry Roulade with whipped chocolate ganache.

Friday, June 15, 2012

Plum Skillet Cake

31 comments:
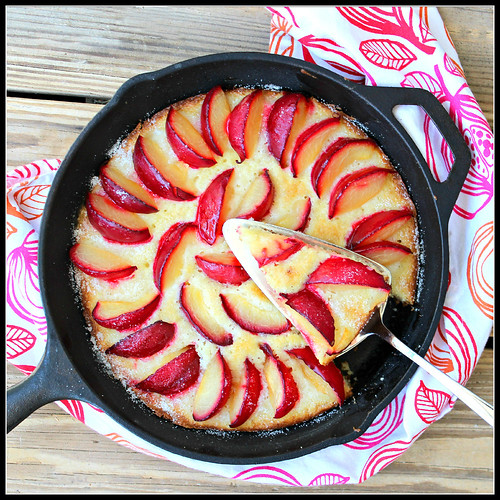
Plum Skillet Cake

Sometimes it's fun to conquer baking challenges -- braided bread, lattice-top pies, croissants -- but sometimes it's nice just to mix together a few ingredients and throw them in the oven. Here a cake batter is easily stirred up, poured into a skillet, and topped with fruit. No fuss, and a stunning and delicious dessert.

Plum Skillet Cake 2

The cake is simple but tasty, and the cast iron gives the edges a nice crust. The plums, which I can find bitter in their fresh form, mellow out as they bake to become lightly sweet and tart, even the peel. A dollop of whipped cream makes a slice even better.

Collage

Some important tips to share: Wait until the cake is halfway done baking before adding the plums.  The top row is the first cake I made, and you can see that the beautiful plums sank into the batter as the cake baked.  Also, the plums were only in the center of the cake, so the outer edges didn't have any of the delicious fruit.  In the bottom row, I added the plums after 15 minutes of baking, and you can see that they barely sank in.  I also increased the number of plums to four, so every slice of cake has plenty of fruit.

Update: This post made the Foodbuzz Top 9!  Thanks for all the buzz!


This post was shared with:
Whatcha Whipped Up Wednesdays
Sweets for a Saturday

Friday, September 9, 2011

Gluten Freedom: Kiss Me, (Chocolate) Cake!

3 comments:

I'd like to welcome WASB's newest contributor, Shannon, who will write Gluten FREEDOM! on Fridays.
Without further ado...

Hello, and Welcome to the first edition of Gluten FREEDOM!, a new feature on the fabulous "What About..." blog ^_^


Why gluten free? Well, to begin with, 1 out of every 133 people have a gluten allergy or Celiac disease (or so my box of Potato Buds tells me). An even more truly disturbing statistic is that 1 in every two gluten free product tastes like... well, lets just say they aren't very good. If you have ever eaten these so called 'baked goods' then you know what I'm talking about: chalky or gritty texture, dry, crumbly body, and often it tastes nothing like the yumminess we're craving.

Well, I aim to change that. I say: take command of our culinary destinies! Rise up, my afflicted brethren and say "NO!" Say "I'll Pass, Thank you Very Much!", to heathen dishes and lackluster confections! With my spatula held high, I vow to lead the way and share with you my secrets for gluten free baking and cooking so delicious that your friends will never suspect a thing!

To that end, let us begin with this decadent chocolate cake. Rich, fudgey and moist, it tastes exactly like a traditional cake made with flour. I made this for my Mom's birthday and even my Dad, who is normally very leery of gluten free foods, DEVOURED it! It's just that good, I promise. It's based off of a cake from a Hershey's cookbook that my mother used to make years ago, however since that book is lost the recipe has been adapted from memory.

First up, the ingredients:

3 cups of TIGHTLY PACKED dark brown sugar
2 sticks of softened sweet (unsalted) butter
1 tablespoon vanilla extract
4 eggs (lightly beaten)
2 3/4 cups of a good, finely milled gluten free flour mix
  • ( I prefer either "Gluten Free Pantry" or "Better Batter"'s blends, but you can always try something else or even make your own blend. Just make sure the flours you use are the finest texture you can possibly get -- this is crucial to the end texture of the cake.)
3/4 cup Dutch Processed Cocoa
1 tablespoon baking soda
1/2 teaspoon salt
1 1/3 cup sour cream (use the full fat kind - no one ever said this was gunna be dietetic guys)
1 cup boiling water

Okay now here's the part where I confess that I am an incredibly lazy baker. If there is a way for me to do less steps, I will take it. Fortunately, this turns out to be a blessing for gluten free baking, because if there is one thing you want to avoid it's over mixing. I think it has to do with the xanthan gum- that stuff can get reaaaaally gross.

Anyway, here's what you do. First, preheat your oven to 350 degrees. Take all the dry ingredients and put them in a bowl (sugar remember, counts as a wet ingredient in baking). If your cocoa looks like this:


Don't stress it. And sure, you COULD sift it, but why? It just adds another step! Go ahead, save time ad just dump it all an a bowl and whisk away until your mixture is mostly combined. The big clumps will break up and a few small ones are not the end of the world.


In a separate large bowl, cream together the butter and sugar as if you were making cookies. (After getting the butter in the bowl, use the papers from the butter to grease your cake pans - standard 9 inches work fine and deep walled ones are ideal. After buttering the pans, toss some cocoa in them and move the pans in a circular motion while tapping away at the sides and bottom of the pan to evenly distribute the cocoa. This will ensure a clean release after baking.) Add the vanilla and then add your already beaten eggs. To this mixture, add about half of the dry mixture (or a third if it seems easier for you). Mix until it's just coming together and then add some of the sour cream. Again, mix until just together and then add more of the dry. Keep alternating until all of the mix and sour cream are just combined into the batter. DO NOT OVER MIX!


Finally, CAREFULLY measure out one cup of boiling water. If you're mixing by hand, add the water slowly in two installments. If you're using a stand or hand mixer, just add it nice and easy on low. You want minimal air bubbles here. Gently pour the mixture into your prepared pans, using a spatula laid across the top if the pans to help eyeball even distribution and to make sure you don't overfill the pans.


Carefully put your pans in the oven and bake for around 45-55 minutes, but DO NOT OVER BAKE! If you know your oven tends to bake things more quickly, than start checking for doneness at 35 minutes. Use the standard toothpick or skewer method (insert into the center of cake and remove from oven when you see no uncooked batter left on the tester but ideally when the cake is still moist enough to leave crumbs on the probe of your choice.)


Ah... the smell alone will drive lesser mind wild! Cool on a wire rack for about ten minutes, then upend out of their pans to cool the rest of the way. They should slide right out, but if not take a skinny spatula and gently run it along the edge where cake meets pan.


If your cake has baked up too high and has formed a "lip", wait until it is completely cooled and remove the extra with a sharp, serrated knife. Eat this bit as your reward for a job well done :)

Now, you can frost this cake any way you want to with any kind of frosting - even one from a can if you must, but for the love of all things yummy why would you frost it with anything other than chocolate?? And frosting can be really easy to make! Here's a very simple butter frosting recipe:

Take two sticks of softened butter and beat until fluffy. Add one box of confectioners sugar. Add 1 teaspoon of vanilla. Add as much dutch processed cocoa as you want until you reach your desired level of chocolatey-ness. If you really want to add some serious chocolate taste, go ahead and melt yourself a square of bakers chocolate and add that to the frosting (be careful not to add it when it's still too hot!) You might want to double this recipe if you like a lot of frosting on your cake.

Decorate your cake or leave it plain. A simple Hershey's kiss on the top is a charming touch. Serve any way you like, or just eat it with your bare hands! Either way, I hope you and your loved ones will enjoy this recipe as the first of many that will give us "Celiacies" and gluten free eaters back our Yumm!


Saturday, January 1, 2011

Flour's Pineapple Upside-Down Cake

14 comments:
Pineapple Upside-Down Cake
I had previously made an easier Pineapple Upside-Down Cake, but this recipe from Flour proves that a little more trouble can really make it worth your while.  A homemade caramel takes some time but isn't hard to do, and fresh pineapple soaks up the caramel.  The cake is rich and moist but crisp at the edges.

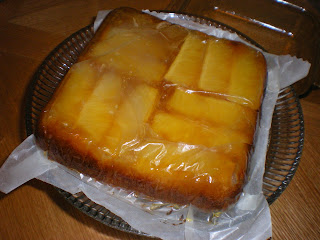
Cut Pineapple Upside-Down Cake
If I had one complaint, it's that the caramel was just a tad too sweet.  Just a tad.  But my preference for sweets isn't the same as everyone else's, and Joe said the cake and level of sweetness were perfect.

Pineapple Upside-Down Cake
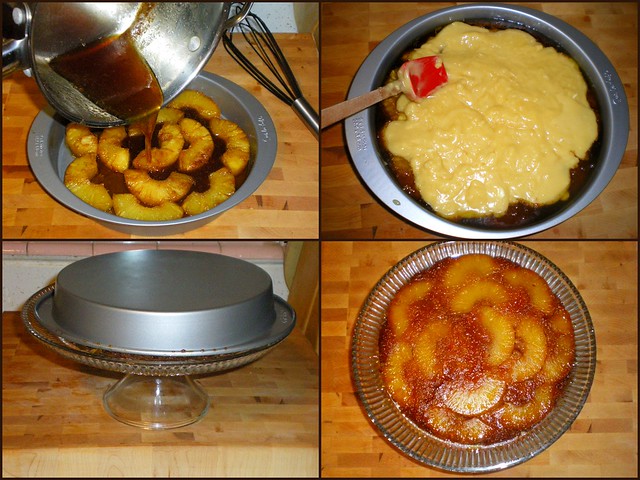
I get intimidated by caramels because of how easily those damned crystals form, but this one was simple enough.  The sugar-water mixture starts out clear, then develops a golden tinge.  At bottom-left, you can see the outer ring is still clear and the pot needs to be swirled before the whole mixture becomes golden brown.

Pineapple Upside-Down Cake1
I'm glad Joe helped make this, not least because it's really hard to snap photos while whisking burning-hot caramel!  Butter is whisked in, making the caramel steam and froth; pineapple is added and cooked in the caramel, then removed to a plate before being placed in the cake pan.

Pineapple Upside-Down Cake2
The caramel is poured over the pineapple, and then topped with the cake batter.  After the cake is baked and cooled, it gets up-ended onto a serving platter.  Each bite gives you a little burst of juice from the caramelized pineapple, and cake that's rich and moist.

Sunday, June 21, 2009

Happy Blog Birthday Pineapple Cake

2 comments:


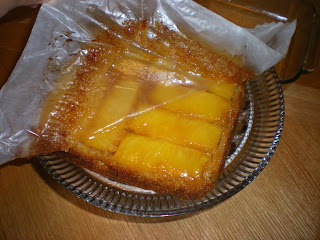
A year has passed since my first blog entry! So I'm commemorating it with a lighter Pineapple Upside-down Cake. I like the lightness of oil-based cakes as opposed to most butter-based cakes, but I tinkered with this recipe to make that caramelized sauce richer. Isn't that the whole point of Pinapple Upside-down Cake? The finished product was a light but moist cake topped with juicy pineapple that mellowed out in caramelized brown sugar and butter.


Adapted from Everyday Food's Light Pineapple Upside-Down Cake
1 cup packed light brown sugar
2 tbs butter, softened at room temperature
1 ripe firm pineapple (skin removed), cored and cut into 16 thin wedges
1 cup all-purpose flour
1/2 cup whole wheat flour
1 1/2 tsp baking powder
1/2 tsp baking soda
1/2 tsp salt
1/3 cup vegetable oil
3/4 cup low-fat buttermilk
2 large eggs
1 tsp pure vanilla extract

Preheat oven to 350 degrees. Line an 8x8 square baking dish with parchment and then lightly grease the parchment.

Beat the butter and half of the brown sugar in a mixing bowl, then spread it evenly on the parchment. Top the mixture with 4- to 5-inch spears of pineapple in alternating directions.


In a medium bowl, mix together the flours, baking powder, baking soda, and salt. In a large bowl, whisk together buttermilk, eggs, vanilla, oil, and the other half of the sugar. Add the flour mixture, and mix until just combined. Pour the batter over the pineapple and smooth the top.


Bake 50 to 60 minutes, until a toothpick inserted in the middle comes out clean. The top may get a little dark, but don't worry. Cool the cake 20 minutes in the pan, then invert it onto a plate and peel off the paper.


Thursday, March 19, 2009

Double Chocolate Mousse Cake

No comments:
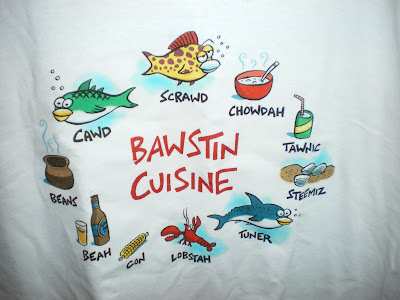
My buddy Nicole is moving back out West! So when we covertly planned her farewell at work, I decided to do a Red Velvet Cake with a Milk Chocolate Mousse and Dark Chocolate Mousse for my fellow chocolate lover. Unconventional, but she said it was "lethally good!" And check out this T-shirt we got her to remember us by.

I halved the recipe for Red Velvet Cupcakes and baked the batter as a single layer in an 8-inch springform pan at 350 degrees for 25 minutes (test for doneness by inserting a skewer or knife). Then I sawed it in half and put it aside for layering.


I used the mousses from a Francois Payard recipe on Epicurious:
3 1/2 cups (812 grams) heavy cream
5 ounces (142 grams) milk chocolate, finely chopped
5 ounces (142 grams) bittersweet chocolate, finely chopped

In the bowl of an electric mixer, using the whisk attachment, beat 2 1/2 cups (580 grams) of the heavy cream to soft peaks. Scrape half of the whipped cream into a medium bowl. Cover both bowls and refrigerate.

Put the milk and dark chocolate in two separate medium bowls. Bring the remaining 1 cup (232 grams) cream to a boil in a small saucepan. Pour 1/2 cup (116 grams) of the hot cream over the milk chocolate and the remaining 1/2 cup (116 grams) over the bittersweet chocolate. Gently whisk the milk chocolate until it is completely melted and the mixture is smooth. Whisk the dark chocolate until smooth.

Let the chocolate mixtures cool for 10 minutes. Fold the milk chocolate mixture into one bowl of whipped cream. Fold the dark chocolate into the remaining whipped cream.

For assembly, I put a cardboard round in the bottom of the springform pan, followed by the bottom half of the cake, cut side up. Spread the dark chocolate mousse in as even a layer as possible, then top it with the other half of the cake, cut side down. Spread the milk chocolate mousse on top of that. Cover tightly with plastic wrap to prevent refrigerator odors from sinking in, and chill for two to four hours.


When ready to serve, carefully remove the springform ring and take out the cake. Sift cocoa powder all over the top. Cut desired designs into a piece of parchment paper, then place paper on top of cake. Sift confectioners sugar over the paper so it falls only over the cutouts.

Saturday, February 28, 2009

DB Challenge: For the Love of Chocolate

12 comments:
The Daring Bakers' February challenge was appropriately Valentines Day-themed, with heart-shaped Flourless Chocolate Cake topped with ice cream on the menu. We were able to choose our own flavors, so I made my easy go-to Vanilla Ice Cream and topped it with Hazelnut Praline. The chocolate had to be top-notch because the cake contained only three ingredients, making the taste and texture almost pure chocolate. I chose Callebaut 60%, and made little cakes in ramekins and small springform pans. It was dense and delicious, but I ultimately preferred my rich yet light Chocolate Souffle. Still, this is a sweet dessert for your valentine, and I love that a recipe by a chef from Malaysia was chosen (where some of my family is from).


Vanilla Ice Cream, Philadelphia Style
From Bruce Weinstein's The Ultimate Ice cream Book
3 cups heavy cream
3/4 cup plus 2 tbs sugar
2 tsp vanilla extract

Heat the cream in a large heavy saucepan over medium heat until small bubbles appear around the edge. Do not let the cream boil. Remove from the heat and add the sugar, stirring until the sugar is completely dissolved. Allow the cream to cool slightly, then stir in the vanilla. Cover and refrigerate until cold or overnight.

Freeze in 1 or 2 batches in your ice cream machine according to the manufacturer's instructions. When finished, the ice cream will be soft but ready to eat. For firmer ice cream, transfer to a freezer-safe container and freeze at least 2 hours.


Hazelnut Praline
Based on Country Living recipe
1/4 lb. shelled and skinned hazelnuts, lightly toasted
1 cup sugar
1/4 cup water

Spread the nuts on a silicone mat, which won't stick to the praline. Put the sugar and water in a small saucepan and cover with a lid to avoid crystallization. Swirl the pot occasionally, but do not stir, over a medium-low heat. When the syrup turns an amber color, pour it immediately over the nuts. Let it set and cool for 30 minutes, then break it apart with your hands and put the pieces in a food processor. Pulse the nuts until they turn sandy, and sprinkle the praline over the vanilla ice cream.


THE CHALLENGE:
The February 2009 challenge is hosted by Wendy of WMPE's blog and Dharm of Dad ~ Baker & Chef.
We have chosen a Chocolate Valentino cake by Chef Wan; a Vanilla Ice Cream recipe from Dharm and a Vanilla Ice Cream recipe from Wendy as the challenge.

February’s challenge is a Flourless Chocolate Cake, Chocolate Valentino, inspired by Malaysia’s “most flamboyant food ambassador”, Chef Wan. Recipe comes from Sweet Treats by Chef Wan

What we Want You to Do:
-Use the following recipe
-Serve with - The original recipe calls for the cake to be served with whipping cream. BUT we decided to make this more of a challenge and ask you to make your own Ice Cream – a first for the DBrs. You can choose any flavour you want and any recipe although we provided two vanilla ice cream recipes. But we are giving you a little freedom here and will allow whipped cream as a topping as well or of course non-dairy whip. Be as creative as you want with your topping. Any fruit puree or sauce would be lovely with this cake.
- Use your favorite chocolate – the finished cake will taste exactly like the chocolate you use. Be creative with your chocolate, if you like a sweeter cake use milk chocolate or a combination of the semisweet and milk chocolate. If you like bittersweet chocolate use that and add sweetness by mixing the semi sweet with bittersweet. If you are daring, try white chocolate. (Dharm used all bittersweet and Wendy used a half bitter/half semi sweet chocolate).
- A higher cocoa percentage increases the bitterness of the chocolate.
-Equipment - it is optional to use a heart shaped pan. For a real Valentino, bake it in a heart shaped pan or cut it out into a heart shape. You may use any shape pan that gives you an area of 50” - 6x8 or 7x7. An 8” spring form pan works with great results as do smaller pans or ramekins.-An instant read thermometer highly recommended.

Note on recipe - the recipe consists of 3 simple ingredients and how you interpret them is part of the challenge. The simplicity of this recipe gives credit to the ingredients much in the same way of French baguette.
-This recipe comes together very quickly with a hand mixer.
-This is a very decadent cake that will sink a little as it cools but will still hold its shape.
-Very dense and fudgy cake that tastes divine.
-The top forms a light crust kind of like a brownie

Posting Date: February 28, 2009
Printable Recipe:

Chocolate Valentino
Preparation Time: 20 minutes
16 ounces (1 pound) (454 grams) of semisweet chocolate, roughly chopped
½ cup (1 stick) plus 2 tablespoons (146 grams total) of unsalted butter
5 large eggs separated

1. Put chocolate and butter in a heatproof bowl and set over a pan of simmering water (the bottom of the bowl should not touch the water) and melt, stirring often.
2. While your chocolate butter mixture is cooling. Butter your pan and line with a parchment circle then butter the parchment.
3. Separate the egg yolks from the egg whites and put into two medium/large bowls.
4. Whip the egg whites in a medium/large grease free bowl until stiff peaks are formed (do not over-whip or the cake will be dry).
5. With the same beater beat the egg yolks together.
6. Add the egg yolks to the cooled chocolate.
7. Fold in 1/3 of the egg whites into the chocolate mixture and follow with remaining 2/3rds. Fold until no white remains without deflating the batter. {link of folding demonstration}
8. Pour batter into prepared pan, the batter should fill the pan 3/4 of the way full, and bake at 375F/190C
9. Bake for 25 minutes until an instant read thermometer reads 140F/60C. Note – If you do not have an instant read thermometer, the top of the cake will look similar to a brownie and a cake tester will appear wet.
10. Cool cake on a rack for 10 minutes then unmold.

Dharm's Ice Cream Recipe
Classic Vanilla Ice Cream
Preparation Time: 30 minutes

Recipe comes from the Ice Cream Book by Joanna Farrow and Sara Lewis (tested modifications and notes in parentheses by Dharm)

Ingredients
1 Vanilla Pod (or substitute with vanilla extract)
300ml / ½ pint / 1 ¼ cups Semi Skimmed Milk – in the U.S. this is 2% fat (or use fresh full fat milk that is pasteurised and homogenised {as opposed to canned or powdered}). Dharm used whole milk.
4 large egg yolks
75g / 3oz / 6 tbsp caster sugar {superfine sugar can be achieved in a food processor or use regular granulated sugar}
5ml / 1 tsp corn flour {cornstarch}
300ml / ½ pint / 1 ¼ cups Double Cream (48% butter fat) {in the U.S. heavy cream is 37% fat)
{you can easily increase your cream's fat content by heating 1/4 cup of heavy cream with 3 Tbs of butter until melted - cool to room temperature and add to the heavy cream as soon as whisk marks appear in the cream, in a slow steady stream, with the mixer on low speed. Raise speed and continue whipping the cream) or use heavy cream the difference will be in the creaminess of the ice cream.

1. Using a small knife slit the vanilla pod lengthways. Pour the milk into a heavy based saucepan, add the vanilla pod and bring to the boil. Remove from heat and leave for 15 minutes to allow the flavours to infuseLift the vanilla pod up. Holding it over the pan, scrape the black seeds out of the pod with a small knife so that they fall back into the milk. SET the vanilla pod aside and bring the milk back to the boil.
2. Whisk the egg yolks, sugar and corn-flour in a bowl until the mixture is thick and foamy.
3. Gradually pour in the hot milk, whisking constantly. Return the mixture to the pan and cook over a gentle hear, stirring all the time
4. When the custard thickens and is smooth, pour it back into the bowl. Cool it then chill.
5. By Hand: Whip the cream until it has thickened but still falls from a spoon. Fold it into the custard and pour into a plastic tub or similar freeze-proof container. Freeze for 6 hours or until firm enough to scoop, beating it twice (during the freezing process – to get smoother ice cream or else the ice cream will be icy and coarse)
By Using and Ice Cream Maker: Stir the cream into the custard and churn the mixture until thick (follow instructions on your ice cream maker)

Wendy's Ice Cream Recipe
Vanilla Philadelphia Style Recipe
Preparation Time: 5 minutes
2 cups (473 ml) of half and half (1 cup of heavy cream and 1 cup of whole, full fat milk)
1 cup (237 ml) heavy cream
2/3 (128 grams) cup sugar
Dash of salt
1 (12 grams) tablespoon of vanilla

Mix all ingredients together (we do this in a plastic pitcher and mix with an emulsifier hand blender-whisking works too).
Refrigerate for 30 minutes or longer
Mix in your ice cream maker as directed.

David Lebovitz link for making ice cream if you do not have an ice cream freezer.

Links to helpful tips:
Folding video demonstration.
Egg Whipping video demonstration.

Wednesday, December 31, 2008

Tastes of the Season

2 comments:

So I saw these Eggnog Mini-Cakes in the King Arthur Flour catalog along with a recipe, and couldn't wait to make them. I ordered the festive holiday molds, but decided to pass on the eggnog flavor, and just replace the milk with eggnog. Wrong move. The cakes came out all right, like your average yellow cake, but they didn't taste noggy. I was guilty of licking the batter bowl, though, and that did taste like eggnog. Go fig. Decorating with royal icing is a fun project.

I also visited the family in New York for the holidays. Instead of a single birthday cake, my twin sister made the long trip to Carrot Top Pastries in Manhattan's Washington Heights and got slices of 3 cakes to create a sampler. I doubted it was worth the trip, and was so wrong! The Black Forest and Chocolate Mousse cakes were to die for, and I'm told the German Chocolate was good (I have a prejudice against baked coconut). I also went to Sunday brunch at B Bar and Grill in Manhattan, but my Eggs Benedict played second fiddle to the fresh-baked banana bread they bring you in place of a traditional bread basket. The bread is filling, but you can take the leftovers home. And their Peach Bellini was tasty, too. My dad's birthday falls near mine, and I took him and the family out to nearby Casa Calamari in Bensonhurst. Go if you're in the neighborhood. The prices are good, the portions are huge, and the food is fab -- I highly recommend the penne vodka and seafood ravioli. Happy new year!!


Eggnog Mini Cakes by King Arthur Flour
1/2 cup (3 1/2 ounces) vegetable oil
1/2 cup (4 ounces) softened butter
3 large eggs
1 1/4 cup (8 3/4 ounces) sugar
1/2 teaspoon salt
1/4 teaspoon eggnog flavor
1/4 teaspoon nutmeg
2 1/4 cup (9 1/2 ounces) King Arthur Unbleached All-Purpose Flour
2 teaspoons baking powder
1 cup (8 ounces) milk
Preheat the oven to 350°F. Lightly grease the wells of a holiday mini-cake pan or 12 silicone cupcake molds.
Beat the oil, butter, eggs, sugar, salt, eggnog flavor and nutmeg until pale yellow and thick. Whisk the flour and baking powder together, and blend into the egg mixture alternately with the milk, beating until smooth. Use 2 tablespoons batter per cup, for the holiday cupcake pan; or 1/4 cup batter per silicone cupcake mold. Bake for 16 to 18 minutes, until the cakes spring back when touched in the center. Cool for 10 minutes in the pan, then turn out onto a rack. To finish, sprinkle with confectioners' sugar.
Yield: 30 mini cakes.
Variation: Bake in a full-size (9-cup minimum) bundt-style pan for 50 to 60 minutes.