Showing posts with label dessert. Show all posts

Friday, September 9, 2011

Gluten Freedom: Kiss Me, (Chocolate) Cake!

3 comments:

I'd like to welcome WASB's newest contributor, Shannon, who will write Gluten FREEDOM! on Fridays.
Without further ado...

Hello, and Welcome to the first edition of Gluten FREEDOM!, a new feature on the fabulous "What About..." blog ^_^


Why gluten free? Well, to begin with, 1 out of every 133 people have a gluten allergy or Celiac disease (or so my box of Potato Buds tells me). An even more truly disturbing statistic is that 1 in every two gluten free product tastes like... well, lets just say they aren't very good. If you have ever eaten these so called 'baked goods' then you know what I'm talking about: chalky or gritty texture, dry, crumbly body, and often it tastes nothing like the yumminess we're craving.

Well, I aim to change that. I say: take command of our culinary destinies! Rise up, my afflicted brethren and say "NO!" Say "I'll Pass, Thank you Very Much!", to heathen dishes and lackluster confections! With my spatula held high, I vow to lead the way and share with you my secrets for gluten free baking and cooking so delicious that your friends will never suspect a thing!

To that end, let us begin with this decadent chocolate cake. Rich, fudgey and moist, it tastes exactly like a traditional cake made with flour. I made this for my Mom's birthday and even my Dad, who is normally very leery of gluten free foods, DEVOURED it! It's just that good, I promise. It's based off of a cake from a Hershey's cookbook that my mother used to make years ago, however since that book is lost the recipe has been adapted from memory.

First up, the ingredients:

3 cups of TIGHTLY PACKED dark brown sugar
2 sticks of softened sweet (unsalted) butter
1 tablespoon vanilla extract
4 eggs (lightly beaten)
2 3/4 cups of a good, finely milled gluten free flour mix
  • ( I prefer either "Gluten Free Pantry" or "Better Batter"'s blends, but you can always try something else or even make your own blend. Just make sure the flours you use are the finest texture you can possibly get -- this is crucial to the end texture of the cake.)
3/4 cup Dutch Processed Cocoa
1 tablespoon baking soda
1/2 teaspoon salt
1 1/3 cup sour cream (use the full fat kind - no one ever said this was gunna be dietetic guys)
1 cup boiling water

Okay now here's the part where I confess that I am an incredibly lazy baker. If there is a way for me to do less steps, I will take it. Fortunately, this turns out to be a blessing for gluten free baking, because if there is one thing you want to avoid it's over mixing. I think it has to do with the xanthan gum- that stuff can get reaaaaally gross.

Anyway, here's what you do. First, preheat your oven to 350 degrees. Take all the dry ingredients and put them in a bowl (sugar remember, counts as a wet ingredient in baking). If your cocoa looks like this:


Don't stress it. And sure, you COULD sift it, but why? It just adds another step! Go ahead, save time ad just dump it all an a bowl and whisk away until your mixture is mostly combined. The big clumps will break up and a few small ones are not the end of the world.


In a separate large bowl, cream together the butter and sugar as if you were making cookies. (After getting the butter in the bowl, use the papers from the butter to grease your cake pans - standard 9 inches work fine and deep walled ones are ideal. After buttering the pans, toss some cocoa in them and move the pans in a circular motion while tapping away at the sides and bottom of the pan to evenly distribute the cocoa. This will ensure a clean release after baking.) Add the vanilla and then add your already beaten eggs. To this mixture, add about half of the dry mixture (or a third if it seems easier for you). Mix until it's just coming together and then add some of the sour cream. Again, mix until just together and then add more of the dry. Keep alternating until all of the mix and sour cream are just combined into the batter. DO NOT OVER MIX!


Finally, CAREFULLY measure out one cup of boiling water. If you're mixing by hand, add the water slowly in two installments. If you're using a stand or hand mixer, just add it nice and easy on low. You want minimal air bubbles here. Gently pour the mixture into your prepared pans, using a spatula laid across the top if the pans to help eyeball even distribution and to make sure you don't overfill the pans.


Carefully put your pans in the oven and bake for around 45-55 minutes, but DO NOT OVER BAKE! If you know your oven tends to bake things more quickly, than start checking for doneness at 35 minutes. Use the standard toothpick or skewer method (insert into the center of cake and remove from oven when you see no uncooked batter left on the tester but ideally when the cake is still moist enough to leave crumbs on the probe of your choice.)


Ah... the smell alone will drive lesser mind wild! Cool on a wire rack for about ten minutes, then upend out of their pans to cool the rest of the way. They should slide right out, but if not take a skinny spatula and gently run it along the edge where cake meets pan.


If your cake has baked up too high and has formed a "lip", wait until it is completely cooled and remove the extra with a sharp, serrated knife. Eat this bit as your reward for a job well done :)

Now, you can frost this cake any way you want to with any kind of frosting - even one from a can if you must, but for the love of all things yummy why would you frost it with anything other than chocolate?? And frosting can be really easy to make! Here's a very simple butter frosting recipe:

Take two sticks of softened butter and beat until fluffy. Add one box of confectioners sugar. Add 1 teaspoon of vanilla. Add as much dutch processed cocoa as you want until you reach your desired level of chocolatey-ness. If you really want to add some serious chocolate taste, go ahead and melt yourself a square of bakers chocolate and add that to the frosting (be careful not to add it when it's still too hot!) You might want to double this recipe if you like a lot of frosting on your cake.

Decorate your cake or leave it plain. A simple Hershey's kiss on the top is a charming touch. Serve any way you like, or just eat it with your bare hands! Either way, I hope you and your loved ones will enjoy this recipe as the first of many that will give us "Celiacies" and gluten free eaters back our Yumm!


Friday, October 24, 2008

The Best Pumpkin Tart/Pie

No comments:
This pumpkin pie is different. It's smoother and mellower than your usual pumpkin pie, and has the versatility of being dressed up as a fancy tart. I love it chilled, but some want it warm. I also make mine more festive with a few cutouts from leftover pie dough. Top it off with a dollop of freshly whipped cream, and it feels like the holidays!

Dorie Greenspan's Sour Cream Pumpkin Pie (or Tart)
9-inch single crust, partially baked and cooled *recipe below*
2 cups canned unsweetened pumpkin puree
3 large eggs, at room temperature
1 cup (packed) light brown sugar
2 tbs unsalted butter, melted and cooled
1½ cups heavy cream
⅓ cup sour cream
1½ tsp ground cinnamon
1½ tsp ground ginger
Pinch of ground cloves (I omitted)
Pinch of freshly grated nutmeg
Pinch of salt
3 tbs dark rum (I also omitted)
2 tsp pure vanilla extract

Center a rack in the oven and preheat it to 450°. Line a baking sheet with parchment or a silicone mat and put the pie plate (or tart pan) on it.
Mix together all the filling ingredients, then pour into the crust. Bake for 10 minutes, then reduce the temperature to 300° and continue to bake for 35 to 45 minutes longer (20 to 25 minutes for a tart), or until a knife inserted close to the center comes out clean. Cool to room temperature.
You'll have filling left over if you make a tart, but use it to make mini-tarts or possibly another tart.
I used Martha Stewart's pate brisee because I know it like the back of my hand, but here's Dorie's pie dough recipe.

3 cups all-purpose flour
¼ cup sugar
1½ tsp salt
2½ sticks cold unsalted butter, cut into pieces
⅓ cup cold vegetable shortening, cut into pieces
About ½ cup ice water

Pulse the flour, sugar, and salt in a food processor fitted with a metal blade. Drop in the butter and shortening and pulse only until the fats are cut into the flour. Pulsing on and off, gradually add 3 tbs water, then use a few long pulses to get the water into the flour. Pulse in as much of the remaining water as necessary to get a dough that will stick together when pinched. Lightly knead the dough into a disk and wrap in plastic. Refrigerate for at least 1 hour before rolling.
To partially bake the crust, preheat the oven to 400°. Butter one side of a sheet of aluminum foil and place that down on the crust. Fill the foil with dried beans or rice or pie weights. Put the pie plate on a baking sheet and bake for 25 minutes. Carefully remove the foil and weights, and if the crust has puffed, press it down gently with the back of a spoon. Return the pie plate to the oven and bake for 8 minutes more, or until the crust is very lightly colored. (I skipped the 8 minutes when making the tart.) Cool to room temperature before filling.

Wednesday, September 24, 2008

French Yogurt Cake with Toasted Almonds


I made this recently for my friend Jill's birthday. I know she doesn't like a big fuss, so a simple french yogurt cake seemed perfect. I dressed it up a bit with almond cream and toasted almonds. The birthday girl says she loved it!

Adapted from Dorie Greenspan's French Yogurt Cake
  • 1 cup all-purpose flour
  • ½ cup ground almonds (or, if you'd prefer, omit these and use another ½ cup of all-purpose flour)
  • 2 tsp baking powder
  • Pinch of salt
  • 1 cup sugar
  • Grated zest of 1 lemon
  • ½ cup plain yogurt *low-fat will work*
  • 3 large eggs
  • ¼ tsp pure vanilla extract
  • ½ cup flavorless oil, such as canola or safflower
  1. Center a rack in the oven and preheat the oven to 350º. Grease an 8½ x 4½ inch loaf pan and place it on a baking sheet. * I used a 9-inch springform pan for a taller, traditional-looking cake*
  2. Whisk together the flour, ground almonds (if you're using them), baking powder, and salt.
  3. Put the sugar and zest in a mixing bowl, and with your fingertips, rub the zest into the sugar until the sugar is moist and aromatic. Add the yogurt, eggs, and vanilla and blend well. Add the dry ingredients, then fold in the oil. You'll have a thick, smooth batter with a slight sheen. Scrape the batter into the pan and smooth the top.
  4. Bake for 50 to 55 minutes, or until the cake begins to pull away from the sides of the pan; it should be golden brown and a thin knife inserted into the center will come out clean. Transfer the pan to a rack and cool for 5 minutes, then run a blunt knife between the cake and the sides of the pan. Unmold, and cool to room temperature right side up on the rack.
*I then spread the almond cream on the top, followed by a sprinkling of the almonds, but you can try other combinations. It's also delicious served plain.*

Martha Stewart's Almond Cream
*You may want to double this recipe*
  • 4 tbs butter, room temperature
  • ¼ cup sugar
  • 1 large egg *If you don't want to use a raw egg, try 2 tsp mayonnaise*
  • ½ cup whole blanched almonds, finely ground in the food processor
  • ¼ cup all purpose flour
  • ¼ tsp pure almond extract

In the bowl of an electric mixer fitted with the paddle attachment, beat the butter and sugar on medium-high speed until light and fluffy, about 2 minutes. Beat in the egg. Add the ground almonds and flour, and beat until combined. Stir in the almond extract and salt. Continue beating until the mixture is light and fluffy, about 2 minutes, scraping down the sides of the bowl as needed. The almond cream can be refrigerated in an airtight container for up to 1 week.

Toasting the almonds

Pour 1 cup of slivered, blanched almonds into a dry nonstick pan and shake the pan every few minutes, until lightly toasted and aromatic. Or spread 1 cup of slivered, blanched almonds in a single layer on a baking sheet and toast lightly in a 200º preheated oven for 20 minutes.

Saturday, August 30, 2008

Strawberry Scoops

No comments:
I made this earlier last week, when my college friend came to visit with her husband and kids. The looks on the girls' faces when I said I made them ice cream was adorable, and I let the older one turn on the machine and attach the paddle. Now my friend is all psyched to buy her own ice cream machine!

Strawberry Ice Cream from The Ultimate Ice Cream Book
3 cups strawberries (I used frozen strawberries without syrup, thawed)
1/4 tsp salt
1/3 cup sugar
2 large eggs
1 1/2 cups half-and half
1/2 cup heavy cream
1 tsp vanilla extract

Puree the strawberries with the salt in a food processor. There should be about 2 cups of puree. In a medium mixing bowl, beat the sugar into the eggs until thickened and pale yellow.
Bring the half-and-half to a simmer in a heavy medium saucepan. Slowly beat the hot half-and-half into the eggs and sugar. Pour the entire mixture back into the pan and place over low heat. Stir constantly with a wooden spoon until the custard thickens slightly. Be careful not to let the mixture boil or the eggs will scramble. Remove from heat and pour through a strainer into a large, clean bowl. Cool slightly, then stir in the puree, cream, and vanilla. Refrigerate overnight.
Freeze in your ice cream machine according to the manufacturer's instructions.

Red Velvet Cupcakes

2 comments:
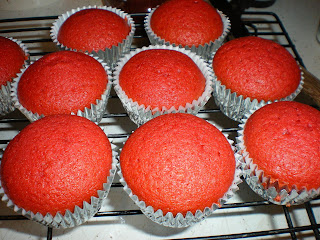
I made these for our summer intern's goodbye party, as a tribute to her southern roots. Paula Deen's recipe looked popular online, but I took note of comments about the recipe being too oily and the funny undertaste of food coloring and made adjustments. Actually, the latter adjustment was involuntary -- I had only a half-bottle of red food coloring, about half a tablespoon (a quarter of what the recipe called for), and the batter still came out scarlet, like a pretty nail polish, as you can see here.

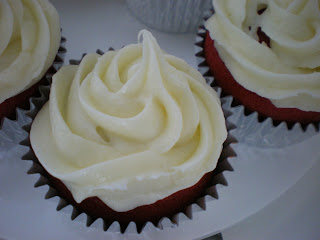
It effectively tastes like yellow cake, and I used my own cream cheese frosting recipe, which goes on all my carrot cakes and pumpkin squares. They made a great first impression on my coworkers, but some of them asked, "What's in them?" Doesn't everyone know what red velvet cake is? A couple even wrinkled their faces and walked off when I joked, "red food coloring," but they generally got great reviews.

RED VELVET CUPCAKES (Adapted from Paula Deen's)
2 1/2 cups cake flour
1 1/4 cups sugar
1 tsp baking soda
1 tsp salt
1 tsp cocoa powder
1 1/4 cups vegetable oil
1 cup buttermilk, well-shaken
2 large eggs, room temperature
1/2 tbs red food coloring
1 tsp white distilled vinegar
1 tsp vanilla extract

Preheat the oven to 350 degrees.
In a medium mixing bowl, stir together the flour, sugar, baking soda, salt, and cocoa powder. In a large bowl, lightly beat together the oil, buttermilk, eggs, food coloring, vinegar, and vanilla extract with an electric mixer. Stir in the dry ingredients.
Fill the cupcake tins about 2/3 full, and bake 20 to 22 minutes. Turn the pans around halfway through baking. Remove from oven and cool completely before frosting. Makes 24 cupcakes.


Cream Cheese Frosting
8 oz. cream cheese, at room temperature
1 stick unsalted butter, at room temperature
1 cup confectioners sugar
1 tsp vanilla extract

Beat the cream cheese and butter together on high, and then mix in the confectioners sugar and vanilla extract on low. Frost cupcakes with an offset spatula or piping bag fitted with a star tip. Or snip the corner off a Ziploc bag to make a makeshift piping bag.

Sunday, July 20, 2008

Lattice-top Cherry Pie

2 comments:

It's not hard to do. Really! I'll even show you how to weave the lattice.


After you roll out your bottom crust and tuck it into your pie plate, roll out your top crust (the instructions say to roll it to a 12x10-inch rectangle, but I could never roll out a perfect rectangle; could you?) and cut it into eight strips with your pastry wheel or a knife. I didn't bother measuring, hence the uneven strips. Use the long strips for the center of your pie, and the shorter strips for the sides. Lay five of them vertically across your pie plate.

Then fold down strips 2 and 4, and lay another strip horizontally across the middle. Fold strips 2 and 4 back up. Then fold down strips 1, 3, and 5, and lay another strip horizontally across the top of the pie.


Next, fold up strips 1, 3, and 5, and lay the last strip horizontally across the bottom of the pie. Fold the strips back down, and trim off any overhang with a small knife. You're done!


Final tips: Wear an apron or old shirt when you're pitting those cherries, unless you don't mind red stains on your shirt. I also used regular cherries I found at the supermarket, instead of hunting for sour cherries as the recipe calls for. Still tastes good!


From Ken Haedrich's Pie: 300 Tried-and-True Recipes for Delicious Homemade Pie
Lattice-Top Deep-Dish Sour Cherry Pie
All-Butter Pie Pastry, Double Crust (recipe follows)

For the filling
6 cups fresh sour cherries, stemmed and pitted
1 1/4 cups plus 3 tbs sugar
1/4 cup cornstarch
2 tsp fresh lemon juice
Grated zest of 1 lemon
2 tbs cold, unsalted butter, cut into small pieces

For the glaze
Milk or light cream
Sugar

  • Prepare the pastry as directed, making half of it just slightly larger than the other. Shape the larger half into a disk and the other half into a square. Wrap the pastry as usual and refrigerate until firm enough to roll, about 1 hour.
  • Roll the disk of pastry into a 13 1/2-inch circle with a floured rolling pin. Gently tuck the pastry into a 9 1/2-inch deep-dish pie pan without stretching it, and sculpt the overhang into an upstanding ridge. Place in the refrigerator for 15 minutes.
  • Place the cherries in a large bowl. Mix the sugar and cornstarch together in a small bowl, then stir the mixture into the fruit. Stir in the lemon juice and zest. Set aside for 10 minutes to juice. Preheat the oven to 400 degrees.
  • Roll the remaining pastry into a 12x10-inch rectangle. With a pastry wheel or pizza cutter, cut the pastry into 8 lengthwise strips, each 1 1/4 inches wide. You should have 8 strips measuring 12 inches long and 1 1/4 inches wide. Set aside.
  • Turn the filling into the chilled pie shell, moistening the rim of the shell slightly. Smooth the top of the filling with a spoon or spatula. Dot the filling with the butter. Then follow the instructions at the top of my post for weaving the lattice. Trim the strips, then pinch the end of the strips into the edge of the pastry. Lightly brush the pastry strips with milk and sprinkle the top of the pie with sugar.
  • Place the pie on the center oven rack and bake for 30 minutes. Reduce the oven temperature to 375 degrees and rotate the pie 180 degrees, so that the part that faced the back of the oven now faces forward. Just in case, slide a large aluminum foil-lined baking sheet onto the rack below to catch any spills. (Really do this! The boiling-over is almost inevitable. In fact, do it when you first put the pie in.) Continue to bake until the top is golden brown and any visible juices bubble thickly, 35 to 40 minutes. Transfer the pie to a wire rack and let cool for at least 2 hours before serving.

All-Butter Pie Pastry (double crust)
2 3/4 cups all-purpose flour
1 tbs sugar
1 tsp salt
1 cup (2 sticks) cold, unsalted butter, cut into small pieces
About 1/2 cup cold water

  • Put the flour, sugar, and salt in a food processor. Pulse several times to mix. Scatter the butter over the dry ingredients and pulse 7 or 8 times to cut the butter in well. Remove the lid and fluff the mixture with a fork, lifting it up from the bottom of the bowl. Drizzle half of the water over the dry ingredients. Pulse 5 or 6 times, until the mixture is crumbly. Fluff the pastry and sprinkle on the remaining water. Pulse 5 or 6 times more, until the pastry starts to form clumps. It will look like coarse crumbs. Empty into a large bowl. (If you don't have a food processor, roughly follow the same instructions using your pastry cutter.)
  • Test the dough by squeezing some of it between your fingers; if it seems a little dry and not quite packable, drizzle a teaspoon or so of cold water over the dough and work it in with your fingertips. Using your hands, pack the dough into 2 balls, as you would pack a snowball. Knead each ball once or twice, then shape into a circle and a square and refrigerate for at least an hour or overnight before rolling.


I used the leftover dough and set aside some of the cherry filling to make this personal-sized cherry tart.