Showing posts with label daring bakers. Show all posts
Saturday, November 28, 2009
Daring Bakers Challenge: Cannoli
Except this month we're the Daring Fryers! I missed the challenge deadline by a day, but better late than never, right? Who sets a deadline for the day after Thanksgiving anyway? I was still recovering from cooking, eating, and baking two of these!
So this was my rush job. I rarely deep-fry, but you might not believe me if you saw the applesauce doughnuts I made earlier this month. Making the cannoli was easy except for the rolling -- the dough has a knack for springing back so the square never seemed to get bigger. But the shells came out crispy and delicious, and I flavored the ricotta filling with vanilla bean and some maple syrup, for that touch of autumn. A lot of people aren't familiar with cannoli, which used to stun me. I grew up in an Italian neighborhood where they were readily available, but when I moved to other states people would ask, "Is that like ravioli?" If you're one of these people, don't get put off by the strange concept of filling deep-fried pastry with cheese. It whips up light and is so good when sweetened.
The November 2009 Daring Bakers Challenge was chosen and hosted by Lisa Michele of Parsley, Sage, Desserts and Line Drives. She chose the Italian Pastry, Cannolo (Cannoli is plural), using the cookbooks Lidia’s Italian-American Kitchen by Lidia Matticchio Bastianich and The Sopranos Family Cookbook by Allen Rucker; recipes by Michelle Scicolone, as ingredient/direction guides. She added her own modifications/changes, so the recipe is not 100% verbatim from either book.
Sunday, September 27, 2009
Daring Bakers Challenge: Vols-au-vent
I've learned how to make puff pastry! I have to admit that while I'm snobby about some baked goods, like a prejudice against storebought frozen pie crust, I've always fully supported buying frozen puff pastry. It's laborious to make, and the stuff in the freezer case is pretty good. This month's challenge called for making vols-au-vent. They're the round cases of puff pastry, and the fillings were up to us. I chose Blackberry Mousse, and Warm Brie with Raspberry.
The mousse wasn't the best I've ever had, so I won't post the mediocre recipe, but it did look pretty. The brie vols-au-vent were delicious, and the flavors were offset with tart and slightly sweet raspberry. I was afraid a slip-up in technicalities might result in flat puff pastry, but these rose nicely. The hardest part was beating the cold butter flat. Sometimes you see TV chefs whip out a rolling pin and bang something around, and they talk about how stress-relieving it is. Not for me!! I had to use serious muscle to beat the cold, hard stuff into submission, and was glad the neighbors weren't home to hear the racket. It also made everything else on the counters clang, and I can't say I'll be abusing butter with a rolling pin the next time I have a bad day.
The rest of the process went like this:
A basic dough without butter is quickly whizzed up in the food processor.
The dough rolls out nicely.
You roll out the four corners to create flaps, with the center remaining thicker and slightly raised.
That is ONE POUND of butter. Which equals 4 sticks. This is not for dieters.
Fold a flap over to begin making your "butter sandwich."
Get the remaining flaps as well.
Then roll it all out. You can kind of make out where the sticks of butter are. They shouldn't be poking through like that, but it's hard to work it in evenly. And it turned out all right.Fold the sides in like a letter. This is what's called a turn, the first of six to incorporate the butter evenly. You roll it out again and repeat.
Bakers poke holes in the dough when resting it to remind them how many turns it has undergone. Here, the three holes represent three turns. It's imperative that the dough remain cold and not start oozing butter or sticking, and that you brush off excess flour.
You can attempt two to four turns before sticking it in the fridge. I made it to four, but it was starting to get melty so I quickly stuck it in the fridge overnight.
The next day, I rolled the dough through the final two turns, for a grand total of six.
You cut out small rounds of dough, and then poke holes in half of them. I didn't have a cutter small enough for the holes, so here I used a cannoli mold.
The rounds make up the bases of the vols-au-vent, and you poke them with a fork for steam to escape. The rounds with holes make up the sides of the upper half. The cutouts can be saved for another use that doesn't require high rise, or saved as caps to top the filling with.
They're brushed with egg wash, and for the first part of their stay in the oven they're covered with a silicone mat. The light weight helps them bake up evenly, and they come out beautiful and golden. On subsequent uses I found that waxed paper wasn't ideal and stuck to the dough, so a silicone mat or parchment paper is better for the sheet pan.
Look how tall and flaky this beauty is! Stay tuned . . . I'll tell you what I did with the leftover dough!
THE CHALLENGE
The September 2009 Daring Bakers' challenge was hosted by Steph of A Whisk and a Spoon. She chose the French treat, Vols-au-Vent based on the Puff Pastry recipe by Michel Richard from the cookbook Baking With Julia by Dorie Greenspan.
Puff pastry (aka pâte feuilletée) is something most of us usually buy at the grocery store,
Thursday, August 27, 2009
Daring Bakers Challenge: Dobos Torte
This month the challenge was to bake that famous Hungarian cake, the Dobos Torte. It calls for baking thin layers of cake, stacking them with buttercream, and topping them with hazelnuts and wedges of caramel. I made mine a miniature so I wouldn't scarf down too much cake, and opted for wispy strands of caramel.
I also nixed the hazelnuts because Joe can't have them, and halved all the ingredients but kept the cooking temp and times the same. I got seven layers out of my little cake tower -- they slide around a little bit with all the buttercream, so you may want to insert a wooden skewer through them while you stack and frost, then remove it and chill. Recipe and obligatory challenge rules follow the pics.

Whip your egg whites to a soft peak and then a stiff peak.

To make my cake a mini, I used a personal-sized springform pan without the bottom. I ladled a third of a cup of batter into the mold, and you can see that when you lift the mold the batter mostly holds its shape. They bake up looking kind of like pancakes.

The buttercream is cooked slightly in a double boiler, and then you add the chocolate to melt.

To make strands of caramel, lightly coat some waxed paper with cooking spray. Dip a spoon into the warm caramel and wave it in zig-zag motions over the paper. Let it firm for a few minutes, and then lift it off the paper. Use a recipe other than the one in this challenge, which is more toffee-like and didn't have the right consistency for caramel strands. (I used Martha Stewart's.)
***
The August 2009 Daring Bakers' challenge was hosted by Angela of A Spoonful of Sugar and Lorraine of Not Quite Nigella. They chose the spectacular DobosTorte based on a recipe from Rick Rodgers' cookbook Kaffeehaus: ExquisiteDesserts from the Classic Caffés of Vienna, Budapest, and Prague.
So, what is the Dobos Torta (or Torte)?
The Dobos Torta is a five-layer sponge cake, filled with a rich chocolate buttercream and topped with thin wedges of caramel. (You may come across recipes which have anywhere between six and 12 layers of cake; there are numerous family variations!) It was invented in 1885 by József C. Dobos, a Hungarian baker, and it rapidly became famous throughout Europe for both its extraordinary taste and its keeping properties. The recipe was a secret until Dobos retired in 1906 and gave the recipe to the Budapest Confectioners' and Gingerbread Makers' Chamber of Industry, providing that every member of the chamber can use it freely.
I also nixed the hazelnuts because Joe can't have them, and halved all the ingredients but kept the cooking temp and times the same. I got seven layers out of my little cake tower -- they slide around a little bit with all the buttercream, so you may want to insert a wooden skewer through them while you stack and frost, then remove it and chill. Recipe and obligatory challenge rules follow the pics.

Whip your egg whites to a soft peak and then a stiff peak.

To make my cake a mini, I used a personal-sized springform pan without the bottom. I ladled a third of a cup of batter into the mold, and you can see that when you lift the mold the batter mostly holds its shape. They bake up looking kind of like pancakes.

The buttercream is cooked slightly in a double boiler, and then you add the chocolate to melt.

To make strands of caramel, lightly coat some waxed paper with cooking spray. Dip a spoon into the warm caramel and wave it in zig-zag motions over the paper. Let it firm for a few minutes, and then lift it off the paper. Use a recipe other than the one in this challenge, which is more toffee-like and didn't have the right consistency for caramel strands. (I used Martha Stewart's.)
***
The August 2009 Daring Bakers' challenge was hosted by Angela of A Spoonful of Sugar and Lorraine of Not Quite Nigella. They chose the spectacular DobosTorte based on a recipe from Rick Rodgers' cookbook Kaffeehaus: ExquisiteDesserts from the Classic Caffés of Vienna, Budapest, and Prague.
So, what is the Dobos Torta (or Torte)?
The Dobos Torta is a five-layer sponge cake, filled with a rich chocolate buttercream and topped with thin wedges of caramel. (You may come across recipes which have anywhere between six and 12 layers of cake; there are numerous family variations!) It was invented in 1885 by József C. Dobos, a Hungarian baker, and it rapidly became famous throughout Europe for both its extraordinary taste and its keeping properties. The recipe was a secret until Dobos retired in 1906 and gave the recipe to the Budapest Confectioners' and Gingerbread Makers' Chamber of Industry, providing that every member of the chamber can use it freely.
Wednesday, May 27, 2009
Daring Bakers Challenge: Strudel, ja!!
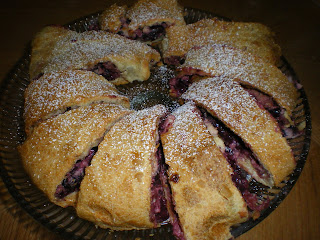
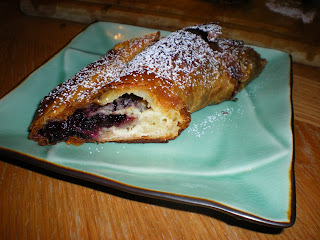
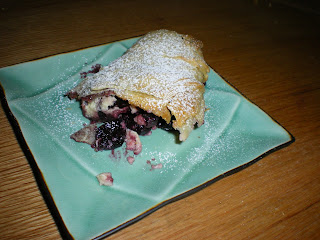
This might be the funnest baking challenge yet. Joe loved it so much that he helped me make a few more (and eat most of them). I wanted something different from the usual apple filling, so I made Cherry Cheese Strudel.
I was surprised by how easy it is to make strudel, especially the dough. Holes and tears are inevitable, and I sure had some, but they're not visible after the dough is rolled up and baked. It comes out beautifully golden and crispy, and the cherry filling is delicious. You do need a lot of space -- a whole table to move around -- and a cloth for assembling the dough. The rollup is definitely my favorite part!
The May Daring Bakers’ challenge was hosted by Linda of make life sweeter! and Courtney of Coco Cooks. They chose Apple Strudel from the recipe book Kaffeehaus: Exquisite Desserts from the Classic Cafés of Vienna, Budapest and Prague by Rick Rodgers.
The dough had to be rolled out thin, then stretched and pulled even thinner.

You had to be able to read through it. Then came the cherry and cheese filling.

You had to be able to read through it. Then came the cherry and cheese filling.
Filling adapted from Martha Stewart's Cherry Cheese Strudel
I had to adapt the filling to fit the smaller dough recipe used in this challenge. I also used a bag of frozen dark sweet cherries, thawed.
12 oz. fresh sour cherries, stemmed and pitted, juices reserved
3/4 cups granulated sugar
1/4 tsp salt
1/4 tsp ground cinnamon
1 tsp cornstarch
6 oz cream cheese, room temperature
1 large egg yolk
Combine the cherries and their juice, half the sugar, half the salt, and cinnamon in a medium high-sided skillet. Place over medium-high heat, and bring to a boil. Cook until juice is reduced, about 10 minutes. Transfer 2 tablespoons of juice to a small bowl; add the cornstarch, and whisk until combined. Return mixture to skillet and cook, stirring until thickened, about 2 minutes. Set aside to cool completely.
In the bowl of an electric mixer fitted with the paddle attachment, beat cream cheese, and the remaining sugar and salt on medium-high speed until very smooth, 2 to 3 minutes. Add the egg yolk, and beat to combine.
Once you've rolled out the dough, starting about 6 inches from the top edge, spread the cream cheese in a 6-inch-wide layer, horizontally, leaving a 3-inch border on each end. Arrange the cherry mixture evenly on top of the cream cheese. Using the cloth, lift up and flip the 6-inch top edge of the dough over the filling. Repeat lifting and folding once, leaving sides open. Then fold in sides of dough to enclose the filling. Continue lifting and folding until the dough is completely rolled into a flat log. If the ends are very thick, trim them as you work.
The recipe for the strudel dough (along with the apple filling suggested in the challenge) and the remaining instructions follow.
![]()
The May Daring Bakers’ challenge was hosted by Linda of make life sweeter! and Courtney of Coco Cooks. They chose Apple Strudel from the recipe book Kaffeehaus: Exquisite Desserts from the Classic Cafés of Vienna, Budapest and Prague by Rick Rodgers.
Saturday, February 28, 2009
DB Challenge: For the Love of Chocolate
Vanilla Ice Cream, Philadelphia Style
From Bruce Weinstein's The Ultimate Ice cream Book
3 cups heavy cream
3/4 cup plus 2 tbs sugar
2 tsp vanilla extract
Heat the cream in a large heavy saucepan over medium heat until small bubbles appear around the edge. Do not let the cream boil. Remove from the heat and add the sugar, stirring until the sugar is completely dissolved. Allow the cream to cool slightly, then stir in the vanilla. Cover and refrigerate until cold or overnight.
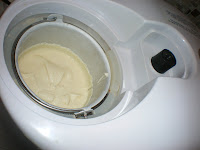
Freeze in 1 or 2 batches in your ice cream machine according to the manufacturer's instructions. When finished, the ice cream will be soft but ready to eat. For firmer ice cream, transfer to a freezer-safe container and freeze at least 2 hours.
Hazelnut Praline
Based on Country Living recipe
1/4 lb. shelled and skinned hazelnuts, lightly toasted
1 cup sugar
1/4 cup water
Spread the nuts on a silicone mat, which won't stick to the praline. Put the sugar and water in a small saucepan and cover with a lid to avoid crystallization. Swirl the pot occasionally, but do not stir, over a medium-low heat. When the syrup turns an amber color, pour it immediately over the nuts. Let it set and cool for 30 minutes, then break it apart with your hands and put the pieces in a food processor. Pulse the nuts until they turn sandy, and sprinkle the praline over the vanilla ice cream.
THE CHALLENGE:
The February 2009 challenge is hosted by Wendy of WMPE's blog and Dharm of Dad ~ Baker & Chef.
We have chosen a Chocolate Valentino cake by Chef Wan; a Vanilla Ice Cream recipe from Dharm and a Vanilla Ice Cream recipe from Wendy as the challenge.
February’s challenge is a Flourless Chocolate Cake, Chocolate Valentino, inspired by Malaysia’s “most flamboyant food ambassador”, Chef Wan. Recipe comes from Sweet Treats by Chef Wan
What we Want You to Do:
-Use the following recipe
-Serve with - The original recipe calls for the cake to be served with whipping cream. BUT we decided to make this more of a challenge and ask you to make your own Ice Cream – a first for the DBrs. You can choose any flavour you want and any recipe although we provided two vanilla ice cream recipes. But we are giving you a little freedom here and will allow whipped cream as a topping as well or of course non-dairy whip. Be as creative as you want with your topping. Any fruit puree or sauce would be lovely with this cake.
- Use your favorite chocolate – the finished cake will taste exactly like the chocolate you use. Be creative with your chocolate, if you like a sweeter cake use milk chocolate or a combination of the semisweet and milk chocolate. If you like bittersweet chocolate use that and add sweetness by mixing the semi sweet with bittersweet. If you are daring, try white chocolate. (Dharm used all bittersweet and Wendy used a half bitter/half semi sweet chocolate).
- A higher cocoa percentage increases the bitterness of the chocolate.
-Equipment - it is optional to use a heart shaped pan. For a real Valentino, bake it in a heart shaped pan or cut it out into a heart shape. You may use any shape pan that gives you an area of 50” - 6x8 or 7x7. An 8” spring form pan works with great results as do smaller pans or ramekins.-An instant read thermometer highly recommended.
Note on recipe - the recipe consists of 3 simple ingredients and how you interpret them is part of the challenge. The simplicity of this recipe gives credit to the ingredients much in the same way of French baguette.
-This recipe comes together very quickly with a hand mixer.
-This is a very decadent cake that will sink a little as it cools but will still hold its shape.
-Very dense and fudgy cake that tastes divine.
-The top forms a light crust kind of like a brownie
Posting Date: February 28, 2009
Printable Recipe:
Chocolate Valentino
Preparation Time: 20 minutes
16 ounces (1 pound) (454 grams) of semisweet chocolate, roughly chopped
½ cup (1 stick) plus 2 tablespoons (146 grams total) of unsalted butter
5 large eggs separated
1. Put chocolate and butter in a heatproof bowl and set over a pan of simmering water (the bottom of the bowl should not touch the water) and melt, stirring often.
2. While your chocolate butter mixture is cooling. Butter your pan and line with a parchment circle then butter the parchment.
3. Separate the egg yolks from the egg whites and put into two medium/large bowls.
4. Whip the egg whites in a medium/large grease free bowl until stiff peaks are formed (do not over-whip or the cake will be dry).
5. With the same beater beat the egg yolks together.
6. Add the egg yolks to the cooled chocolate.
7. Fold in 1/3 of the egg whites into the chocolate mixture and follow with remaining 2/3rds. Fold until no white remains without deflating the batter. {link of folding demonstration}
8. Pour batter into prepared pan, the batter should fill the pan 3/4 of the way full, and bake at 375F/190C
9. Bake for 25 minutes until an instant read thermometer reads 140F/60C. Note – If you do not have an instant read thermometer, the top of the cake will look similar to a brownie and a cake tester will appear wet.
10. Cool cake on a rack for 10 minutes then unmold.
Dharm's Ice Cream Recipe
Classic Vanilla Ice Cream
Preparation Time: 30 minutes
Recipe comes from the Ice Cream Book by Joanna Farrow and Sara Lewis (tested modifications and notes in parentheses by Dharm)
Ingredients
1 Vanilla Pod (or substitute with vanilla extract)
300ml / ½ pint / 1 ¼ cups Semi Skimmed Milk – in the U.S. this is 2% fat (or use fresh full fat milk that is pasteurised and homogenised {as opposed to canned or powdered}). Dharm used whole milk.
4 large egg yolks
75g / 3oz / 6 tbsp caster sugar {superfine sugar can be achieved in a food processor or use regular granulated sugar}
5ml / 1 tsp corn flour {cornstarch}
300ml / ½ pint / 1 ¼ cups Double Cream (48% butter fat) {in the U.S. heavy cream is 37% fat)
{you can easily increase your cream's fat content by heating 1/4 cup of heavy cream with 3 Tbs of butter until melted - cool to room temperature and add to the heavy cream as soon as whisk marks appear in the cream, in a slow steady stream, with the mixer on low speed. Raise speed and continue whipping the cream) or use heavy cream the difference will be in the creaminess of the ice cream.
1. Using a small knife slit the vanilla pod lengthways. Pour the milk into a heavy based saucepan, add the vanilla pod and bring to the boil. Remove from heat and leave for 15 minutes to allow the flavours to infuseLift the vanilla pod up. Holding it over the pan, scrape the black seeds out of the pod with a small knife so that they fall back into the milk. SET the vanilla pod aside and bring the milk back to the boil.
2. Whisk the egg yolks, sugar and corn-flour in a bowl until the mixture is thick and foamy.
3. Gradually pour in the hot milk, whisking constantly. Return the mixture to the pan and cook over a gentle hear, stirring all the time
4. When the custard thickens and is smooth, pour it back into the bowl. Cool it then chill.
5. By Hand: Whip the cream until it has thickened but still falls from a spoon. Fold it into the custard and pour into a plastic tub or similar freeze-proof container. Freeze for 6 hours or until firm enough to scoop, beating it twice (during the freezing process – to get smoother ice cream or else the ice cream will be icy and coarse)
By Using and Ice Cream Maker: Stir the cream into the custard and churn the mixture until thick (follow instructions on your ice cream maker)
Wendy's Ice Cream Recipe
Vanilla Philadelphia Style Recipe
Preparation Time: 5 minutes
2 cups (473 ml) of half and half (1 cup of heavy cream and 1 cup of whole, full fat milk)
1 cup (237 ml) heavy cream
2/3 (128 grams) cup sugar
Dash of salt
1 (12 grams) tablespoon of vanilla
Mix all ingredients together (we do this in a plastic pitcher and mix with an emulsifier hand blender-whisking works too).
Refrigerate for 30 minutes or longer
Mix in your ice cream maker as directed.
David Lebovitz link for making ice cream if you do not have an ice cream freezer.
Links to helpful tips:
Folding video demonstration.
Egg Whipping video demonstration.
Thursday, October 30, 2008
Daring Bakers Challenge: Pizza!
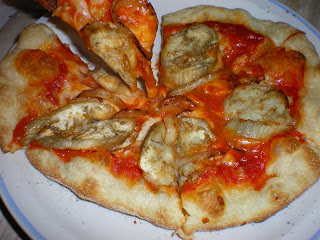
When it comes to pizza, I'm a less-is-more gal. Friends who know me as a meat lover may find it strange that I don't like meat on my pizza, but chicken or beef weighs it down. And I sure don't want servings of baked ziti on top, and I prefer the traditional sauce-and-mozzarella version. I like a topping of tomato slices with fresh basil, or my other favorite, which I made here -- Roasted Eggplant & Caramelized Onions. You may say you don't like eggplant (eggplant parmigiana seems to be everyone's exception), and I used to say that, too. But try eggplant roasted, slightly caramelized and well done, and it's nothing like that spongy, underdone stuff that restaurants sometimes serve up.
I roast a skinny Chinese eggplant (peeled, sliced, and tossed with olive oil, salt, and pepper) in a 300-degree oven for 15 minutes. I also caramelize some onions in a saute pan with a bit of olive oil, salt, and pepper until they're translucent and slightly brown at the edges. Toss them on top of your pizza before it goes into the oven.
From Peter Reinhart's The Bread Baker’s Apprentice
Makes 6 pizza crusts (about 9-12 inches/23-30 cm in diameter)
Ingredients:
4½ cups (20¼ ounces/607.5 g) unbleached high-gluten (14%) bread flour or all-purpose flour, chilled
1¾ tsp salt
1 tsp instant yeast
¼ cup (2 ounces/60g) olive oil (Optional, but it’s better with)
1¾ cups (14 ounces/420g or 420ml) water, ice cold (40° F/4.5° C)
1 tbs sugar
Semolina/durum flour or cornmeal for dusting
1. Mix together the flour, salt and instant yeast in a big bowl (or in the bowl of your stand mixer).
2. Add the oil, sugar, and cold water and mix well (with the help of a large wooden spoon or with the paddle attachment, on low speed) in order to form a sticky ball of dough. On a clean surface, knead for about 5-7 minutes, until the dough is smooth and the ingredients are homogeneously distributed. If it is too wet, add a little flour (not too much, though) and if it is too dry add 1 or 2 teaspoons extra water.
NOTE: If you are using an electric mixer, switch to the dough hook and mix on medium speed for the same amount of time.The dough should clear the sides of the bowl but stick to the bottom of the bowl. If the dough is too wet, sprinkle in a little more flour, so that it clears the sides. If, on the contrary, it clears the bottom of the bowl, dribble in a teaspoon or two of cold water.The finished dough should be springy, elastic, and sticky, not just tacky, and register 50°-55° F/10°-13° C.
3. Flour a work surface or counter. Line a jelly pan with baking paper/parchment. Lightly oil the paper.
4. With the help of a metal or plastic dough scraper, cut the dough into 6 equal pieces (or larger if you want to make larger pizzas).
NOTE: To avoid the dough from sticking to the scraper, dip the scraper into water between cuts.
5. Sprinkle some flour over the dough. Make sure your hands are dry and then flour them. Gently round each piece into a ball.
6. Transfer the dough balls to the lined jelly pan and mist them generously with spray oil. Slip the pan into plastic bag or enclose in plastic food wrap.
7. Put the pan into the refrigerator and let the dough rest overnight or for up to three days.
NOTE: You can store the dough balls in a zippered freezer bag if you want to save some of the dough for any future baking. In that case, pour some oil(a few tablespooons only) in a medium bowl and dip each dough ball into the oil, so that it is completely covered in oil. Then put each ball into a separate bag. Store the bags in the freezer for no longer than 3 months. The day before you plan to make pizza, remember to transfer the dough balls from the freezer to the refrigerator.
8. On the day you plan to eat pizza, exactly two hours before you make it, remove the desired number of dough balls from the refrigerator. Dust the counter with flour and spray lightly with oil. Place the dough balls on a floured surface and sprinkle them with flour. Dust your hands with flour and delicately press the dough into disks about ½ inch thick and 5 inches in diameter. Sprinkle with flour and mist with oil. Loosely cover the dough rounds with plastic wrap and then allow to rest for 2 hours.
9. At least 45 minutes before making the pizza, place a baking stone on the lower third of the oven. Preheat the oven as hot as possible (500° F).
10. Generously sprinkle the back of a jelly pan with semolina/durum flour or cornmeal. Flour your hands (palms, backs and knuckles). Take 1 piece of dough by lifting it with a pastry scraper. Lay the dough across your fists in a very delicate way and carefully stretch it by bouncing it in a circular motion on your hands, and by giving it a little stretch with each bounce. Once the dough has expanded outward, move to a full toss.
11. When the dough has the shape you want (about 9-12 inches/ in diameter for a 6 ounce piece of dough), place it on the back of the jelly pan, making sure there is enough semolina/durum flour or cornmeal to allow it to slide and not stick to the pan.
12. Lightly top it with sweet or savory toppings of your choice.
13. Slide the topped pizza onto the stone in the oven or bake directly on the jelly pan. Close the door and bake for 5-8 minutes.
14. Take the pizza out of the oven and transfer it to a cutting board or your plate. In order to allow the cheese to set a little, wait 3-5 minutes before slicing or serving.

Sunday, August 31, 2008
Daring Bakers Challenge: Eclairs
My first Daring Bakers challenge! I just couldn't get them to look pretty, but let me tell you, they were tasty! Since we're a household of two, I brought most of the eclairs in to work earlier this month, and the reactions were funny. "You can make eclairs?" Some people thought they were made only in factories. They disappeared quickly, in any case. I had troubles in the beginning with eclairs that fell flat, since the instructions on sticking the spoon in the oven were confusing, but I got them to puff up all right.
I initially made both vanilla and chocolate pastry creams, since I thought that with the glaze it would be chocolate overload. But I wound up stirring melted chocolate into the vanilla cream after I tasted how divine the chocolate was. I also made the labor-intensive glaze on the first try, but swapped it out on Take 2 for a simple ganache (equal parts hot cream and bittersweet chocolate with a couple pats of butter). Now I just have to jog a million miles to work all those calories off!
Subscribe to:
Posts (Atom)