Sunday, June 7, 2009

Teatime Treats! The Best Scones, Plus Cuke Sandwiches

1 comment:

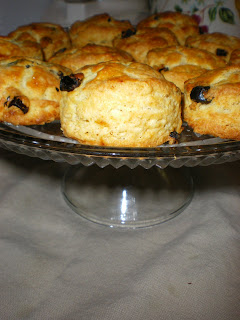
They're the quintessential afternoon tea nibbles -- scones and cucumber sandwiches. Beverly (i.e. the Queen of Scones) calls this recipe The Best Scones, and they really are. They're the flakiest, tenderest, moistest scones you'll ever have. And why not round them out with some tiny sandwiches, and a cuppa English Breakfast, Assam, or Ceylon?


I halved this scone recipe for our household of two, but you can probably freeze some right before they go into the oven and bake them up on demand. I also halved the amount of salt, but whether you do the same is up to you. Check out the flaky layers of this baby.


The Best Scones by Beverly
4 cups all-purpose
2 tbs baking powder
2 tsp salt
¾ lb. cold unsalted butter, diced (that's 3 sticks)
4 large eggs, beaten lightly
1 cup cold heavy cream
1 egg beaten with 1 tbs water or milk, for egg wash, Or use cream
Raisins or currants (I used ½ cup)

Preheat the oven to 400°.

Combine the flour, baking powder, and salt in the bowl of an electric mixer fitted with the paddle attachment. You can also make this in a food processor with the metal blade like I did, or by hand with a pastry blender. Add the butter and mix on low speed until the butter is in pea-sized pieces. Mix the eggs and cream together, and quickly add them to the flour-and-butter mixture. Combine until just blended. Mix in the raisins or currants.


Dump the dough onto a floured surface and knead just until it comes together. Roll the dough ¾ inch thick. Cut into 4-inch squares and then in half diagonally to make triangles, or any shape you desire. Brush the tops with cream. Bake on a baking sheet lined with parchment paper or a silicone mat for 18 minutes, until the outside is crusty and the inside is fully baked.

Makes 16 scones.


This is my thrown-together cucumber sandwich recipe.

Cucumber Sandwiches
1 cucumber, peeled
6 slices bread
2 oz. cream cheese, softened at room temperature
½ tsp salt
1 tsp chopped fresh parsley
2 tsp chopped fresh chives, plus more for garnish

You'll need a vegetable peeler, paper towels, and a tall biscuit cutter.

Cut the crusts off the bread. You can freeze them in a zip-top bag to make breadcrumbs out of. Holding the cucumber so it stands vertically on a cutting board, use the peeler to shave off thick slices of cucumber, until you get to the seedy part. Discard the seedy core. Lay the cucumber on paper towels to soak up excess moisture, so your sandwiches don't get soggy.

Stir the salt, parsley, and chives into the softened cream cheese. Spread the mixture onto the bread slices, then top with the layers of cucumber. You can leave them open-faced or top them with another slice of bread. Cut them into triangles, or use a biscuit cutter to cut out little teatime-sized rounds. The cutter has to be tall enough that it won't get lost in the sandwich, and sharp enough to cut through.

Scatter some chives over the tops for garnish. Keep the sandwiches covered so they don't dry out.
Wednesday, May 27, 2009

Daring Bakers Challenge: Strudel, ja!!

17 comments:

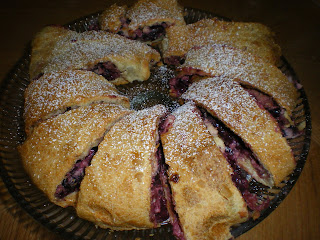
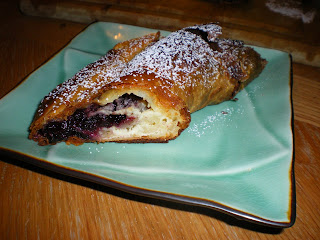
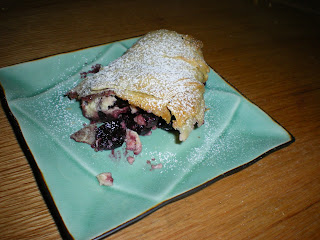
This might be the funnest baking challenge yet. Joe loved it so much that he helped me make a few more (and eat most of them). I wanted something different from the usual apple filling, so I made Cherry Cheese Strudel.


I was surprised by how easy it is to make strudel, especially the dough. Holes and tears are inevitable, and I sure had some, but they're not visible after the dough is rolled up and baked. It comes out beautifully golden and crispy, and the cherry filling is delicious. You do need a lot of space -- a whole table to move around -- and a cloth for assembling the dough. The rollup is definitely my favorite part!

The May Daring Bakers’ challenge was hosted by Linda of make life sweeter! and Courtney of Coco Cooks. They chose Apple Strudel from the recipe book Kaffeehaus: Exquisite Desserts from the Classic Cafés of Vienna, Budapest and Prague by Rick Rodgers.


The dough had to be rolled out thin, then stretched and pulled even thinner.


You had to be able to read through it. Then came the cherry and cheese filling.


Filling adapted from Martha Stewart's Cherry Cheese Strudel
I had to adapt the filling to fit the smaller dough recipe used in this challenge. I also used a bag of frozen dark sweet cherries, thawed.
12 oz. fresh sour cherries, stemmed and pitted, juices reserved
3/4 cups granulated sugar
1/4 tsp salt
1/4 tsp ground cinnamon
1 tsp cornstarch
6 oz cream cheese, room temperature
1 large egg yolk

Combine the cherries and their juice, half the sugar, half the salt, and cinnamon in a medium high-sided skillet. Place over medium-high heat, and bring to a boil. Cook until juice is reduced, about 10 minutes. Transfer 2 tablespoons of juice to a small bowl; add the cornstarch, and whisk until combined. Return mixture to skillet and cook, stirring until thickened, about 2 minutes. Set aside to cool completely.

In the bowl of an electric mixer fitted with the paddle attachment, beat cream cheese, and the remaining sugar and salt on medium-high speed until very smooth, 2 to 3 minutes. Add the egg yolk, and beat to combine.

Once you've rolled out the dough, starting about 6 inches from the top edge, spread the cream cheese in a 6-inch-wide layer, horizontally, leaving a 3-inch border on each end. Arrange the cherry mixture evenly on top of the cream cheese. Using the cloth, lift up and flip the 6-inch top edge of the dough over the filling. Repeat lifting and folding once, leaving sides open. Then fold in sides of dough to enclose the filling. Continue lifting and folding until the dough is completely rolled into a flat log. If the ends are very thick, trim them as you work.

The recipe for the strudel dough (along with the apple filling suggested in the challenge) and the remaining instructions follow.

The May Daring Bakers’ challenge was hosted by Linda of make life sweeter! and Courtney of Coco Cooks. They chose Apple Strudel from the recipe book Kaffeehaus: Exquisite Desserts from the Classic Cafés of Vienna, Budapest and Prague by Rick Rodgers.

Tuesday, May 5, 2009

Strawberry Tartlets

No comments:
Strawberries from the store have been so delicious lately, I had to make strawberry tarts. Except for the arm workout I got while whisking the pastry cream, these were easy. For visual interest, I usually also top each one with a blueberry and sliver of kiwi, but I love the pure strawberry of this version and it made for lighter work. And they were still plenty tasty.

Strawberry Tarts
Half-recipe of Martha Stewart's Pate Brisee
Pound of Strawberries, washed, dried, and hulled
Pastry Cream, recipe follows

Preheat oven to 325 degrees. Roll out the tart dough and cut it into squares a little larger than the square tart wells, or whatever mold you plan to use. Tuck the squares of dough inside the wells, cover the entire tray with a sheet of foil, and bake 12 minutes. Remove the foil, and bake 10 more minutes. Let it cool before removing the pastry shells, and repeat with remaining dough. Allow shells to cool completely before assembling.


Strawberries last longer if you wait until you use them to wash them. Darker ones tend to be sweeter. Choose 12 small berries that won't be bigger than the tart, and slice them in half.
Spoon or pipe the pastry cream into each shell. I like to pipe it with a star tip. Top each tart with a strawberry half. For extra shine or sweetness, you can also melt a bit of seedless jam and brush it on top of the berries. That's it! Makes 24 tartlets.

Pastry Cream
From Dorie Greenspan's Baking: From My Home to Yours
2 cups whole milk
6 large egg yolks
½ cup sugar
⅓ cup cornstarch, sifted
1½ tsp pure vanilla extract
3½ tsp unsalted butter, cut into bits at room temperature
Bring the milk to a boil in a small saucepan.
Neanwhile, in a medium heavy-bottomed saucepan, whisk the yolks together with the sugar and cornstarch until thick and well-blended. Still whisking, drizzle in about ¼ cup of the hot milk -- this will temper, or warm, the yolks so they won't curdle. Whisking all the while, slowly pour in the remainder of the milk. Put the pan over medium heat and, whisking vigorously, constantly and thoroughly (making sure to get into the edges of the pot), bring the mixture to a boil. Keep at a boil, still whisking, for 1 to 2 minutes, then remove the pan from the heat.


Whisk in the vanilla extract. Let sit for 5 minutes, then whisk in bits of butter, stirring until they are fully incorporated and the pastry cream is smooth and silky. Scrape the cream into a bowl. You can press a piece of plastic wrap against the surface of the cream to create an airtight seal and refrigerate the pastry cream until cold or, if you want to cool it quickly -- as I always do -- put the bowl into a larger bowl filled with ice cubes and cold water, and stir the pastry cream occasionally until it is thoroughly chilled, about 20 minutes.

Sunday, April 12, 2009

Rosemary Flatbread

No comments:
I was going to make buttermilk biscuits for Easter, but these were so much lighter and easier. You just combine the ingredients, let it rise for a bit, and bake off. Even the rolling out is simple, since the soft dough doesn't require the muscle that rolling out pastry does. They come out chewy, and crisp at the edges. I can see myself making these a lot, in endless variations.

Rosemary Flatbread, adapted from Martha Stewart Living
2¼ tsp active dry yeast (1 envelope)
¾ cup warm water (110 degrees)
2 cups all-purpose flour
Coarse sea salt
Cracked black pepper
1 tbs plus 1½ tsp extra-virgin olive oil, plus more for bowl and brushing
1 tbs chopped rosemary or other herb, plus more for decorating on top

Place a baking stone in a cold oven and preheat to 400 degrees. Combine yeast and water, and let stand until foamy, about 5 minutes. Stir well.

Pulse flour and 1 tsp salt in a food processor to combine. Add yeast mixture, oil, and rosemary. Process just until a dough forms. Turn dough onto a lightly floured surface. Knead for 1 minute. Shape into a ball. Place in an oiled bowl, and turn to coat. Cover loosely with plastic wrap. Let rise until doubled, about 1 hour.


Punch down the dough, and divide into 4 pieces. Gently roll each piece into a 6-inch disc. Don't roll them too thin, or they'll have the dryness and consistency of a cracker instead of the softness and texture of a bread. Brush with oil, sprinkle with salt and pepper, and decoratively top with pieces of rosemary.


Bake them one at a time on the baking stone without turning, for about 7 minutes each. A wooden pizza peel can make placement easy, and tongs make removal simple. If you're using a baking sheet because you don't have a baking stone, bake them for 10 to 12 minutes each.


Monday, March 30, 2009

Spinach in Small Bites

No comments:

I was amazed by the reception these spinach mini-tarts got. I knew they were good, but I didn't know they were that good! So I'm posting them here, and it's not my recipe and I haven't changed much except to show how to make them minis. Personally, I like the higher crust-to-filling ratio you get from the minis, and they're more fun for parties!

Oh, and I used Martha Stewart's pate brisee instead of the crust in the original recipe, which called for shortening. Shortening weirds me out, and the pate brisee was easy because I've got it committed to memory. I made them in a square tart mini pan with 2-inch wells that's cool because you push up the bottoms for easy extraction.

Mini Spinach & Pine Nut Tarts
Adapted from Emeril's
Pine Nut and Spinach Tart
Half-recipe of Martha Stewart's pate brisee
½ cup pine nuts (about 3 oz)
¼ cup olive oil
1 cup chopped yellow onion
10 oz fresh spinach, stems removed, well rinsed and chopped, or 1 10-ounce package frozen chopped spinach, thawed and squeezed to remove excess liquid
¾ teaspoon salt
½ teaspoon ground black pepper
3 large eggs
¾ cup heavy cream (I prefer half-and-half in this)
½ cup (about 3 oz) crumbled goat cheese, or feta

Preheat oven to 375°.
Roll out the chilled pate brisee and cut it into 2½-inch squares. Tuck each square into the wells of a mini-tart pan. A little excess riding above the sides of the wells is fine. Lightly wrap a sheet of foil over the top of the pan and bake for 5 minutes, then remove the foil and bake for 5 more. Allow the crusts to cool.

In a dry pan, toast the pine nuts for a few minutes until fragrant. Set the nuts aside. Heat the oil over medium-high heat, then add the onions and cook for 3 minutes. Add the spinach, salt, and pepper and cook the liquid is evaporated, 2 minutes. Remove from the heat and cool. In a large bowl whisk the eggs and cream (or half-and-half). Stir in the spinach, cheese, and half of the pine nuts. Spoon the filling into the crusts, almost to the top of each, and sprinkle the reserved nuts on top.

Set the pan on a baking sheet to avoid any leakage from dripping in the oven. Bake them for 20 minutes, until golden. When the pan is cool enough to handle, remove the tarts, then repeat with the remaining dough and filling. Makes about 30.

Thursday, March 19, 2009

Double Chocolate Mousse Cake

No comments:
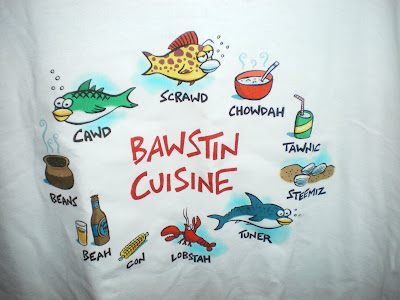
My buddy Nicole is moving back out West! So when we covertly planned her farewell at work, I decided to do a Red Velvet Cake with a Milk Chocolate Mousse and Dark Chocolate Mousse for my fellow chocolate lover. Unconventional, but she said it was "lethally good!" And check out this T-shirt we got her to remember us by.

I halved the recipe for Red Velvet Cupcakes and baked the batter as a single layer in an 8-inch springform pan at 350 degrees for 25 minutes (test for doneness by inserting a skewer or knife). Then I sawed it in half and put it aside for layering.


I used the mousses from a Francois Payard recipe on Epicurious:
3 1/2 cups (812 grams) heavy cream
5 ounces (142 grams) milk chocolate, finely chopped
5 ounces (142 grams) bittersweet chocolate, finely chopped

In the bowl of an electric mixer, using the whisk attachment, beat 2 1/2 cups (580 grams) of the heavy cream to soft peaks. Scrape half of the whipped cream into a medium bowl. Cover both bowls and refrigerate.

Put the milk and dark chocolate in two separate medium bowls. Bring the remaining 1 cup (232 grams) cream to a boil in a small saucepan. Pour 1/2 cup (116 grams) of the hot cream over the milk chocolate and the remaining 1/2 cup (116 grams) over the bittersweet chocolate. Gently whisk the milk chocolate until it is completely melted and the mixture is smooth. Whisk the dark chocolate until smooth.

Let the chocolate mixtures cool for 10 minutes. Fold the milk chocolate mixture into one bowl of whipped cream. Fold the dark chocolate into the remaining whipped cream.

For assembly, I put a cardboard round in the bottom of the springform pan, followed by the bottom half of the cake, cut side up. Spread the dark chocolate mousse in as even a layer as possible, then top it with the other half of the cake, cut side down. Spread the milk chocolate mousse on top of that. Cover tightly with plastic wrap to prevent refrigerator odors from sinking in, and chill for two to four hours.


When ready to serve, carefully remove the springform ring and take out the cake. Sift cocoa powder all over the top. Cut desired designs into a piece of parchment paper, then place paper on top of cake. Sift confectioners sugar over the paper so it falls only over the cutouts.

Wednesday, March 11, 2009

Neat Idea

No comments:

It was hard to locate things in my kitchen drawers. I'd often toss and shove around gadgets and utensils, which were all thrown together with no order. I'd seen online features for installing wooden dividers in drawers, but it seemed like too much work.


No-skid shelf-liner is great stuff -- it keeps everything stationary and prevents things from sliding around. Now everything has its place, and I even threw out a few things I don't need. Just buy the non-adhesive, no-skid kind, cut it to fit each drawer, and lay it down. Easy spring cleaning!