Showing posts with label eggplant. Show all posts

Wednesday, March 28, 2012

Eggplant Parmesan Sandwiches

10 comments:
Eggplant Parmesan Sandwich

The crispy, Panko-coated eggplant slices are so good, I could eat a whole plate of just those.  But it doesn't hurt to throw on some mozzarella, tomatoes, peppadews, and basil, and sandwich the whole thing in a ciabatta roll.  I was telling Joe just that when he asked, sort of absent-mindedly, "Is it crispy?" I bit into one, and the loud crunch got his attention.  Then he ended up pilfering some eggplant slices.

Graffiti Eggplant

The recipe is a bit of a production, but I think you can easily streamline it without affecting the quality.  Skip the whole eggplant-salting thing for starters.  This is a graffiti eggplant, and it not only looks cool, but it's smaller than your typical Italian eggplant and not as bitter or full of seeds; hence, no need to salt and drain. One of these made about a quarter of the recipe, which was a perfect amount for us.  And I made those oven-roasted tomatoes (they're lost between layers in the photo, in case you were wondering), and they were good but I don't think worth the trouble again.  A spoon of marinara will do it for me next time.

You also don't need the whole inch of oil in the skillet, or the frying thermometer.  We're not making bone-in fried chicken here, so drop a crumb of panko in the oil -- if it doesn't do much, the oil's not hot enough, and if it starts to bubble up it's hot enough.  I cooked them by color rather than time, flipping and removing them when they were golden brown.  I hate spongy, al dente eggplant, but these were meltingly soft.  A bit of a production, yes, but also a very satisfying lunch.

This post was featured on Yummly's 10 Egg-cellent Eggplant Recipes.
Certified Yummly Recipes on Yummly.com


I also wanted to thank Dawn at DJ's Sugar Shack for passing on to me the Versatile Blogger award and Anuja of Simple Baking for the Liebster Blog award.  Since I've received the Versatile Blogger award in the past, you don't need to read all about me again or the blogs I recommend.  But if you'd like to anyway, click here.  And definitely visit Dawn's and Anuja's great blogs!

Photobucket


Thursday, November 18, 2010

Mom's Shrimp-Stuffed Eggplant

12 comments:

Shrimp-Stuffed Eggplant
New photo updated Oct. 2012. 

You might think shrimp and eggplant are an odd combination, unless you've had this dish at dim sum.  I love it.  Mom still finds it weird to have me snapping shots around her and trying to note every little detail, but I got the recipe!  In exchange, I showed her how to make sweet potato biscuits, which I'll be posting soon.

Shrimp-Stuffed Eggplant

The eggplant is sliced on the diagonal, and then sliced again (but not all the way through) to create a pocket to hold the shrimp.  The slices are then filled with shrimp, and browned in the pan.  Because eggplant sucks up oil like a sponge, eggplant dishes can be greasy.  Mom uses the Chinese method of quickly frying for color and flavor, then steaming the rest of the way through to avoid more oil absorption.  The dish is finished off with the usual oyster sauce, and Mom's addition of mirin adds complexity.  Use Japanese eggplants, which are slender and long, rather than the short and bulbous Italian variety.

Sunday, May 30, 2010

BBQ Pulled Pork Sandwiches

4 comments:
037

It's Memorial Day weekend, and that means a couple months of sweet corn, burgers, ribs, and pulled pork sandwiches.  This pulled pork recipe, like many others of its kind, calls for being made in an oven and not the grill.  I find that's also the case for ribs, and I've come to prefer making ribs in the oven to avoid that char you get so easily on the grill.  I also love how easy this pulled pork is -- just marinate, cover and bake for a few hours the next day, pull apart, and you're done.  And unlike other pulled pork recipes I've tried, this one is truly pull-apart tender; no shredding with your knife is required.  It's a great hot-weather dish.

Raised Bed
And speaking of hot weather, my little vegetable and herb garden is taking off.  We prepared a raised bed for the first time in our yard.  Removing the sod was the hardest part, and we kept the rest simple.  No poured concrete or deep barriers, since it is a rented house after all.  We've got four varieties of tomatoes --Early Girl (top right), Sun Sugar (a yellow variety), Roma, and Grape -- along with parsley, chives, buttercrunch lettuce, and eggplant.  There was originally more lettuce, but some of the young plants got drowned in heavy rain, as did my strawberry plants.  I cursed Mother Nature and went off to get more strawberry plants, but the store was all out except for what they called these urban planters.  It was more than I planned to spend, but it's got almost a dozen strawberry plants, and a cool pot.  It already has some green fruit and beautiful white flowers.  I'm excited for my upcoming summer bounty!

Flowers
That includes peonies.  I'm crazy about these flowers.  Too bad they're such slow growers and last so briefly.  I planted the one in the top right photo a few years ago, and it finally had one bloom this year.  Just one bloom.  I had gotten so impatient I bought a potted one (lower left), and it also yielded exactly one bloom.  I just can't win.  At top left is a shrub that blooms every spring, but I have no idea what it is.  The Sun Sugar tomatoes, at bottom right, have begun to sprout flowers that will bear the fruit.

So back to that pulled pork...

Pulled Pork
I used a tenderloin instead of the pork butt the recipe calls for, since that was what I had in the freezer.  I was concerned it might turn out dry because tenderloin isn't as fatty as butt (go ahead, snicker), but you might be able to see that this tenderloin had some fat.  It was also half the size the recipe called for, but that's OK for our household of two.  We've still got leftovers for today!  I also have a confession: I didn't use the barbecue sauce the recipe includes, or even make my own.  I resorted to a storebought bottled sauce, but it was still delicious.  Come on, I had to work Memorial Day weekend!

Monday, March 29, 2010

Roasted Vegetable Tart, Upside-Down Pie, and Ming

3 comments:
025
Isn't that pretty?  A tart of roasted vegetables and goat cheese.  Here's something not so pretty.

IMGP7108

This was a lemon meringue pie that I painstakingly worked on, only to have it flip over in the car!  I had the pie on the back seat and the dome on the floor so the still-warm pie wouldn't steam.  When I braked suddenly, the pie flew and hit the seat in front of it, then fell into the dome.  It was kind of amazing that it made it into the dome, but I was devastated and furious!  Nevertheless, it got eaten at work (it was Pie Night).

Friday, February 12, 2010

Fish Steamed Chinese-Style

1 comment:
Steaming is such a healthy and fast way to cook.  This delicate fish was flavored by ginger, scallions, and soy sauce.  I've lagged on posting so much I don't even remember what kind of a fish this was. My guess is some kind of snapper or bass, but I do remember it was delicious, just like Mom used to make. Although I haven't been posting, I haven't been idle either!

I baked these to make up for the lost linzer cookies around December.  I know I said I bake them only once a year, but Sis never got them for our birthday/Christmas.  So now they're Valentine's cookies!

I also cooked up a sauce from San Marzano tomatoes and discovered why they cost about $5 a can.  The taste really is complex and sweet, but at that price I soon went back to ho-hum tomatoes.

And I made pizza topped with eggplant and sundried tomatoes.  Okay, so maybe Joe did all the work, but I cooked and assembled my own topping.  And got stuck with kitchen cleanup.  But back to the fish...

HELLO!!!  Don't be afraid because he still has a head.  If that turns you off, don't go shopping with my mom.  She once asked if I wanted fish for dinner, then took me to the corner market and bought one from the tank.  I knew what was going to happen, but the sight of the fish flopping around while the man decapitated it almost ruined my appetite.  Do make sure it's been scaled and gutted.

So here's how you steam.  You can use one of the short, metal racks to elevate your heatproof plate in the wok or saucepan.  But the traditional way is to crisscross a pair of wooden chopsticks above steaming water.

Place some sliced ginger (about 1 inch) and scallions (about 4) in the cavity of the fish.  I don't think it's possible to overdo the scallions and ginger, which are only used as flavoring and will be discarded.  Place your fish on a plate, and position the plate on the chopsticks.  Cover and steam for 15 to 20 minutes, checking to ensure the water doesn't dry out.  Then drain the steaming water from the dish, and sprinkle some fresh scallions and ginger on top, which won't have turned limp and discolored from cooking.  Pour 2 tablespoons of soy sauce and 1 tablespoon of sesame oil on top.

Mom never did this part, not wanting to add unnecessary fat to food, but it's common to heat a few tablespoons of oil until it's crackling hot.  The effect is supposed to crisp the skin and brighten the vegetables, but I think you need a lot more oil for crispy skin.  Still, it's a nice sizzle.

Wednesday, August 19, 2009

Ming Tsai, and Backyard Veggies

No comments:


I've never been interested in putting my mug on this blog, but it's not every day I get a photo op with Ming Tsai! The renowned chef of Blue Ginger in Wellesley and Simply Ming on PBS came to support the opening of the Asian American Journalists Association Convention in Boston. He was a sweetheart, and there are hopes he'll be doing more with our group in the future!


On to the rest. No recipes in this posting, but I have been munching happily on homegrown tomatoes! Aren't they beautiful?


I love the sweetness of the grape variety, and they're perfect for just throwing in salads. And the basil plants are growing in the same pots like weeds. Tasty weeds . . .


Did you know eggplant plants grew flowers? I had no idea. Pretty purple ones.


And this guy is still small, and the only one on the plant. I wonder if it's ready for picking. Come to think of it, I don't think I bought the big variety. Now, what to make with it . . .

Thursday, October 30, 2008

Daring Bakers Challenge: Pizza!

6 comments:
Growing up in the Bensonhurst section of Brooklyn, N.Y., I was surrounded by Italians and, consequently, excellent pizza. Outside New York City, pizza wasn't always so good, but with this Daring Bakers challenge I've learned to make a darned good one in my oven! True, Joe the Residential Pizza Maker had made this exact one many times before, but I'd always been a spectator and consumer, never the maker. This time, I watched and learned and tossed dough.

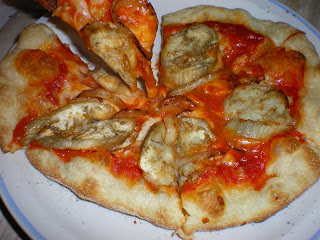
When it comes to pizza, I'm a less-is-more gal. Friends who know me as a meat lover may find it strange that I don't like meat on my pizza, but chicken or beef weighs it down. And I sure don't want servings of baked ziti on top, and I prefer the traditional sauce-and-mozzarella version. I like a topping of tomato slices with fresh basil, or my other favorite, which I made here -- Roasted Eggplant & Caramelized Onions. You may say you don't like eggplant (eggplant parmigiana seems to be everyone's exception), and I used to say that, too. But try eggplant roasted, slightly caramelized and well done, and it's nothing like that spongy, underdone stuff that restaurants sometimes serve up.

I roast a skinny Chinese eggplant (peeled, sliced, and tossed with olive oil, salt, and pepper) in a 300-degree oven for 15 minutes. I also caramelize some onions in a saute pan with a bit of olive oil, salt, and pepper until they're translucent and slightly brown at the edges. Toss them on top of your pizza before it goes into the oven.


From Peter Reinhart's The Bread Baker’s Apprentice
Makes 6 pizza crusts (about 9-12 inches/23-30 cm in diameter)
Ingredients:
4½ cups (20¼ ounces/607.5 g) unbleached high-gluten (14%) bread flour or all-purpose flour, chilled
1¾ tsp salt
1 tsp instant yeast
¼ cup (2 ounces/60g) olive oil (Optional, but it’s better with)
1¾ cups (14 ounces/420g or 420ml) water, ice cold (40° F/4.5° C)
1 tbs sugar
Semolina/durum flour or cornmeal for dusting
1. Mix together the flour, salt and instant yeast in a big bowl (or in the bowl of your stand mixer).
2. Add the oil, sugar, and cold water and mix well (with the help of a large wooden spoon or with the paddle attachment, on low speed) in order to form a sticky ball of dough. On a clean surface, knead for about 5-7 minutes, until the dough is smooth and the ingredients are homogeneously distributed. If it is too wet, add a little flour (not too much, though) and if it is too dry add 1 or 2 teaspoons extra water.
NOTE: If you are using an electric mixer, switch to the dough hook and mix on medium speed for the same amount of time.The dough should clear the sides of the bowl but stick to the bottom of the bowl. If the dough is too wet, sprinkle in a little more flour, so that it clears the sides. If, on the contrary, it clears the bottom of the bowl, dribble in a teaspoon or two of cold water.The finished dough should be springy, elastic, and sticky, not just tacky, and register 50°-55° F/10°-13° C.
3. Flour a work surface or counter. Line a jelly pan with baking paper/parchment. Lightly oil the paper.
4. With the help of a metal or plastic dough scraper, cut the dough into 6 equal pieces (or larger if you want to make larger pizzas).
NOTE: To avoid the dough from sticking to the scraper, dip the scraper into water between cuts.
5. Sprinkle some flour over the dough. Make sure your hands are dry and then flour them. Gently round each piece into a ball.
6. Transfer the dough balls to the lined jelly pan and mist them generously with spray oil. Slip the pan into plastic bag or enclose in plastic food wrap.
7. Put the pan into the refrigerator and let the dough rest overnight or for up to three days.
NOTE: You can store the dough balls in a zippered freezer bag if you want to save some of the dough for any future baking. In that case, pour some oil(a few tablespooons only) in a medium bowl and dip each dough ball into the oil, so that it is completely covered in oil. Then put each ball into a separate bag. Store the bags in the freezer for no longer than 3 months. The day before you plan to make pizza, remember to transfer the dough balls from the freezer to the refrigerator.
8. On the day you plan to eat pizza, exactly two hours before you make it, remove the desired number of dough balls from the refrigerator. Dust the counter with flour and spray lightly with oil. Place the dough balls on a floured surface and sprinkle them with flour. Dust your hands with flour and delicately press the dough into disks about ½ inch thick and 5 inches in diameter. Sprinkle with flour and mist with oil. Loosely cover the dough rounds with plastic wrap and then allow to rest for 2 hours.
9. At least 45 minutes before making the pizza, place a baking stone on the lower third of the oven. Preheat the oven as hot as possible (500° F).
10. Generously sprinkle the back of a jelly pan with semolina/durum flour or cornmeal. Flour your hands (palms, backs and knuckles). Take 1 piece of dough by lifting it with a pastry scraper. Lay the dough across your fists in a very delicate way and carefully stretch it by bouncing it in a circular motion on your hands, and by giving it a little stretch with each bounce. Once the dough has expanded outward, move to a full toss.
11. When the dough has the shape you want (about 9-12 inches/ in diameter for a 6 ounce piece of dough), place it on the back of the jelly pan, making sure there is enough semolina/durum flour or cornmeal to allow it to slide and not stick to the pan.
12. Lightly top it with sweet or savory toppings of your choice.
13. Slide the topped pizza onto the stone in the oven or bake directly on the jelly pan. Close the door and bake for 5-8 minutes.
14. Take the pizza out of the oven and transfer it to a cutting board or your plate. In order to allow the cheese to set a little, wait 3-5 minutes before slicing or serving.