Showing posts with label pizza. Show all posts

Friday, April 20, 2012

Cast Iron Skillet Pizza

12 comments:
Cast Iron Pizza 2

Have you ever heard of making pizza in a cast iron skillet?  We've owned a pizza stone for years, but when I saw this recipe I wanted to try it anyway.  I wanted to see how a skillet held up to a stone, and how storebought pizza dough compares to homemade.  Initially I waved away the idea of following the recipe by using storebought dough, but then I wondered what the quality of premade dough is like and if the convenience is worth it.

Cast Iron Pizza slice 2

You can buy premade pizza dough in the refrigerated section of your supermarket's bakery.  When I saw whole wheat dough along with plain, I decided to add another level to my experiment.  Both pizzas are made the same way, with a quick sauce from scratch, fresh mozzarella, and crumbled Italian sausage.  When they were done, I topped them with parsley and shavings of Parmesan.

Cast Iron Pizza slice

My verdicts:

1) Storebought dough is not as good as homemade dough, but it's not far off, and convenience counts for a lot.  Dough from scratch has to be made the night before, and there are resting periods in the refrigerator and at room temperature -- the storebought dough is ready to use when you bring it home.  The flavor of storebought is close to homemade, and the texture is a little doughier than homemade but not a deal-breaker.  If you want to go the from-scratch route anyway, I have only praise for Peter Reinhart's dough recipe.

2) I can't say the same for the whole wheat dough.  It rolled out nice and thin and didn't have the annoying elasticity of the plain dough, but I missed that elasticity and chew when eating the whole wheat crust.  It also had all the flavor of cardboard.

3) The cast iron skillet works great, producing a crust with a nicely crisped bottom.  If you have only a 10-inch skillet like me, a half-pound of pizza dough will work for this recipe or one pound will make two pizzas; scale down the other ingredients slightly as well.  If you're fighting kitchen clutter, you may opt for just your skillet instead of buying a pizza stone.

4) The pizza recipe is delicious as well.  I like the from-scratch sauce, and the small amount guarantees you won't have a soggy crust.  I like the use of fresh mozzarella, and even though it releases water after cooking the taste is superior.  I left out the arugula because I'm not a fan, but the parsley and Parmesan are nice.

If you've wanted to try making your own pizza, this is the easiest I've seen yet.

Monday, April 25, 2011

Easter Ham and Pineapple Pizza ... a.k.a. "The Debby"

5 comments:
Easter Ham and Pineapple Pizza

When my friend Debby and I were college roommates, we'd wake up hungry after the occasional (or semi-frequent?) night of too much drinking.  Debby would phone in a Hawaiian pizza for delivery.  A short time ago, she said I should create a dish for her on the blog, something salty and sweet.

Easter Ham and Pineapple Pizza

So this one's for Debby: on this Easter Sunday I skipped roasting a whole ham and made a Hawaiian pizza, which is topped with ham and pineapple.  I threw on some grape tomatoes for a quick roast on top because Debby loves tomatoes, and a few pepperoni strips for good measure.  Have a slice with some beer!

Easter Ham and Pineapple Pizza

The dough recipe makes 6 small pizzas.  Not feeding a frat party?  Throw some dough balls in the freezer for when the next craving hits.  That's 4 pizzas in the making in my freezer.

Friday, February 12, 2010

Fish Steamed Chinese-Style

1 comment:
Steaming is such a healthy and fast way to cook.  This delicate fish was flavored by ginger, scallions, and soy sauce.  I've lagged on posting so much I don't even remember what kind of a fish this was. My guess is some kind of snapper or bass, but I do remember it was delicious, just like Mom used to make. Although I haven't been posting, I haven't been idle either!

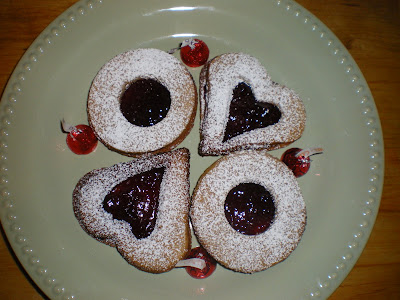
I baked these to make up for the lost linzer cookies around December.  I know I said I bake them only once a year, but Sis never got them for our birthday/Christmas.  So now they're Valentine's cookies!

I also cooked up a sauce from San Marzano tomatoes and discovered why they cost about $5 a can.  The taste really is complex and sweet, but at that price I soon went back to ho-hum tomatoes.

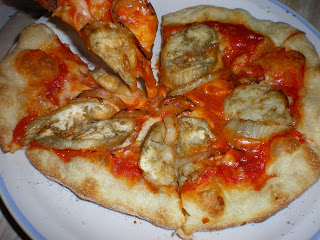
And I made pizza topped with eggplant and sundried tomatoes.  Okay, so maybe Joe did all the work, but I cooked and assembled my own topping.  And got stuck with kitchen cleanup.  But back to the fish...

HELLO!!!  Don't be afraid because he still has a head.  If that turns you off, don't go shopping with my mom.  She once asked if I wanted fish for dinner, then took me to the corner market and bought one from the tank.  I knew what was going to happen, but the sight of the fish flopping around while the man decapitated it almost ruined my appetite.  Do make sure it's been scaled and gutted.

So here's how you steam.  You can use one of the short, metal racks to elevate your heatproof plate in the wok or saucepan.  But the traditional way is to crisscross a pair of wooden chopsticks above steaming water.

Place some sliced ginger (about 1 inch) and scallions (about 4) in the cavity of the fish.  I don't think it's possible to overdo the scallions and ginger, which are only used as flavoring and will be discarded.  Place your fish on a plate, and position the plate on the chopsticks.  Cover and steam for 15 to 20 minutes, checking to ensure the water doesn't dry out.  Then drain the steaming water from the dish, and sprinkle some fresh scallions and ginger on top, which won't have turned limp and discolored from cooking.  Pour 2 tablespoons of soy sauce and 1 tablespoon of sesame oil on top.

Mom never did this part, not wanting to add unnecessary fat to food, but it's common to heat a few tablespoons of oil until it's crackling hot.  The effect is supposed to crisp the skin and brighten the vegetables, but I think you need a lot more oil for crispy skin.  Still, it's a nice sizzle.

Thursday, October 30, 2008

Daring Bakers Challenge: Pizza!

6 comments:
Growing up in the Bensonhurst section of Brooklyn, N.Y., I was surrounded by Italians and, consequently, excellent pizza. Outside New York City, pizza wasn't always so good, but with this Daring Bakers challenge I've learned to make a darned good one in my oven! True, Joe the Residential Pizza Maker had made this exact one many times before, but I'd always been a spectator and consumer, never the maker. This time, I watched and learned and tossed dough.

When it comes to pizza, I'm a less-is-more gal. Friends who know me as a meat lover may find it strange that I don't like meat on my pizza, but chicken or beef weighs it down. And I sure don't want servings of baked ziti on top, and I prefer the traditional sauce-and-mozzarella version. I like a topping of tomato slices with fresh basil, or my other favorite, which I made here -- Roasted Eggplant & Caramelized Onions. You may say you don't like eggplant (eggplant parmigiana seems to be everyone's exception), and I used to say that, too. But try eggplant roasted, slightly caramelized and well done, and it's nothing like that spongy, underdone stuff that restaurants sometimes serve up.

I roast a skinny Chinese eggplant (peeled, sliced, and tossed with olive oil, salt, and pepper) in a 300-degree oven for 15 minutes. I also caramelize some onions in a saute pan with a bit of olive oil, salt, and pepper until they're translucent and slightly brown at the edges. Toss them on top of your pizza before it goes into the oven.


From Peter Reinhart's The Bread Baker’s Apprentice
Makes 6 pizza crusts (about 9-12 inches/23-30 cm in diameter)
Ingredients:
4½ cups (20¼ ounces/607.5 g) unbleached high-gluten (14%) bread flour or all-purpose flour, chilled
1¾ tsp salt
1 tsp instant yeast
¼ cup (2 ounces/60g) olive oil (Optional, but it’s better with)
1¾ cups (14 ounces/420g or 420ml) water, ice cold (40° F/4.5° C)
1 tbs sugar
Semolina/durum flour or cornmeal for dusting
1. Mix together the flour, salt and instant yeast in a big bowl (or in the bowl of your stand mixer).
2. Add the oil, sugar, and cold water and mix well (with the help of a large wooden spoon or with the paddle attachment, on low speed) in order to form a sticky ball of dough. On a clean surface, knead for about 5-7 minutes, until the dough is smooth and the ingredients are homogeneously distributed. If it is too wet, add a little flour (not too much, though) and if it is too dry add 1 or 2 teaspoons extra water.
NOTE: If you are using an electric mixer, switch to the dough hook and mix on medium speed for the same amount of time.The dough should clear the sides of the bowl but stick to the bottom of the bowl. If the dough is too wet, sprinkle in a little more flour, so that it clears the sides. If, on the contrary, it clears the bottom of the bowl, dribble in a teaspoon or two of cold water.The finished dough should be springy, elastic, and sticky, not just tacky, and register 50°-55° F/10°-13° C.
3. Flour a work surface or counter. Line a jelly pan with baking paper/parchment. Lightly oil the paper.
4. With the help of a metal or plastic dough scraper, cut the dough into 6 equal pieces (or larger if you want to make larger pizzas).
NOTE: To avoid the dough from sticking to the scraper, dip the scraper into water between cuts.
5. Sprinkle some flour over the dough. Make sure your hands are dry and then flour them. Gently round each piece into a ball.
6. Transfer the dough balls to the lined jelly pan and mist them generously with spray oil. Slip the pan into plastic bag or enclose in plastic food wrap.
7. Put the pan into the refrigerator and let the dough rest overnight or for up to three days.
NOTE: You can store the dough balls in a zippered freezer bag if you want to save some of the dough for any future baking. In that case, pour some oil(a few tablespooons only) in a medium bowl and dip each dough ball into the oil, so that it is completely covered in oil. Then put each ball into a separate bag. Store the bags in the freezer for no longer than 3 months. The day before you plan to make pizza, remember to transfer the dough balls from the freezer to the refrigerator.
8. On the day you plan to eat pizza, exactly two hours before you make it, remove the desired number of dough balls from the refrigerator. Dust the counter with flour and spray lightly with oil. Place the dough balls on a floured surface and sprinkle them with flour. Dust your hands with flour and delicately press the dough into disks about ½ inch thick and 5 inches in diameter. Sprinkle with flour and mist with oil. Loosely cover the dough rounds with plastic wrap and then allow to rest for 2 hours.
9. At least 45 minutes before making the pizza, place a baking stone on the lower third of the oven. Preheat the oven as hot as possible (500° F).
10. Generously sprinkle the back of a jelly pan with semolina/durum flour or cornmeal. Flour your hands (palms, backs and knuckles). Take 1 piece of dough by lifting it with a pastry scraper. Lay the dough across your fists in a very delicate way and carefully stretch it by bouncing it in a circular motion on your hands, and by giving it a little stretch with each bounce. Once the dough has expanded outward, move to a full toss.
11. When the dough has the shape you want (about 9-12 inches/ in diameter for a 6 ounce piece of dough), place it on the back of the jelly pan, making sure there is enough semolina/durum flour or cornmeal to allow it to slide and not stick to the pan.
12. Lightly top it with sweet or savory toppings of your choice.
13. Slide the topped pizza onto the stone in the oven or bake directly on the jelly pan. Close the door and bake for 5-8 minutes.
14. Take the pizza out of the oven and transfer it to a cutting board or your plate. In order to allow the cheese to set a little, wait 3-5 minutes before slicing or serving.