Saturday, August 30, 2008

Strawberry Scoops

No comments:
I made this earlier last week, when my college friend came to visit with her husband and kids. The looks on the girls' faces when I said I made them ice cream was adorable, and I let the older one turn on the machine and attach the paddle. Now my friend is all psyched to buy her own ice cream machine!

Strawberry Ice Cream from The Ultimate Ice Cream Book
3 cups strawberries (I used frozen strawberries without syrup, thawed)
1/4 tsp salt
1/3 cup sugar
2 large eggs
1 1/2 cups half-and half
1/2 cup heavy cream
1 tsp vanilla extract

Puree the strawberries with the salt in a food processor. There should be about 2 cups of puree. In a medium mixing bowl, beat the sugar into the eggs until thickened and pale yellow.
Bring the half-and-half to a simmer in a heavy medium saucepan. Slowly beat the hot half-and-half into the eggs and sugar. Pour the entire mixture back into the pan and place over low heat. Stir constantly with a wooden spoon until the custard thickens slightly. Be careful not to let the mixture boil or the eggs will scramble. Remove from heat and pour through a strainer into a large, clean bowl. Cool slightly, then stir in the puree, cream, and vanilla. Refrigerate overnight.
Freeze in your ice cream machine according to the manufacturer's instructions.

Red Velvet Cupcakes

2 comments:
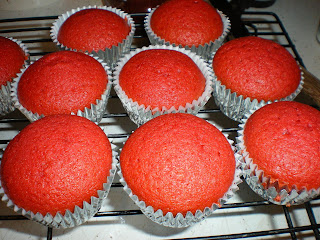
I made these for our summer intern's goodbye party, as a tribute to her southern roots. Paula Deen's recipe looked popular online, but I took note of comments about the recipe being too oily and the funny undertaste of food coloring and made adjustments. Actually, the latter adjustment was involuntary -- I had only a half-bottle of red food coloring, about half a tablespoon (a quarter of what the recipe called for), and the batter still came out scarlet, like a pretty nail polish, as you can see here.

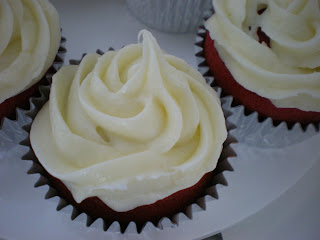
It effectively tastes like yellow cake, and I used my own cream cheese frosting recipe, which goes on all my carrot cakes and pumpkin squares. They made a great first impression on my coworkers, but some of them asked, "What's in them?" Doesn't everyone know what red velvet cake is? A couple even wrinkled their faces and walked off when I joked, "red food coloring," but they generally got great reviews.

RED VELVET CUPCAKES (Adapted from Paula Deen's)
2 1/2 cups cake flour
1 1/4 cups sugar
1 tsp baking soda
1 tsp salt
1 tsp cocoa powder
1 1/4 cups vegetable oil
1 cup buttermilk, well-shaken
2 large eggs, room temperature
1/2 tbs red food coloring
1 tsp white distilled vinegar
1 tsp vanilla extract

Preheat the oven to 350 degrees.
In a medium mixing bowl, stir together the flour, sugar, baking soda, salt, and cocoa powder. In a large bowl, lightly beat together the oil, buttermilk, eggs, food coloring, vinegar, and vanilla extract with an electric mixer. Stir in the dry ingredients.
Fill the cupcake tins about 2/3 full, and bake 20 to 22 minutes. Turn the pans around halfway through baking. Remove from oven and cool completely before frosting. Makes 24 cupcakes.


Cream Cheese Frosting
8 oz. cream cheese, at room temperature
1 stick unsalted butter, at room temperature
1 cup confectioners sugar
1 tsp vanilla extract

Beat the cream cheese and butter together on high, and then mix in the confectioners sugar and vanilla extract on low. Frost cupcakes with an offset spatula or piping bag fitted with a star tip. Or snip the corner off a Ziploc bag to make a makeshift piping bag.

Wednesday, August 20, 2008

My Favorite Use for Garden Tomatoes: Crostini

1 comment:
I once told a friend who says she can't cook how easy these are to make, and she replied, "But it requires a heating element." Come on, anyone can toast bread, right? That's all the cooking required!

My tomatoes only started ripening around the second week of August, probably due to the lack of sunshine with the nonstop storms we've had. My basil plant, on the other hand, is about 2 feet tall! And both are required for one of my favorite summertime snacks. The other must is fresh mozzarella -- the soft, creamy kind that's packed or stored in water. Don't buy the cheaper, rubbery variety at the store. That stuff is fine for melting and disguising behind other ingredients, but with something this fresh you need the good cheese.

Some people will want to toss it back in the oven to cook the tomatoes a bit and melt the cheese, but I like the summery freshness of it my way.

1 baguette
3-4 plum tomatoes, sliced
1 ball fresh mozzarella cheese, sliced
5-7 fresh basil leaves
Olive oil

Preheat your oven to 350 degrees. Slice the baguette into thin pieces and rub a bit of olive oil on them. Toast the bread on a baking sheet for about 20 minutes, until the bread is golden brown. You can also just throw them in your toaster oven, but that tends to brown just the outside instead of toasting the bread thoroughly for a nicer crunch.
After that, it's easy assembly. Top each piece of bread with a slice of mozzarella (the cheese acts as a nice barrier for the bread against the wetness of the tomato). Then top them each with a slice of tomato (and plum tomatoes are better because they have less water, leading to less sogginess). Slice your basil leaves into thin strips and scatter them over the tomatoes. Follow with dashes of salt and pepper. That's it!

These work great as party appetizers. You can also lay the ingredients out like I did above, but in larger quantities, and let guests assemble the finger food themselves.

Wednesday, August 6, 2008

Tea in Boston & NYC

No comments:

I had afternoon tea with a few friends today, but I stopped at Whittard of Chelsea at Faneuil Hall first, and look what I got! They were 50% off, and so pretty! My heart also stopped at a set that featured cats, but the fine bone china looked too delicate for me to be comfortable using.


So we went to the Boston Langham hotel, and I snapped a pic of my plate with my cellphone like a tourist. My friends thought it would be funny to include an "after" shot, after I demolished my little finger sandwiches and pastries. Doesn't it look like a work of art (that is, the "before" shot)? I had smoked salmon (from top left down), ham mousse (better than it sounds), and cucumber sandwiches; scones, banana bread, and some walnut-y tea bread; and Boston cream pie (which, if you don't know, is actually a cake), a chocolate-covered strawberry, a macaroon, and a tasty madeleine. I washed it all down with cups of Assam. My favorite place is still the Taj, but they have the nerve not to serve on weekdays anymore! Still, this was, as my friend Bill put it, "pretty damn good."
Update:
I went to New York later that week to throw a bridal shower and visit my folks, and I had tea with my mom (she wanted to try it, too) at Lady Mendl's in Manhattan. Sorry, but no pictures! It looked like too much of a classy place (the type where waiters invade your personal space by putting your napkin on your lap for you... hate that) to be clicking pictures with my cell, so I chickened out. But I can describe!
It's located in an inn where an actress used to live, and the interior decor is beautiful 1920s New York style, with lots of beautiful wood paneling and candles. Tea there isn't served on a three-tier stand or square plate, but in five courses (and you can ask for seconds!). First course is a salad, followed by a second course of finger sandwiches. Those included cucumber; turkey with cranberry; smoked salmon; and sundried tomato and goat cheese. Third course consisted of scrumptious scones with Devonshire cream. For fourth course, you get a choice of a slice of chocolate mousse cake or a layered crepes with vanilla cream cake, both served with fresh berries. My mom picked the chocolate mousse cake and devoured it, and I thought the layered crepes cake was a bit squidgy and only OK. We couldn't really eat anymore, but there was a fifth course of chocolate-covered strawberries with petit fours and some poppyseed cookie I wasn't crazy about. Much was left on our plates. My darjeeling was tasty, and my mom chose a great oolong with mild floral notes. The whole experience was pretty good, and cost $35 per person. Worth checking out!

Wednesday, July 23, 2008

Cheese Ravioli from Scratch

2 comments:
Joe's the pasta-maker in our house (and pizza, and bread most of the time). But I'm good at filling and cutting the ravioli. We make a great team! These are tasty on a bed of sauce with more Parmesan grated on top while the ravioli are still hot so the cheese melts just slightly.

What we used for the filling:
1/3 cup ricotta
1/3 cup shredded mozzarella
1/4 cup grated Parmesan
3 tbs. dried oregano (fresh, if you have it)
2 tbs. dried basil (ditto)
1 tbs. salt
1 tbs. black pepper
Stir together and set aside. Play with the filling, adding other cheeses, herbs, or seasonings.


Joe's pasta ingredient list is simple:
3/4 cup semolina
1/4 cup all-purpose flour
1 tbs olive oil
1 tbs water (more, if needed)

He whizzes them all together in a food processor (knead by hand if you don't have one) just until the dough comes together in a ball. The dough shouldn't be sticky, and if the sides are frayed when you're cranking it out, your dough is probably too dry. He then divides the dough in half and flattens each half into a rectangle.


Then he folds the dough in thirds like a letter, as pictured, and runs it through the pasta machine. (Why he prefers a hand crank instead of a stand mixer attachment, I don't know.) Run the dough through the crank starting on setting 1, and each time gradually work your way up to setting 7.

The dough will be thin like this.

My rolling mat is great because it has a grid and measurements in inches and centimeters. Cut your dough (my pastry cutter makes these pretty scalloped edges) into long strips. Throw some flour under the strips to keep them from sticking to your mat.

Scoop 1/2 tsp of filling in the center of each square (mine were about 2 square inches each), taking care not to overfill them. Lay another strip on top.

Using a wooden bamoo skewer, go between the lumps of filling, and press down and roll around to push out the air and seal the pasta.

Do the same at the top and bottom, pressing down and rolling in toward the filling and back out to the edge.

Cut up your squares. You can also use a round cookie cutter to make circular ravioli instead.


Boil them for 3 to 4 minutes, and fish them out with a strainer. They'll float to the top. Happy eatins'!

Sunday, July 20, 2008

Lattice-top Cherry Pie

2 comments:

It's not hard to do. Really! I'll even show you how to weave the lattice.


After you roll out your bottom crust and tuck it into your pie plate, roll out your top crust (the instructions say to roll it to a 12x10-inch rectangle, but I could never roll out a perfect rectangle; could you?) and cut it into eight strips with your pastry wheel or a knife. I didn't bother measuring, hence the uneven strips. Use the long strips for the center of your pie, and the shorter strips for the sides. Lay five of them vertically across your pie plate.

Then fold down strips 2 and 4, and lay another strip horizontally across the middle. Fold strips 2 and 4 back up. Then fold down strips 1, 3, and 5, and lay another strip horizontally across the top of the pie.


Next, fold up strips 1, 3, and 5, and lay the last strip horizontally across the bottom of the pie. Fold the strips back down, and trim off any overhang with a small knife. You're done!


Final tips: Wear an apron or old shirt when you're pitting those cherries, unless you don't mind red stains on your shirt. I also used regular cherries I found at the supermarket, instead of hunting for sour cherries as the recipe calls for. Still tastes good!


From Ken Haedrich's Pie: 300 Tried-and-True Recipes for Delicious Homemade Pie
Lattice-Top Deep-Dish Sour Cherry Pie
All-Butter Pie Pastry, Double Crust (recipe follows)

For the filling
6 cups fresh sour cherries, stemmed and pitted
1 1/4 cups plus 3 tbs sugar
1/4 cup cornstarch
2 tsp fresh lemon juice
Grated zest of 1 lemon
2 tbs cold, unsalted butter, cut into small pieces

For the glaze
Milk or light cream
Sugar

  • Prepare the pastry as directed, making half of it just slightly larger than the other. Shape the larger half into a disk and the other half into a square. Wrap the pastry as usual and refrigerate until firm enough to roll, about 1 hour.
  • Roll the disk of pastry into a 13 1/2-inch circle with a floured rolling pin. Gently tuck the pastry into a 9 1/2-inch deep-dish pie pan without stretching it, and sculpt the overhang into an upstanding ridge. Place in the refrigerator for 15 minutes.
  • Place the cherries in a large bowl. Mix the sugar and cornstarch together in a small bowl, then stir the mixture into the fruit. Stir in the lemon juice and zest. Set aside for 10 minutes to juice. Preheat the oven to 400 degrees.
  • Roll the remaining pastry into a 12x10-inch rectangle. With a pastry wheel or pizza cutter, cut the pastry into 8 lengthwise strips, each 1 1/4 inches wide. You should have 8 strips measuring 12 inches long and 1 1/4 inches wide. Set aside.
  • Turn the filling into the chilled pie shell, moistening the rim of the shell slightly. Smooth the top of the filling with a spoon or spatula. Dot the filling with the butter. Then follow the instructions at the top of my post for weaving the lattice. Trim the strips, then pinch the end of the strips into the edge of the pastry. Lightly brush the pastry strips with milk and sprinkle the top of the pie with sugar.
  • Place the pie on the center oven rack and bake for 30 minutes. Reduce the oven temperature to 375 degrees and rotate the pie 180 degrees, so that the part that faced the back of the oven now faces forward. Just in case, slide a large aluminum foil-lined baking sheet onto the rack below to catch any spills. (Really do this! The boiling-over is almost inevitable. In fact, do it when you first put the pie in.) Continue to bake until the top is golden brown and any visible juices bubble thickly, 35 to 40 minutes. Transfer the pie to a wire rack and let cool for at least 2 hours before serving.

All-Butter Pie Pastry (double crust)
2 3/4 cups all-purpose flour
1 tbs sugar
1 tsp salt
1 cup (2 sticks) cold, unsalted butter, cut into small pieces
About 1/2 cup cold water

  • Put the flour, sugar, and salt in a food processor. Pulse several times to mix. Scatter the butter over the dry ingredients and pulse 7 or 8 times to cut the butter in well. Remove the lid and fluff the mixture with a fork, lifting it up from the bottom of the bowl. Drizzle half of the water over the dry ingredients. Pulse 5 or 6 times, until the mixture is crumbly. Fluff the pastry and sprinkle on the remaining water. Pulse 5 or 6 times more, until the pastry starts to form clumps. It will look like coarse crumbs. Empty into a large bowl. (If you don't have a food processor, roughly follow the same instructions using your pastry cutter.)
  • Test the dough by squeezing some of it between your fingers; if it seems a little dry and not quite packable, drizzle a teaspoon or so of cold water over the dough and work it in with your fingertips. Using your hands, pack the dough into 2 balls, as you would pack a snowball. Knead each ball once or twice, then shape into a circle and a square and refrigerate for at least an hour or overnight before rolling.


I used the leftover dough and set aside some of the cherry filling to make this personal-sized cherry tart.

Saturday, July 5, 2008

Back to Baking: Buttermilk Biscuits

No comments:


So the weather cooled down a bit today, and I was eager to use my oven again. I've been grilling outside and using my ice cream maker to make more frozen yogurt, but avoiding baking because the heat just gets unbearable. This recipe is from Rose Levy Berenbaum, and I used the more reliable weight measurements.


WeightVolumeIngredients
3 oz6 tbscold, unsalted butter
6.5 oz1 1/4 cupsBleached all-purpose flour
2.3 oz2/3 cupCake flour
.5 oz1 tbsBaking powder
1 tspSalt
1.3 oz3 tbsSugar
1.3 oz2 Large eggs, hard-cooked, yolks only
6.3 oz3/4 cupButtermilk or heavy cream (I used buttermilk)


You'll need a baking sheet plus a cushioned baking sheet OR 2 baking sheets, one on top of the other, lined with Silpat or parchment. You'll also need a baking stone (like a pizza stone) or a baking sheet.

Cut the butter and chill it. Place the oven rack at the middle level and put the stone or baking sheet on it. Preheat the oven to 400 degrees.

In a large bowl, whisk together the flour, baking powder, salt, and sugar. If White Lily self-rising flour is sold in your area, you can use 10 oz OR 2 cups of that, and omit the flours, baking powder, and salt in the chart above. Add the butter, and use your fingertips to press it into the flour until you get pieces that resemble coarse meal. Press the egg yolk through a fine strainer into the flour mixture, and whisk to distribute them evenly. Stir in the buttermilk, just until the flour is moistened and the dough starts to come together. Knead it on a lightly floured counter, and roll it 3/4 inch thick.

Dip a 2 1/2-inch round biscuit cutter or cookie cutter into a dish of flour before each cut (helps it not stick) and cut through the dough, lifting without twisting for maximum rise. Knead any leftover dough scraps and roll them out, repeating the process until you've used them all up. Place them an inch apart.

Place your baking sheet(s) on the hot baking stone or baking sheet, raise the temperature to 400 degrees, and bake for 5 minutes. Then lower the temperature to 375 degrees and bake 10 to 15 minutes more or until golden (an instant-read thermometer inserted in the center should say 200 degrees). The recipe yielded 12 biscuits for me.

I have to confess I used my food processor to make the dough up to this point, instead of a pastry cutter or mushing anything by hand. It's just faster, and I whizzed the hard-boiled yolks in the food processor, too. Don't they look like lemon zest?


The recipe doesn't call for it, but I snipped in some chives from my herb box for half the biscuits. Why not?

For the other half, I mixed together a teaspoon of paprika with a dash of cayenne pepper, and kneaded some of that mixture into the dough, and use the remainder of the mixture to sprinkle on the tops.


It helps to cut your biscuits real close to each other, to minimize the necessity of re-rolling the dough.