Tuesday, September 30, 2008

Homemade Fried Chicken

2 comments:

Sometimes you just get the craving for fried chicken, and not the drive-through kind. After doing some reading on the subject matter, I threw together a simple enough flour mixture, though I admit there was a second try for some tweaking. Serve it with some mashed potatoes or biscuits, and one obligatory healthy side, and you're in heaven.

One other note: a thermometer is necessary. It takes longer than you'd think to get the oil up to temperature, and the oil needs to be hot enough and the chicken cooked long enough to get the perfect browning outside and doneness inside. A candy thermometer works great for this. I also have a deep fryer, but I find I like my enameled cast iron dutch oven better.

  • About 9 chicken thighs, wings, and drumsticks
  • 1 cup buttermilk or 1 egg plus 1 cup milk
  • 1 cup all-purpose flour
  • 1 tbs baking powder
  • 1 tsp salt
  • 1 tsp black pepper
  • ½ tsp ground cayenne pepper
  • Enough oil to fill half of a large dutch oven
  1. Start heating your oil to 360º (the temperature will drop to about 350º when you add the chicken, which is where you want to keep the temp). It may take more than 10 minutes to heat up.
  2. Trim the skin off the drumsticks and thighs, if you'd like. Place all the chicken in a bowl filled with the buttermilk, or the egg and milk. In a shallow bowl, stir together the flour, baking powder, salt, and peppers. Dredge the chicken pieces through the flour mixture and set aside.
  3. When the oil comes to temperature, add your chicken pieces. Don't overcrowd the pot or they won't cook evenly; 4-5 pieces at a time is best. Cook the chicken for about 13 minutes, turning the pieces halfway through the cooking time with a handheld brass strainer like the one in the picture. The chicken should be about the color in the photo. Drain the chicken on paper towels and pat dry, and serve.

Wednesday, September 24, 2008

French Yogurt Cake with Toasted Almonds


I made this recently for my friend Jill's birthday. I know she doesn't like a big fuss, so a simple french yogurt cake seemed perfect. I dressed it up a bit with almond cream and toasted almonds. The birthday girl says she loved it!

Adapted from Dorie Greenspan's French Yogurt Cake
  • 1 cup all-purpose flour
  • ½ cup ground almonds (or, if you'd prefer, omit these and use another ½ cup of all-purpose flour)
  • 2 tsp baking powder
  • Pinch of salt
  • 1 cup sugar
  • Grated zest of 1 lemon
  • ½ cup plain yogurt *low-fat will work*
  • 3 large eggs
  • ¼ tsp pure vanilla extract
  • ½ cup flavorless oil, such as canola or safflower
  1. Center a rack in the oven and preheat the oven to 350º. Grease an 8½ x 4½ inch loaf pan and place it on a baking sheet. * I used a 9-inch springform pan for a taller, traditional-looking cake*
  2. Whisk together the flour, ground almonds (if you're using them), baking powder, and salt.
  3. Put the sugar and zest in a mixing bowl, and with your fingertips, rub the zest into the sugar until the sugar is moist and aromatic. Add the yogurt, eggs, and vanilla and blend well. Add the dry ingredients, then fold in the oil. You'll have a thick, smooth batter with a slight sheen. Scrape the batter into the pan and smooth the top.
  4. Bake for 50 to 55 minutes, or until the cake begins to pull away from the sides of the pan; it should be golden brown and a thin knife inserted into the center will come out clean. Transfer the pan to a rack and cool for 5 minutes, then run a blunt knife between the cake and the sides of the pan. Unmold, and cool to room temperature right side up on the rack.
*I then spread the almond cream on the top, followed by a sprinkling of the almonds, but you can try other combinations. It's also delicious served plain.*

Martha Stewart's Almond Cream
*You may want to double this recipe*
  • 4 tbs butter, room temperature
  • ¼ cup sugar
  • 1 large egg *If you don't want to use a raw egg, try 2 tsp mayonnaise*
  • ½ cup whole blanched almonds, finely ground in the food processor
  • ¼ cup all purpose flour
  • ¼ tsp pure almond extract

In the bowl of an electric mixer fitted with the paddle attachment, beat the butter and sugar on medium-high speed until light and fluffy, about 2 minutes. Beat in the egg. Add the ground almonds and flour, and beat until combined. Stir in the almond extract and salt. Continue beating until the mixture is light and fluffy, about 2 minutes, scraping down the sides of the bowl as needed. The almond cream can be refrigerated in an airtight container for up to 1 week.

Toasting the almonds

Pour 1 cup of slivered, blanched almonds into a dry nonstick pan and shake the pan every few minutes, until lightly toasted and aromatic. Or spread 1 cup of slivered, blanched almonds in a single layer on a baking sheet and toast lightly in a 200º preheated oven for 20 minutes.

Tuesday, September 9, 2008

Worth Their Weight in Gold: Financiers

No comments:

I'd been wanting to add financiers to my repertoire for a while, and Aisha from A Piece of Cake told me about this recipe for Raspberry Financiers.


I only had one tray of the mini-muffin molds the recipe calls for, and didn't want that single tiny tray baking by itself for 30 minutes, so I also used 10 tartlet molds measuring 1¾ inches across and ½ inch deep, and they worked well (same amount of time in the oven). If you have rectangular molds, you can bake them in their traditional shape resembling gold ingots. They are tasty, and perfect for teatime!


Little Next Door's Raspberry Financiers

Total time: 1 hour, 10 minutes plus chilling time for the dough
Servings: Makes 2½ dozen
  • 4 egg whites
  • 1¼ cups powdered sugar
  • 11 tablespoons butter
  • ½ cup flour
  • ½ cup almond flour (I just ground up blanched almonds very fine in a food processor)
  • ½ pint fresh raspberries
  1. Combine the egg whites and sugar in a medium bowl. Place the bowl over a similar-sized saucepan to form a bain-marie or double-boiler filled with gently simmering water. Stir the egg whites and sugar with a whisk just until the whites warm slightly and the sugar dissolves. Remove from the heat and set aside.
  2. In a small saucepan, cook the butter over medium heat until it begins to brown and gives off a nutty aroma. Remove from the heat to prevent the butter from overcooking. Set aside, but keep very warm.
  3. In a large bowl using a hand mixer, or in the bowl of a stand mixer, begin whisking the egg white mixture at low speed. With the mixer running, gently add the flour, followed by the almond flour, and mix just to combine. Add in the warm butter in a thin stream, mixing at low speed until it is incorporated. Scrape the sides and bottom of the bowl, and continue to mix 10 seconds more to ensure the batter is completely combined. Cover and refrigerate for at least 1 hour, preferably overnight.
  4. Heat the oven to 325º. Spray or butter a tray of miniature muffin molds (our molds measured 1¾ inches wide by ½ inch deep). Fill the molds two-thirds full with batter, and place a fresh raspberry on top of each. Place the tray in the oven and bake 30 to 40 minutes, until golden. Remove and cool on a wire rack. Repeat with the remaining batter.

Sunday, August 31, 2008

Daring Bakers Challenge: Eclairs

17 comments:

My first Daring Bakers challenge! I just couldn't get them to look pretty, but let me tell you, they were tasty! Since we're a household of two, I brought most of the eclairs in to work earlier this month, and the reactions were funny. "You can make eclairs?" Some people thought they were made only in factories. They disappeared quickly, in any case. I had troubles in the beginning with eclairs that fell flat, since the instructions on sticking the spoon in the oven were confusing, but I got them to puff up all right.
I initially made both vanilla and chocolate pastry creams, since I thought that with the glaze it would be chocolate overload. But I wound up stirring melted chocolate into the vanilla cream after I tasted how divine the chocolate was. I also made the labor-intensive glaze on the first try, but swapped it out on Take 2 for a simple ganache (equal parts hot cream and bittersweet chocolate with a couple pats of butter). Now I just have to jog a million miles to work all those calories off!

Saturday, August 30, 2008

Strawberry Scoops

No comments:
I made this earlier last week, when my college friend came to visit with her husband and kids. The looks on the girls' faces when I said I made them ice cream was adorable, and I let the older one turn on the machine and attach the paddle. Now my friend is all psyched to buy her own ice cream machine!

Strawberry Ice Cream from The Ultimate Ice Cream Book
3 cups strawberries (I used frozen strawberries without syrup, thawed)
1/4 tsp salt
1/3 cup sugar
2 large eggs
1 1/2 cups half-and half
1/2 cup heavy cream
1 tsp vanilla extract

Puree the strawberries with the salt in a food processor. There should be about 2 cups of puree. In a medium mixing bowl, beat the sugar into the eggs until thickened and pale yellow.
Bring the half-and-half to a simmer in a heavy medium saucepan. Slowly beat the hot half-and-half into the eggs and sugar. Pour the entire mixture back into the pan and place over low heat. Stir constantly with a wooden spoon until the custard thickens slightly. Be careful not to let the mixture boil or the eggs will scramble. Remove from heat and pour through a strainer into a large, clean bowl. Cool slightly, then stir in the puree, cream, and vanilla. Refrigerate overnight.
Freeze in your ice cream machine according to the manufacturer's instructions.

Red Velvet Cupcakes

2 comments:
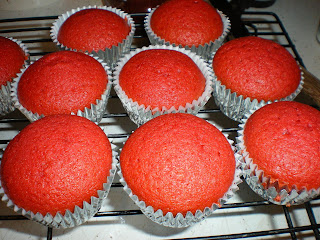
I made these for our summer intern's goodbye party, as a tribute to her southern roots. Paula Deen's recipe looked popular online, but I took note of comments about the recipe being too oily and the funny undertaste of food coloring and made adjustments. Actually, the latter adjustment was involuntary -- I had only a half-bottle of red food coloring, about half a tablespoon (a quarter of what the recipe called for), and the batter still came out scarlet, like a pretty nail polish, as you can see here.

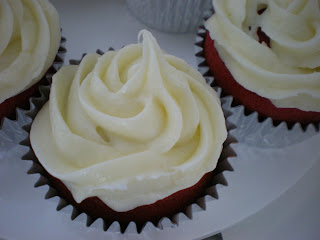
It effectively tastes like yellow cake, and I used my own cream cheese frosting recipe, which goes on all my carrot cakes and pumpkin squares. They made a great first impression on my coworkers, but some of them asked, "What's in them?" Doesn't everyone know what red velvet cake is? A couple even wrinkled their faces and walked off when I joked, "red food coloring," but they generally got great reviews.

RED VELVET CUPCAKES (Adapted from Paula Deen's)
2 1/2 cups cake flour
1 1/4 cups sugar
1 tsp baking soda
1 tsp salt
1 tsp cocoa powder
1 1/4 cups vegetable oil
1 cup buttermilk, well-shaken
2 large eggs, room temperature
1/2 tbs red food coloring
1 tsp white distilled vinegar
1 tsp vanilla extract

Preheat the oven to 350 degrees.
In a medium mixing bowl, stir together the flour, sugar, baking soda, salt, and cocoa powder. In a large bowl, lightly beat together the oil, buttermilk, eggs, food coloring, vinegar, and vanilla extract with an electric mixer. Stir in the dry ingredients.
Fill the cupcake tins about 2/3 full, and bake 20 to 22 minutes. Turn the pans around halfway through baking. Remove from oven and cool completely before frosting. Makes 24 cupcakes.


Cream Cheese Frosting
8 oz. cream cheese, at room temperature
1 stick unsalted butter, at room temperature
1 cup confectioners sugar
1 tsp vanilla extract

Beat the cream cheese and butter together on high, and then mix in the confectioners sugar and vanilla extract on low. Frost cupcakes with an offset spatula or piping bag fitted with a star tip. Or snip the corner off a Ziploc bag to make a makeshift piping bag.

Wednesday, August 20, 2008

My Favorite Use for Garden Tomatoes: Crostini

1 comment:
I once told a friend who says she can't cook how easy these are to make, and she replied, "But it requires a heating element." Come on, anyone can toast bread, right? That's all the cooking required!

My tomatoes only started ripening around the second week of August, probably due to the lack of sunshine with the nonstop storms we've had. My basil plant, on the other hand, is about 2 feet tall! And both are required for one of my favorite summertime snacks. The other must is fresh mozzarella -- the soft, creamy kind that's packed or stored in water. Don't buy the cheaper, rubbery variety at the store. That stuff is fine for melting and disguising behind other ingredients, but with something this fresh you need the good cheese.

Some people will want to toss it back in the oven to cook the tomatoes a bit and melt the cheese, but I like the summery freshness of it my way.

1 baguette
3-4 plum tomatoes, sliced
1 ball fresh mozzarella cheese, sliced
5-7 fresh basil leaves
Olive oil

Preheat your oven to 350 degrees. Slice the baguette into thin pieces and rub a bit of olive oil on them. Toast the bread on a baking sheet for about 20 minutes, until the bread is golden brown. You can also just throw them in your toaster oven, but that tends to brown just the outside instead of toasting the bread thoroughly for a nicer crunch.
After that, it's easy assembly. Top each piece of bread with a slice of mozzarella (the cheese acts as a nice barrier for the bread against the wetness of the tomato). Then top them each with a slice of tomato (and plum tomatoes are better because they have less water, leading to less sogginess). Slice your basil leaves into thin strips and scatter them over the tomatoes. Follow with dashes of salt and pepper. That's it!

These work great as party appetizers. You can also lay the ingredients out like I did above, but in larger quantities, and let guests assemble the finger food themselves.