Thursday, July 30, 2009

Peach-Vanilla Bean Cobbler with Sugar Crunch Lattice

No comments:
I always wait until summer to make peach cobbler or peach pie. Frozen and canned peaches can't compare, and they aren't as juicy or fragrant. I love peach pie, but cobbler is infinitely easier. There's no bottom crust to worry about getting soggy, and some recipes allow you to just spoon and smooth a batter on top. This one pretties it up with a lattice, yet still looks rustic and easy.

This is great fresh out of the oven, and a scoop of frozen yogurt melts over the top and gives that refreshing chill you want in the sweltering heat (especially after your oven's heated the kitchen). But it's just as delicious at room temperature and free of any accompaniments.
Peach-Vanilla Bean Cobbler with Sugar Crunch Lattice
From The Art and Soul of Baking by Sur La Table and Cindy Mushet
Serves 6 to 8
1 recipe Cream Scones (page 152), prepared through Step 2
2¼ pounds ripe peaches, peeled
¼ to ½ cup (1 ¾ to 3 ½ oz) sugar, plus 2 tbs for the lattice
1 vanilla bean, or 2 tsp pure vanilla extract
2 tsp freshly squeezed lemon juice
2 tsp cornstarch or tapioca flour, or 4 tsp unbleached all-purpose flour
Vanilla ice cream or Vanilla Crème Fraiche, for serving
9-inch ceramic pie pan or other wide 6-cup baking dish

1. Make the filling. Use a paring knife to half and pit the peaches, then cut into ½-inch-thick slices. Transfer to a large bowl. Taste a peach slice — if it is sweet and ripe, use only ¼ cup sugar (or even less, if it is very sweet). If it’s tart or slightly under-ripe, use up to an additional ¼ cup. Place the sugar in the small bowl. Use the tip of the paring knife to split the vanilla bean in half lengthwise. Turn the knife over and use the dull side to scrape out all the seeds into the sugar. Rub the mixture together with your fingers until the seeds are evenly dispersed. Pour over the fruit. Add the lemon juice and cornstarch (and the vanilla extract or paste, if using) and gently toss with the spatula until all the fruit is evenly coated. Press the fruit into the baking dish in an even layer.


Vanilla sugar and vanilla bean-speckled peaches

2. Make the Lattice. Dust your work surface and the top of the dough with flour. Roll the dough into a 16-inch circle about 1/8 inch thick. Rotate the dough slightly each time you roll—this will help you roll the dough in an even circle and will alert you immediately when the dough is sticking to the surface. If it does stick, gently use a bench scraper to release the dough, lifting it off the surface and adding a bit more flour to the surface to prevent further sticking.
3. Cut the dough into 1½-inch wide strips. The strips toward the center of the circle will be longer than the strips toward the edges and this is fine. You will use the longer strips in the center of your baking dish when weaving the lattice, and the shorter strips near the edges of the dish.
4. Weave the lattice. Brush any excess flour from the surface of the dough. Gently lift the strips and place half of them about ½ inch apart from the top of the fruit, letting any excess dough fall over the edge of the dish for the moment. Fold every other strip back halfway, exposing the fruit underneath. Precisely at that halfway point, place a strip of dough perpendicular, laying it over the unfolded strips. Unfold the folded strips, laying them over the new strip of dough. Fold back the strips that were left flat the first time, and place another new strip of dough over the fruit and flat strips of dough. Straighten and tighten the dough each time you do this so your lattice looks even. Continue in this manner until you reach the edge of the pan, then turn the pan and weave the other half of the lattice, beginning at the center and working outward. Once the lattice is finished, use the paring knife to trim any overhanging dough flush with the pan. Chill for 20 minutes.


5. Bake and serve the cobbler. Preheat the oven to 350 degrees and position an oven rack in the center. Sprinkle the lattice evenly with the remaining 2 tablespoons of sugar. You may want to place a baking sheet or a piece of foil under the cobbler to catch any juices that may bubble over. Bake for 40 to 50 minutes, until the topping is nicely browned and the fruit is bubbling and soft (the tip of the paring knife should easily slide in and out of the peach slices). Serve warm or at room temperature, accompanied by ice cream or crème fraiche.

Storing. This cobbler is at its best immediately after baking. Store any leftovers in the refrigerator, covered with plastic wrap, for 2 to 3 days. Reheat, covered loosely with foil, in a 350 degree oven for 40 to 50 minutes, or until warmed through.

Cream Scones
From The Art and Soul of Baking by Sur La Table and Cindy Mushet
2 cups (10 ounces) all purpose flour
¼ cup (1¾ oz) sugar
2½ tsp baking powder
¼ tsp salt
1 stick (4 oz) cold unsalted butter, cut into ½-inch cubes
1 cup (8 oz) chilled heavy whipping cream
1 egg, lightly beaten
1 tbs sugar
1. Preheat the oven to 425 degrees and position an oven rack in the center. Line the baking sheet with parchment paper or a thin silicone mat. Place the flour, sugar, baking powder, and salt in the bowl of the food processor and process for 10 seconds to blend well. Add the cold butter pieces and pulse 5 times at 1-second intervals, or until the butter is cut into medium pieces. Add the cream and pulse another 20 times, or until the dough holds together in small, thick clumps. Use a spatula to scrape the dough out onto a lightly floured work surface. Gently squeeze the clumps together until they form a cohesive dough.
2. Pat the dough into a circle 7 inches in diameter and about 1 inch thick. Use a chef’s knife to cut the dough into 8 equal wedges and transfer to the prepared baking sheet, spacing them about 2 inches apart.

Cobbler prepared with a crust of flower-shaped dough cutouts

Saturday, June 27, 2009

Lil Cookies & Cream Cheesecakes

3 comments:

These little bites of cheesecake are so cute. I actually don't like Oreos, but I love Cookies & Cream. Sounds strange, I know, but I was also one of those kids who hated tomatoes but loved ketchup and tomato sauce -- at least I grew out of that. These are from the new Martha Stewart's Cupcakes book, and I love how the crust for each cheesecake is an entire Oreo.


It's so much easier to plop a cookie in each paper cup, rather than grind up graham crackers and press them into each cupcake well. They bake up really quickly, and everybody will love them. One word of advice: Read the entire recipe to make sure you have enough cupcake or muffin trays. It yields a lot of batter (I halved the recipe and used cupcake tins instead of muffin tins), and the cheesecakes need to refrigerate in the trays, so you can't remove the cakes immediately to bake up the rest of the batter.

Cookies and Cream Cheesecakes from Martha Stewart's Cupcakes
42 cream-filled chocolate sandwich cookies, such as Oreos, 30 left whole and 12 coarsely chopped
2 pounds cream cheese, room temperature
1 cup sugar
1 tsp pure vanilla extract
4 large eggs, room temperature, lightly beaten
1 cup sour cream
Pinch of salt

Preheat oven to 275 degrees. Line standard muffin tins with paper liners. Place 1 whole cookie in the bottom of each lined cup.


With an electric mixer on medium-high speed, beat cream cheese until smooth, scraping down sides of bowl as needed. Gradually add sugar, and beat until combined. Beat in vanilla.
Drizzle in eggs, a bit at a time, beating to combine and scraping down sides of bowl as needed. Beat in sour cream and salt. Stir in chopped cookies by hand.
Divide batter evenly among cookie-filled cups, filling each almost to the top. Bake, rotating tins halfway through, until filling is set, about 22 minutes. Transfer tins to wire racks to cool completely. Refrigerate (in tins) at least 4 hours (or up to overnight). Remove from tins just before serving.

Enjoy them with a glass of milk!

Sunday, June 21, 2009

Happy Blog Birthday Pineapple Cake

2 comments:


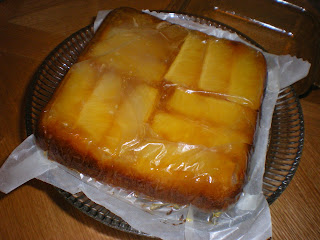
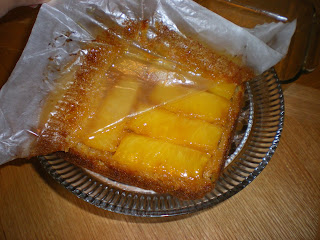
A year has passed since my first blog entry! So I'm commemorating it with a lighter Pineapple Upside-down Cake. I like the lightness of oil-based cakes as opposed to most butter-based cakes, but I tinkered with this recipe to make that caramelized sauce richer. Isn't that the whole point of Pinapple Upside-down Cake? The finished product was a light but moist cake topped with juicy pineapple that mellowed out in caramelized brown sugar and butter.


Adapted from Everyday Food's Light Pineapple Upside-Down Cake
1 cup packed light brown sugar
2 tbs butter, softened at room temperature
1 ripe firm pineapple (skin removed), cored and cut into 16 thin wedges
1 cup all-purpose flour
1/2 cup whole wheat flour
1 1/2 tsp baking powder
1/2 tsp baking soda
1/2 tsp salt
1/3 cup vegetable oil
3/4 cup low-fat buttermilk
2 large eggs
1 tsp pure vanilla extract

Preheat oven to 350 degrees. Line an 8x8 square baking dish with parchment and then lightly grease the parchment.

Beat the butter and half of the brown sugar in a mixing bowl, then spread it evenly on the parchment. Top the mixture with 4- to 5-inch spears of pineapple in alternating directions.


In a medium bowl, mix together the flours, baking powder, baking soda, and salt. In a large bowl, whisk together buttermilk, eggs, vanilla, oil, and the other half of the sugar. Add the flour mixture, and mix until just combined. Pour the batter over the pineapple and smooth the top.


Bake 50 to 60 minutes, until a toothpick inserted in the middle comes out clean. The top may get a little dark, but don't worry. Cool the cake 20 minutes in the pan, then invert it onto a plate and peel off the paper.


Tuesday, June 16, 2009

Daring Cooks Challenge: Potstickers!

6 comments:


I get asked a lot why I don't make more Chinese food. Well, I learned to cook after I left home, and there were far more resources on Western cooking. But one thing I did help make as a kid were won tons, so this potsticker challenge seemed very doable. But unlike some other bloggers, this isn't really representative of cuisine in Hainan (the island in China's south), Malaysia, or Singapore -- the places of my grandparents' and parents' birth. It's just what my family used to fill won tons and then tweaked by me. It's delicious, is what it is!


I've never made wrappers from scratch before, but I've got to thank Jen of use real butter for making it mandatory for the challenge! Once I got the hang of making them, it was relatively easy. I tried my hand at pretty pleats, but they were ugly so I proceeded with a simple fold-over. So the result was plain, but our cleared plates were testament to the tastiness!


My Filling:

It was funny measuring ingredients for this recipe. If your mom is like my mom, she measures and times nothing because she just has the instinct. That's led to some unsuccessful re-creations of her recipes (is "a little" a pinch or a teaspoon, ma?), but I always managed with this!
½ lb ground pork
½ lb shrimp, peeled and deveined
1 tsp ginger, grated on the microplane or minced
5 scallions, chopped
1 tbs sesame oil
1 tbs soy sauce
½ tsp black pepper
2 tbs cornstarch

Pulse everything in the food processor until you get chunky bits. Or finely chop the larger ingredients and stir everything together. That ice-cream-like-scoop you use for cookie dough is useful here, too. Thanks to Lisa-Is-Bossy for the suggestion on using a pestle as a mini rolling pin! I was confused a bit at first on how thick and long to roll the dough logs, but if you have a scale, each dough chunk and rolled-out wrapper should average out to about 25 grams.


These get fried a bit so you get crunchy undersides, and then they sizzle in steam so they cook the rest of the way through:


The Challenge: Chinese dumplings/potstickers (aka gyoza in Japanese)

Reveal Date: June 14th! Good luck, Daring Cooks - woohoo!
It's a basic concept: a filling inside a dough wrapper, sealed, and cooked. This delicious theme runs through many cultures and is among the more popular bites at Chinese restaurants - especially dim sum. The recipe I provide is based on my family recipe. There is a lot of wiggle room and I encourage you to explore. If you've made them before - great! Now try something different!

The process goes a little like this:


You can (and should) reference instructional photos and discussion on my blog post here.

Sunday, June 7, 2009

Teatime Treats! The Best Scones, Plus Cuke Sandwiches

1 comment:

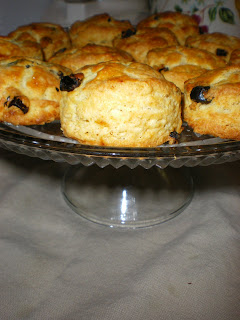
They're the quintessential afternoon tea nibbles -- scones and cucumber sandwiches. Beverly (i.e. the Queen of Scones) calls this recipe The Best Scones, and they really are. They're the flakiest, tenderest, moistest scones you'll ever have. And why not round them out with some tiny sandwiches, and a cuppa English Breakfast, Assam, or Ceylon?


I halved this scone recipe for our household of two, but you can probably freeze some right before they go into the oven and bake them up on demand. I also halved the amount of salt, but whether you do the same is up to you. Check out the flaky layers of this baby.


The Best Scones by Beverly
4 cups all-purpose
2 tbs baking powder
2 tsp salt
¾ lb. cold unsalted butter, diced (that's 3 sticks)
4 large eggs, beaten lightly
1 cup cold heavy cream
1 egg beaten with 1 tbs water or milk, for egg wash, Or use cream
Raisins or currants (I used ½ cup)

Preheat the oven to 400°.

Combine the flour, baking powder, and salt in the bowl of an electric mixer fitted with the paddle attachment. You can also make this in a food processor with the metal blade like I did, or by hand with a pastry blender. Add the butter and mix on low speed until the butter is in pea-sized pieces. Mix the eggs and cream together, and quickly add them to the flour-and-butter mixture. Combine until just blended. Mix in the raisins or currants.


Dump the dough onto a floured surface and knead just until it comes together. Roll the dough ¾ inch thick. Cut into 4-inch squares and then in half diagonally to make triangles, or any shape you desire. Brush the tops with cream. Bake on a baking sheet lined with parchment paper or a silicone mat for 18 minutes, until the outside is crusty and the inside is fully baked.

Makes 16 scones.


This is my thrown-together cucumber sandwich recipe.

Cucumber Sandwiches
1 cucumber, peeled
6 slices bread
2 oz. cream cheese, softened at room temperature
½ tsp salt
1 tsp chopped fresh parsley
2 tsp chopped fresh chives, plus more for garnish

You'll need a vegetable peeler, paper towels, and a tall biscuit cutter.

Cut the crusts off the bread. You can freeze them in a zip-top bag to make breadcrumbs out of. Holding the cucumber so it stands vertically on a cutting board, use the peeler to shave off thick slices of cucumber, until you get to the seedy part. Discard the seedy core. Lay the cucumber on paper towels to soak up excess moisture, so your sandwiches don't get soggy.

Stir the salt, parsley, and chives into the softened cream cheese. Spread the mixture onto the bread slices, then top with the layers of cucumber. You can leave them open-faced or top them with another slice of bread. Cut them into triangles, or use a biscuit cutter to cut out little teatime-sized rounds. The cutter has to be tall enough that it won't get lost in the sandwich, and sharp enough to cut through.

Scatter some chives over the tops for garnish. Keep the sandwiches covered so they don't dry out.

Wednesday, May 27, 2009

Daring Bakers Challenge: Strudel, ja!!

17 comments:

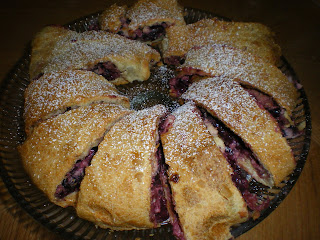
This might be the funnest baking challenge yet. Joe loved it so much that he helped me make a few more (and eat most of them). I wanted something different from the usual apple filling, so I made Cherry Cheese Strudel.


I was surprised by how easy it is to make strudel, especially the dough. Holes and tears are inevitable, and I sure had some, but they're not visible after the dough is rolled up and baked. It comes out beautifully golden and crispy, and the cherry filling is delicious. You do need a lot of space -- a whole table to move around -- and a cloth for assembling the dough. The rollup is definitely my favorite part!

The May Daring Bakers’ challenge was hosted by Linda of make life sweeter! and Courtney of Coco Cooks. They chose Apple Strudel from the recipe book Kaffeehaus: Exquisite Desserts from the Classic Cafés of Vienna, Budapest and Prague by Rick Rodgers.


The dough had to be rolled out thin, then stretched and pulled even thinner.


You had to be able to read through it. Then came the cherry and cheese filling.


Filling adapted from Martha Stewart's Cherry Cheese Strudel
I had to adapt the filling to fit the smaller dough recipe used in this challenge. I also used a bag of frozen dark sweet cherries, thawed.
12 oz. fresh sour cherries, stemmed and pitted, juices reserved
3/4 cups granulated sugar
1/4 tsp salt
1/4 tsp ground cinnamon
1 tsp cornstarch
6 oz cream cheese, room temperature
1 large egg yolk

Combine the cherries and their juice, half the sugar, half the salt, and cinnamon in a medium high-sided skillet. Place over medium-high heat, and bring to a boil. Cook until juice is reduced, about 10 minutes. Transfer 2 tablespoons of juice to a small bowl; add the cornstarch, and whisk until combined. Return mixture to skillet and cook, stirring until thickened, about 2 minutes. Set aside to cool completely.

In the bowl of an electric mixer fitted with the paddle attachment, beat cream cheese, and the remaining sugar and salt on medium-high speed until very smooth, 2 to 3 minutes. Add the egg yolk, and beat to combine.

Once you've rolled out the dough, starting about 6 inches from the top edge, spread the cream cheese in a 6-inch-wide layer, horizontally, leaving a 3-inch border on each end. Arrange the cherry mixture evenly on top of the cream cheese. Using the cloth, lift up and flip the 6-inch top edge of the dough over the filling. Repeat lifting and folding once, leaving sides open. Then fold in sides of dough to enclose the filling. Continue lifting and folding until the dough is completely rolled into a flat log. If the ends are very thick, trim them as you work.

The recipe for the strudel dough (along with the apple filling suggested in the challenge) and the remaining instructions follow.

The May Daring Bakers’ challenge was hosted by Linda of make life sweeter! and Courtney of Coco Cooks. They chose Apple Strudel from the recipe book Kaffeehaus: Exquisite Desserts from the Classic Cafés of Vienna, Budapest and Prague by Rick Rodgers.

Tuesday, May 5, 2009

Strawberry Tartlets

No comments:
Strawberries from the store have been so delicious lately, I had to make strawberry tarts. Except for the arm workout I got while whisking the pastry cream, these were easy. For visual interest, I usually also top each one with a blueberry and sliver of kiwi, but I love the pure strawberry of this version and it made for lighter work. And they were still plenty tasty.

Strawberry Tarts
Half-recipe of Martha Stewart's Pate Brisee
Pound of Strawberries, washed, dried, and hulled
Pastry Cream, recipe follows

Preheat oven to 325 degrees. Roll out the tart dough and cut it into squares a little larger than the square tart wells, or whatever mold you plan to use. Tuck the squares of dough inside the wells, cover the entire tray with a sheet of foil, and bake 12 minutes. Remove the foil, and bake 10 more minutes. Let it cool before removing the pastry shells, and repeat with remaining dough. Allow shells to cool completely before assembling.


Strawberries last longer if you wait until you use them to wash them. Darker ones tend to be sweeter. Choose 12 small berries that won't be bigger than the tart, and slice them in half.
Spoon or pipe the pastry cream into each shell. I like to pipe it with a star tip. Top each tart with a strawberry half. For extra shine or sweetness, you can also melt a bit of seedless jam and brush it on top of the berries. That's it! Makes 24 tartlets.

Pastry Cream
From Dorie Greenspan's Baking: From My Home to Yours
2 cups whole milk
6 large egg yolks
½ cup sugar
⅓ cup cornstarch, sifted
1½ tsp pure vanilla extract
3½ tsp unsalted butter, cut into bits at room temperature
Bring the milk to a boil in a small saucepan.
Neanwhile, in a medium heavy-bottomed saucepan, whisk the yolks together with the sugar and cornstarch until thick and well-blended. Still whisking, drizzle in about ¼ cup of the hot milk -- this will temper, or warm, the yolks so they won't curdle. Whisking all the while, slowly pour in the remainder of the milk. Put the pan over medium heat and, whisking vigorously, constantly and thoroughly (making sure to get into the edges of the pot), bring the mixture to a boil. Keep at a boil, still whisking, for 1 to 2 minutes, then remove the pan from the heat.


Whisk in the vanilla extract. Let sit for 5 minutes, then whisk in bits of butter, stirring until they are fully incorporated and the pastry cream is smooth and silky. Scrape the cream into a bowl. You can press a piece of plastic wrap against the surface of the cream to create an airtight seal and refrigerate the pastry cream until cold or, if you want to cool it quickly -- as I always do -- put the bowl into a larger bowl filled with ice cubes and cold water, and stir the pastry cream occasionally until it is thoroughly chilled, about 20 minutes.