Friday, September 18, 2009

Greek Lamb & Tzatziki

No comments:
010
I was telling my friend Aisha that I had seen a Barefoot Contessa episode on Greek food where she made lamb, and that I was going to make it this week. She asked if I would be blogging the dish, and I said, "Nah, I won't be doing anything different or putting a twist on it, and the recipe's on the Internet." But it was really good!

I won't bother going about the recipe, but you can find it here. I followed it most of the way, but I added smashed cloves of garlic to the marinade, and used 0% Greek yogurt where the "Contessa" called for full-fat. Partly because that's what the store had available, partly because the fat-free stuff is so rich anyway, and partly out of consideration for my arteries. I also added the last of my homegrown grape tomatoes to the skewers, made her recipe for Tzatziki, and broiled a side of eggplant slices brushed with olive oil. The grill wouldn't light up and I'm too afraid of the propane tank to replace it or otherwise fuss with it, but the broiler worked fine. The texture of the eggplant becomes almost creamy (I loathe spongy eggplant), and the lamb was delicious with flavors of rosemary, garlic, and lemon.
019
This tzatziki was a cinch to throw together, and I made it the night before while creating the marinade.
026
I also threw in some lemon thyme, since the recipes had lemon zest and juice.
003
I used a boneless, butterflied leg of lamb that weighed just over a pound and a half, but it made enough for 2 nights of dinner! That sure made Joe happy. Here, on the second night, I served it over roasted potatoes.
010 - Copy
On a side note, I grew zucchini plants for the first time this year. Except there were never any zucchini! The leaves on trees have started to change color and fall, but last week I discovered there were zucchini a few inches long on the plants! I wonder if the delay was due to the wet (more like drenched) and cool summer we've had. Better late than never, huh?

Monday, August 31, 2009

Cherry Custard Pie

No comments:

Cherry Custard Pie

I think nothing says summer like homemade ice cream, peach pie, and cherry pie. I already made the first two this summer, so I had cherry pie on the brain. I like how this one is different, with the cherries sitting in a sweet custard and that flaky crust. This recipe's from Ken Haedrich's Pie, but I used Rose Levy Beranbaum's Flaky Cream Cheese Pie Crust, my all-time favorite pie dough recipe. Save your dough scraps to make the cute little cherry cutouts, and the leftover cream to whip for garnish.

011

This contraption is a cherry pitter. You could also use frozen, pitted cherries for convenience, especially out of season.

001
After rolling out, trim the ends to an even circle, and tuck under.

004
Shape the rolled-under edge into a scalloped crust.

010
Poking holes reduces puffing-up. I followed the instructions for resting and chilling, but there was still some crust shrinkage. Can't be helped sometimes, I guess.

022
After pouring in your custard -- which was so easy to throw together -- drop the cherries in one by one, trying to space them evenly. Plan enough time for the cooling and chilling before serving.


Cherry Custard Pie
From Ken Haedrich's Pie
1 recipe Basic Flaky Pie Pastry, Single Crust (See the cream cheese pie dough recipe I used here)
2 large eggs
1 large egg yolk
⅔ cup sugar
1 cup light cream or half-and-half
½ cup heavy or whipping cream
½ tsp vanilla extract
1½ tbs kirsch, Grand Marnier, or triple sec (optional)
Pinch of salt
One 15-ounce can pitted sweet cherries, drained, or 1½ cups fresh sweet cherries, stemmed and pitted

Prepare the pastry and refrigerate until firm enough to roll, about 1 hour.

Preheat the oven to 400°. On a sheet of lightly floured waxed paper, roll the pastry into a 12-inch circle with a floured rolling pin. Invert the pastry over a 9-inch standard pie pan, center, and peel off the paper. Tuck the pastry into the pan, without stretching it, and sculpt the edge so it is slightly higher than the rim. Place in the freezer for 15 minutes, then partially prebake (Fit a sheet of foil into the pie pastry and pour in enough dried beans or other pie weights to fill to the top. Bake the pie shell on the center rack for 15 minutes. Remove the foil and beans and lower the temperature to 375°, then take a fork and prick the pastry all over the bottom. Bake the pie shell for another 10 to 12 minutes.) and let cool. Reduce the oven temperature to 350°.

Combine the eggs, egg yolk, and sugar in a large bowl. Using an electric mixer, blend briefly on medium speed. Add the light cream, heavy cream, vanilla, kirsch (if using), and salt and blend briefly. Slowly pour the filling into the cooled pie shell. One by one, gently drop the cherries into the filling, spacing them more or less evenly.

Place the pie on the center oven rack and bake until the custard is set, about 45 minutes. Rotate the pie 180 degrees halfway through the baking, so that the part that faced the back of the oven now faces forward. When done, the filling will jiggle -- not move in waves -- when you give the pie a little nudge.

Transfer the pie to a wire rack and let cool thoroughly. Cover with loosely tented aluminum foil and refrigerate for at least 3 hours or overnight before serving.

031

Thursday, August 27, 2009

Daring Bakers Challenge: Dobos Torte

14 comments:
056
This month the challenge was to bake that famous Hungarian cake, the Dobos Torte. It calls for baking thin layers of cake, stacking them with buttercream, and topping them with hazelnuts and wedges of caramel. I made mine a miniature so I wouldn't scarf down too much cake, and opted for wispy strands of caramel.

077
I also nixed the hazelnuts because Joe can't have them, and halved all the ingredients but kept the cooking temp and times the same. I got seven layers out of my little cake tower -- they slide around a little bit with all the buttercream, so you may want to insert a wooden skewer through them while you stack and frost, then remove it and chill. Recipe and obligatory challenge rules follow the pics.

006 010
Whip your egg whites to a soft peak and then a stiff peak.

015 017

To make my cake a mini, I used a personal-sized springform pan without the bottom. I ladled a third of a cup of batter into the mold, and you can see that when you lift the mold the batter mostly holds its shape. They bake up looking kind of like pancakes.

026 027
The buttercream is cooked slightly in a double boiler, and then you add the chocolate to melt.

046 047

To make strands of caramel, lightly coat some waxed paper with cooking spray. Dip a spoon into the warm caramel and wave it in zig-zag motions over the paper. Let it firm for a few minutes, and then lift it off the paper. Use a recipe other than the one in this challenge, which is more toffee-like and didn't have the right consistency for caramel strands. (I used Martha Stewart's.)
***
The August 2009 Daring Bakers' challenge was hosted by Angela of A Spoonful of Sugar and Lorraine of Not Quite Nigella. They chose the spectacular DobosTorte based on a recipe from Rick Rodgers' cookbook Kaffeehaus: ExquisiteDesserts from the Classic Caffés of Vienna, Budapest, and Prague.

So, what is the Dobos Torta (or Torte)?

The Dobos Torta is a five-layer sponge cake, filled with a rich chocolate buttercream and topped with thin wedges of caramel. (You may come across recipes which have anywhere between six and 12 layers of cake; there are numerous family variations!) It was invented in 1885 by József C. Dobos, a Hungarian baker, and it rapidly became famous throughout Europe for both its extraordinary taste and its keeping properties. The recipe was a secret until Dobos retired in 1906 and gave the recipe to the Budapest Confectioners' and Gingerbread Makers' Chamber of Industry, providing that every member of the chamber can use it freely.

Wednesday, August 19, 2009

Ming Tsai, and Backyard Veggies

No comments:


I've never been interested in putting my mug on this blog, but it's not every day I get a photo op with Ming Tsai! The renowned chef of Blue Ginger in Wellesley and Simply Ming on PBS came to support the opening of the Asian American Journalists Association Convention in Boston. He was a sweetheart, and there are hopes he'll be doing more with our group in the future!


On to the rest. No recipes in this posting, but I have been munching happily on homegrown tomatoes! Aren't they beautiful?


I love the sweetness of the grape variety, and they're perfect for just throwing in salads. And the basil plants are growing in the same pots like weeds. Tasty weeds . . .


Did you know eggplant plants grew flowers? I had no idea. Pretty purple ones.


And this guy is still small, and the only one on the plant. I wonder if it's ready for picking. Come to think of it, I don't think I bought the big variety. Now, what to make with it . . .

Thursday, July 30, 2009

Peach-Vanilla Bean Cobbler with Sugar Crunch Lattice

No comments:
I always wait until summer to make peach cobbler or peach pie. Frozen and canned peaches can't compare, and they aren't as juicy or fragrant. I love peach pie, but cobbler is infinitely easier. There's no bottom crust to worry about getting soggy, and some recipes allow you to just spoon and smooth a batter on top. This one pretties it up with a lattice, yet still looks rustic and easy.

This is great fresh out of the oven, and a scoop of frozen yogurt melts over the top and gives that refreshing chill you want in the sweltering heat (especially after your oven's heated the kitchen). But it's just as delicious at room temperature and free of any accompaniments.
Peach-Vanilla Bean Cobbler with Sugar Crunch Lattice
From The Art and Soul of Baking by Sur La Table and Cindy Mushet
Serves 6 to 8
1 recipe Cream Scones (page 152), prepared through Step 2
2¼ pounds ripe peaches, peeled
¼ to ½ cup (1 ¾ to 3 ½ oz) sugar, plus 2 tbs for the lattice
1 vanilla bean, or 2 tsp pure vanilla extract
2 tsp freshly squeezed lemon juice
2 tsp cornstarch or tapioca flour, or 4 tsp unbleached all-purpose flour
Vanilla ice cream or Vanilla Crème Fraiche, for serving
9-inch ceramic pie pan or other wide 6-cup baking dish

1. Make the filling. Use a paring knife to half and pit the peaches, then cut into ½-inch-thick slices. Transfer to a large bowl. Taste a peach slice — if it is sweet and ripe, use only ¼ cup sugar (or even less, if it is very sweet). If it’s tart or slightly under-ripe, use up to an additional ¼ cup. Place the sugar in the small bowl. Use the tip of the paring knife to split the vanilla bean in half lengthwise. Turn the knife over and use the dull side to scrape out all the seeds into the sugar. Rub the mixture together with your fingers until the seeds are evenly dispersed. Pour over the fruit. Add the lemon juice and cornstarch (and the vanilla extract or paste, if using) and gently toss with the spatula until all the fruit is evenly coated. Press the fruit into the baking dish in an even layer.


Vanilla sugar and vanilla bean-speckled peaches

2. Make the Lattice. Dust your work surface and the top of the dough with flour. Roll the dough into a 16-inch circle about 1/8 inch thick. Rotate the dough slightly each time you roll—this will help you roll the dough in an even circle and will alert you immediately when the dough is sticking to the surface. If it does stick, gently use a bench scraper to release the dough, lifting it off the surface and adding a bit more flour to the surface to prevent further sticking.
3. Cut the dough into 1½-inch wide strips. The strips toward the center of the circle will be longer than the strips toward the edges and this is fine. You will use the longer strips in the center of your baking dish when weaving the lattice, and the shorter strips near the edges of the dish.
4. Weave the lattice. Brush any excess flour from the surface of the dough. Gently lift the strips and place half of them about ½ inch apart from the top of the fruit, letting any excess dough fall over the edge of the dish for the moment. Fold every other strip back halfway, exposing the fruit underneath. Precisely at that halfway point, place a strip of dough perpendicular, laying it over the unfolded strips. Unfold the folded strips, laying them over the new strip of dough. Fold back the strips that were left flat the first time, and place another new strip of dough over the fruit and flat strips of dough. Straighten and tighten the dough each time you do this so your lattice looks even. Continue in this manner until you reach the edge of the pan, then turn the pan and weave the other half of the lattice, beginning at the center and working outward. Once the lattice is finished, use the paring knife to trim any overhanging dough flush with the pan. Chill for 20 minutes.


5. Bake and serve the cobbler. Preheat the oven to 350 degrees and position an oven rack in the center. Sprinkle the lattice evenly with the remaining 2 tablespoons of sugar. You may want to place a baking sheet or a piece of foil under the cobbler to catch any juices that may bubble over. Bake for 40 to 50 minutes, until the topping is nicely browned and the fruit is bubbling and soft (the tip of the paring knife should easily slide in and out of the peach slices). Serve warm or at room temperature, accompanied by ice cream or crème fraiche.

Storing. This cobbler is at its best immediately after baking. Store any leftovers in the refrigerator, covered with plastic wrap, for 2 to 3 days. Reheat, covered loosely with foil, in a 350 degree oven for 40 to 50 minutes, or until warmed through.

Cream Scones
From The Art and Soul of Baking by Sur La Table and Cindy Mushet
2 cups (10 ounces) all purpose flour
¼ cup (1¾ oz) sugar
2½ tsp baking powder
¼ tsp salt
1 stick (4 oz) cold unsalted butter, cut into ½-inch cubes
1 cup (8 oz) chilled heavy whipping cream
1 egg, lightly beaten
1 tbs sugar
1. Preheat the oven to 425 degrees and position an oven rack in the center. Line the baking sheet with parchment paper or a thin silicone mat. Place the flour, sugar, baking powder, and salt in the bowl of the food processor and process for 10 seconds to blend well. Add the cold butter pieces and pulse 5 times at 1-second intervals, or until the butter is cut into medium pieces. Add the cream and pulse another 20 times, or until the dough holds together in small, thick clumps. Use a spatula to scrape the dough out onto a lightly floured work surface. Gently squeeze the clumps together until they form a cohesive dough.
2. Pat the dough into a circle 7 inches in diameter and about 1 inch thick. Use a chef’s knife to cut the dough into 8 equal wedges and transfer to the prepared baking sheet, spacing them about 2 inches apart.

Cobbler prepared with a crust of flower-shaped dough cutouts

Saturday, June 27, 2009

Lil Cookies & Cream Cheesecakes

3 comments:

These little bites of cheesecake are so cute. I actually don't like Oreos, but I love Cookies & Cream. Sounds strange, I know, but I was also one of those kids who hated tomatoes but loved ketchup and tomato sauce -- at least I grew out of that. These are from the new Martha Stewart's Cupcakes book, and I love how the crust for each cheesecake is an entire Oreo.


It's so much easier to plop a cookie in each paper cup, rather than grind up graham crackers and press them into each cupcake well. They bake up really quickly, and everybody will love them. One word of advice: Read the entire recipe to make sure you have enough cupcake or muffin trays. It yields a lot of batter (I halved the recipe and used cupcake tins instead of muffin tins), and the cheesecakes need to refrigerate in the trays, so you can't remove the cakes immediately to bake up the rest of the batter.

Cookies and Cream Cheesecakes from Martha Stewart's Cupcakes
42 cream-filled chocolate sandwich cookies, such as Oreos, 30 left whole and 12 coarsely chopped
2 pounds cream cheese, room temperature
1 cup sugar
1 tsp pure vanilla extract
4 large eggs, room temperature, lightly beaten
1 cup sour cream
Pinch of salt

Preheat oven to 275 degrees. Line standard muffin tins with paper liners. Place 1 whole cookie in the bottom of each lined cup.


With an electric mixer on medium-high speed, beat cream cheese until smooth, scraping down sides of bowl as needed. Gradually add sugar, and beat until combined. Beat in vanilla.
Drizzle in eggs, a bit at a time, beating to combine and scraping down sides of bowl as needed. Beat in sour cream and salt. Stir in chopped cookies by hand.
Divide batter evenly among cookie-filled cups, filling each almost to the top. Bake, rotating tins halfway through, until filling is set, about 22 minutes. Transfer tins to wire racks to cool completely. Refrigerate (in tins) at least 4 hours (or up to overnight). Remove from tins just before serving.

Enjoy them with a glass of milk!

Sunday, June 21, 2009

Happy Blog Birthday Pineapple Cake

2 comments:


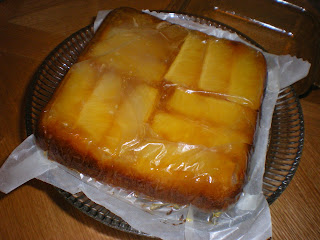
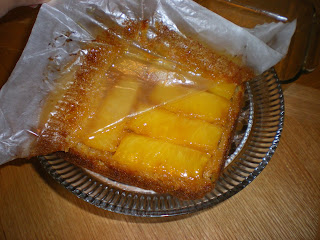
A year has passed since my first blog entry! So I'm commemorating it with a lighter Pineapple Upside-down Cake. I like the lightness of oil-based cakes as opposed to most butter-based cakes, but I tinkered with this recipe to make that caramelized sauce richer. Isn't that the whole point of Pinapple Upside-down Cake? The finished product was a light but moist cake topped with juicy pineapple that mellowed out in caramelized brown sugar and butter.


Adapted from Everyday Food's Light Pineapple Upside-Down Cake
1 cup packed light brown sugar
2 tbs butter, softened at room temperature
1 ripe firm pineapple (skin removed), cored and cut into 16 thin wedges
1 cup all-purpose flour
1/2 cup whole wheat flour
1 1/2 tsp baking powder
1/2 tsp baking soda
1/2 tsp salt
1/3 cup vegetable oil
3/4 cup low-fat buttermilk
2 large eggs
1 tsp pure vanilla extract

Preheat oven to 350 degrees. Line an 8x8 square baking dish with parchment and then lightly grease the parchment.

Beat the butter and half of the brown sugar in a mixing bowl, then spread it evenly on the parchment. Top the mixture with 4- to 5-inch spears of pineapple in alternating directions.


In a medium bowl, mix together the flours, baking powder, baking soda, and salt. In a large bowl, whisk together buttermilk, eggs, vanilla, oil, and the other half of the sugar. Add the flour mixture, and mix until just combined. Pour the batter over the pineapple and smooth the top.


Bake 50 to 60 minutes, until a toothpick inserted in the middle comes out clean. The top may get a little dark, but don't worry. Cool the cake 20 minutes in the pan, then invert it onto a plate and peel off the paper.