Friday, September 9, 2011

Gluten Freedom: Kiss Me, (Chocolate) Cake!

3 comments:

I'd like to welcome WASB's newest contributor, Shannon, who will write Gluten FREEDOM! on Fridays.
Without further ado...

Hello, and Welcome to the first edition of Gluten FREEDOM!, a new feature on the fabulous "What About..." blog ^_^


Why gluten free? Well, to begin with, 1 out of every 133 people have a gluten allergy or Celiac disease (or so my box of Potato Buds tells me). An even more truly disturbing statistic is that 1 in every two gluten free product tastes like... well, lets just say they aren't very good. If you have ever eaten these so called 'baked goods' then you know what I'm talking about: chalky or gritty texture, dry, crumbly body, and often it tastes nothing like the yumminess we're craving.

Well, I aim to change that. I say: take command of our culinary destinies! Rise up, my afflicted brethren and say "NO!" Say "I'll Pass, Thank you Very Much!", to heathen dishes and lackluster confections! With my spatula held high, I vow to lead the way and share with you my secrets for gluten free baking and cooking so delicious that your friends will never suspect a thing!

To that end, let us begin with this decadent chocolate cake. Rich, fudgey and moist, it tastes exactly like a traditional cake made with flour. I made this for my Mom's birthday and even my Dad, who is normally very leery of gluten free foods, DEVOURED it! It's just that good, I promise. It's based off of a cake from a Hershey's cookbook that my mother used to make years ago, however since that book is lost the recipe has been adapted from memory.

First up, the ingredients:

3 cups of TIGHTLY PACKED dark brown sugar
2 sticks of softened sweet (unsalted) butter
1 tablespoon vanilla extract
4 eggs (lightly beaten)
2 3/4 cups of a good, finely milled gluten free flour mix
  • ( I prefer either "Gluten Free Pantry" or "Better Batter"'s blends, but you can always try something else or even make your own blend. Just make sure the flours you use are the finest texture you can possibly get -- this is crucial to the end texture of the cake.)
3/4 cup Dutch Processed Cocoa
1 tablespoon baking soda
1/2 teaspoon salt
1 1/3 cup sour cream (use the full fat kind - no one ever said this was gunna be dietetic guys)
1 cup boiling water

Okay now here's the part where I confess that I am an incredibly lazy baker. If there is a way for me to do less steps, I will take it. Fortunately, this turns out to be a blessing for gluten free baking, because if there is one thing you want to avoid it's over mixing. I think it has to do with the xanthan gum- that stuff can get reaaaaally gross.

Anyway, here's what you do. First, preheat your oven to 350 degrees. Take all the dry ingredients and put them in a bowl (sugar remember, counts as a wet ingredient in baking). If your cocoa looks like this:


Don't stress it. And sure, you COULD sift it, but why? It just adds another step! Go ahead, save time ad just dump it all an a bowl and whisk away until your mixture is mostly combined. The big clumps will break up and a few small ones are not the end of the world.


In a separate large bowl, cream together the butter and sugar as if you were making cookies. (After getting the butter in the bowl, use the papers from the butter to grease your cake pans - standard 9 inches work fine and deep walled ones are ideal. After buttering the pans, toss some cocoa in them and move the pans in a circular motion while tapping away at the sides and bottom of the pan to evenly distribute the cocoa. This will ensure a clean release after baking.) Add the vanilla and then add your already beaten eggs. To this mixture, add about half of the dry mixture (or a third if it seems easier for you). Mix until it's just coming together and then add some of the sour cream. Again, mix until just together and then add more of the dry. Keep alternating until all of the mix and sour cream are just combined into the batter. DO NOT OVER MIX!


Finally, CAREFULLY measure out one cup of boiling water. If you're mixing by hand, add the water slowly in two installments. If you're using a stand or hand mixer, just add it nice and easy on low. You want minimal air bubbles here. Gently pour the mixture into your prepared pans, using a spatula laid across the top if the pans to help eyeball even distribution and to make sure you don't overfill the pans.


Carefully put your pans in the oven and bake for around 45-55 minutes, but DO NOT OVER BAKE! If you know your oven tends to bake things more quickly, than start checking for doneness at 35 minutes. Use the standard toothpick or skewer method (insert into the center of cake and remove from oven when you see no uncooked batter left on the tester but ideally when the cake is still moist enough to leave crumbs on the probe of your choice.)


Ah... the smell alone will drive lesser mind wild! Cool on a wire rack for about ten minutes, then upend out of their pans to cool the rest of the way. They should slide right out, but if not take a skinny spatula and gently run it along the edge where cake meets pan.


If your cake has baked up too high and has formed a "lip", wait until it is completely cooled and remove the extra with a sharp, serrated knife. Eat this bit as your reward for a job well done :)

Now, you can frost this cake any way you want to with any kind of frosting - even one from a can if you must, but for the love of all things yummy why would you frost it with anything other than chocolate?? And frosting can be really easy to make! Here's a very simple butter frosting recipe:

Take two sticks of softened butter and beat until fluffy. Add one box of confectioners sugar. Add 1 teaspoon of vanilla. Add as much dutch processed cocoa as you want until you reach your desired level of chocolatey-ness. If you really want to add some serious chocolate taste, go ahead and melt yourself a square of bakers chocolate and add that to the frosting (be careful not to add it when it's still too hot!) You might want to double this recipe if you like a lot of frosting on your cake.

Decorate your cake or leave it plain. A simple Hershey's kiss on the top is a charming touch. Serve any way you like, or just eat it with your bare hands! Either way, I hope you and your loved ones will enjoy this recipe as the first of many that will give us "Celiacies" and gluten free eaters back our Yumm!


Wednesday, September 7, 2011

Banana Cream Pie

8 comments:
bananae
I have yet to meet someone who does not like banana cream pie.  Slices of banana are stirred into a pastry cream, spooned into a pie crust, and topped with lightly sweetened whipped cream ... what's not to like?  And this mini-pie is adorable.

Banana Cream Pie

If only its bigger brother were so successful. When I cut into the big one, the filling was not quite soupy, but not as firm as it should have been.  I initially thought the recipe was at fault and was going to direct readers to this earlier recipe, but the fault lay with me.  In the rush of Labor Day, I refrigerated the big one for only half the recommended time, thinking the filling had set enough, and tended to other things.  But later at home when I cut into the mini-pie, which had been refrigerated all day, the consistency was perfect.  So don't follow my example, but follow the recipe!

This post was linked to:
Sweet Treats Thursday
Sweet Tooth Friday
Tea Party Tuesday
Sweets for a Saturday

Sunday, September 4, 2011

Giving New Meaning to "Baby Food"

1 comment:
alien stew

It looks like this recipe from my sister goes something like, put a carrot, two onions, some soy sauce, sazon, and Audrey in a pot.


Friday, September 2, 2011

Chocolate Gelato, and Hold the Extras

6 comments:
Chocolate Gelato 2
I'm mostly an ice cream purist -- hold the nuts, chocolate chips, candy, and other bits.  Pure chocolate is my undisputed favorite, though maple ice cream is also up there.  With only four ingredients, this gelato has a deep and intense chocolate flavor.  That's owed in large part to the high quality of cocoa I used, Guittard.  I had my doubts because the unfrozen gelato tasted an awful lot like pudding, but once it was frozen and set up it was like rich chocolate ice cream.  Is it my favorite recipe?  No, that distinction still belongs to Ben & Jerry's, but this is still excellent and easier.

Chocolate Gelato
Like most gelato recipes, this one uses milk and not cream.  That's a plus in the health department, but it usually means a dessert that's icier and not satisfyingly rich, like the strawberry gelato I tried a couple months ago.  That wasn't a problem here.  Try this one when your next chocolate craving hits.

Tuesday, August 30, 2011

Chicken Stir-Fry with Snow Peas

3 comments:
Chicken Stir-Fry with Snow Peas

"How did you make that chicken??"  Joe insisted on knowing.  He couldn't stop talking about how tender and juicy and perfectly cooked it was.  I had just thrown some ingredients in the fridge together as a stir-fry, and he loved it.  "Is it dark-meat chicken?  Thighs?"  No.  "Then what did you do to it?"

Ingredients
I had fun drawing out the suspense.  I had just taken chicken breasts, cut them up, and marinated them for a few minutes in soy sauce, cornstarch, rice wine vinegar, and a bit of baking soda.  A later conversation with my mother revealed that restaurants use the baking soda to tenderize beef, not chicken; egg white is used for chicken.  Whatever, Mom, it works.  No, you won't taste the baking soda, and I wouldn't be worried about consuming it -- it's in baked goods all the time.  Worth noting: I like this brand of oyster sauce because it has no MSG.

Kind of worth noting: I have childhood memories of my mom seating me in front of piles of snow peas and having me peel off that tendril at the top and down the side.  It annoyed me as a kid, especially since I hated vegetables until college, but I smile to think of it now.

Chicken pieces
My other guess as to why the chicken turned out so well is that I always try not to overcook meat.  I think people get so afraid of undercooking meat that they dry it out and toughen it, and I cooked the chicken just until it was done.

Chicken Stir-Fry Plate
Throw in some garlic and slightly crunchy snow peas, and you've got a delicious and healthy dinner.  And a Joe who won't stop eating the chicken when you try to photograph a blog post.

Saturday, August 27, 2011

I Got the Versatile Blogger Award

3 comments:
I'm flattered that Brandi, Leslie, and Amanda of Three Fabulous Mommies thought of this blog when passing on “The Versatile Blogger” award.  Thanks to the three of you for following What About Second Breakfast?  Be sure to check out Three Fabulous Mommies, and the other great blogs below.


The rules after accepting the Versatile Blogger Award are:
1. Thank the person who gave the award and link back to them in your post.
2. Share 7 things about yourself.
3. Pass this award along to 15 recently discovered blogs.  (I got lazy and did 10)


Seven facts about Shirley:
1. I speak on the conversational, not fluent, level of Mandarin, and know only a few phrases of my grandparents' dialect, from Hainan, China.
2. I LOVE cats.  I'm not a hoarder, but I had 2 and recently lost 1 so I'm sad.  :(
3. I like using spreadsheets.
4. I enjoy fantasy novels (did my blog's title clue you in?) and Victorian and Regency lit.  Jane Austen, Lord of the Rings, and A Song of Ice and Fire (the Game of Thrones series) rank at top.
5. I never learned to swim, but that didn't stop me from hopping on a jet-ski once!
6. People assume I have hoity-toity food tastes, but fast food is a guilty pleasure for me.  Don't even think about touching my fries.  Seriously.
7. My mom didn't know she was having twins until the doctor said another one (me!) was coming.


10 Versatile Bloggers (in no particular order):

1. Adora's Box
2. Tracy's Culinary Adventures
3. Anecdotes and Apple Cores
4. IndianSimmer
5. Just One Cookbook
6. All Day I Dream About Food
7. The Culinary Chronicles
8. The Sweet Swiper
9. Cats and Casseroles
10. A Pinch of Sweet

Thursday, August 25, 2011

Lattice-top Peach Pie

12 comments:
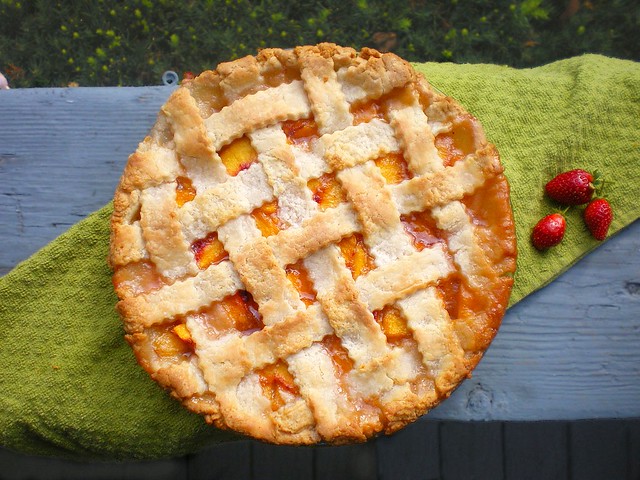
Lattice-top Peach Pie whole

The nights are already starting to get chilly in Boston, and I'm going to miss having in-season watermelon, cherries, and peaches.  While I look forward to the warming food and holidays of autumn, I'm always sad to leave the barbeques, beach trips, and fresh fruits of summer behind.  Peach pie is a constant rival with apple for favorite pie in my book, and I wanted to try a new recipe this summer.  This is a Lattice-top Peach Pie with a cream cheese crust.

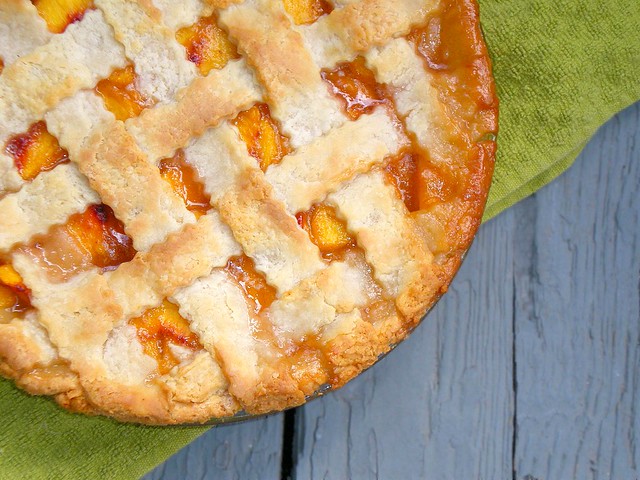
Lattice-top Peach Pie

The top crust in the recipe isn't a lattice, but when I flipped to the photos in the middle of the book I saw the same recipe with a lattice and thought, why not?  I'll describe the few adjustments to make when using a lattice in the recipe section after the jump.

Strawberry plant

The other thing I'll miss?  Picking strawberries off my porch.  The sweetness and subtlety of flavors just can't compare with grocery store strawberries.

Strawberry plant 2

Unfortunately, I only pick about 5 a week and they're barely bigger than grapes.  Where are my pints?  If you have strawberry-growing tips, please share!  The information tab on this plant even promised huge berries.

Cutting Lattice Strips

Truth be told, although the cream cheese crust came out perfect, I'd prefer a flaky all-butter crust to pair with peaches.  But I can attest to this same cream cheese crust being perfect for Apple Pie and Banana Cream Pie.  And I'd give the filling a hit of cinnamon next time, as I usually do.  But I can't complain, because it's still a pretty damn good pie.

Lattice-top Peach Pie Unbaked

If you've never done a lattice top, it's honestly one of the easiest parts.  Not lyin'.  Rolling out the dough and trying to prevent rips and tears can rile me up, but weaving those strips in and out takes only a minute.

Lattice-top Peach Pie Slice

One last tip: For peeling those soft peach skins, this serrated peeler is amazing.  I found mine at Sur la Table.  I've heard of cutting an X into the bottom of a peach, blanching it in a pot of water, and then plunging it into ice water.  Skip the production and just get a serrated peeler.  Happy baking!

This post is linked to:
* Sweet Treats Party
* Sweets for a Saturday
* Sweet Tooth Friday
* Tea Party Tuesday